Every 2nd person you meet is fond of taking pictures, ranging from their photos to pictures of aesthetic nature. Seeing such extensive use of images and videos, users always look for options to secure such data from getting deleted accidentally. Apart from securing data on cloud drives, using USB flash drives is paramount.
This article will focus on Android users, their photos, and other media content management. You will be able to comprehend how to transfer photos from Android to flash drive using the right methods. By learning the best available methods, you will easily secure your photos present on your Android device.
What to Do Before Transferring Photos from Android to Flash Drive
Before transferring photos from an Android phone to a USB flash drive, you need to be aware of some essential tips you need to ensure. These adaptive reasons will help you figure out the essential things that should be advisably followed before performing any transfer from your Android phone:
- Device Battery: It is important to ensure that your Android device has a sufficient battery level that protects it from interruptions. Any interruption due to the device's battery can be problematic, leading to system errors.
- Organizing Your Photos: To make the transfer process simple and effective, you should organize iPhone photos properly. Arranging your photos in the right order would make the selection convenient.
- Updating Your Device's OS: Being an Android user, you might face multiple system issues if your device needs to be updated to the latest OS. You should cover this requirement by installing the latest OS on your Android device.
- Selecting the Right USB Flash Drive: This is the most important thing, regardless of being a simple thing to ensure. Selecting the right USB is paramount, even if you cover every detail of your Android device. Try to get a USB stick from a reputable service and ensure it is at least a USB 3.0.
- Compatibility of Files: While you cover all hardware requirements of this process, make sure that the file format compatibility between the Android and USB drive is cross-checked. Any incompatible connection would lead to an unsuccessful transfer of pictures.
3 Ways to Transfer Photos from Photos from Android to Flash Drive
As you've learned some crucial details that need to be ensured before transferring pics between devices, let's go directly to the methods that help its execution. Follow the directed discussion on the methods explaining how to transfer photos from Android to Flash Drive:
Method 1: Drag and Drop Photos from Android to USB Flash Drive
For the first method, the entire process of transferring photos from Android phone to external hard drives or USB drives is simple. This conventional technique transfers your photos from the Android phone to the USB through a connection established by the computer. By a simple drag and drop, all your essential images will be transferred to the USB flash drive that is connected to the computer along with the Android phone:
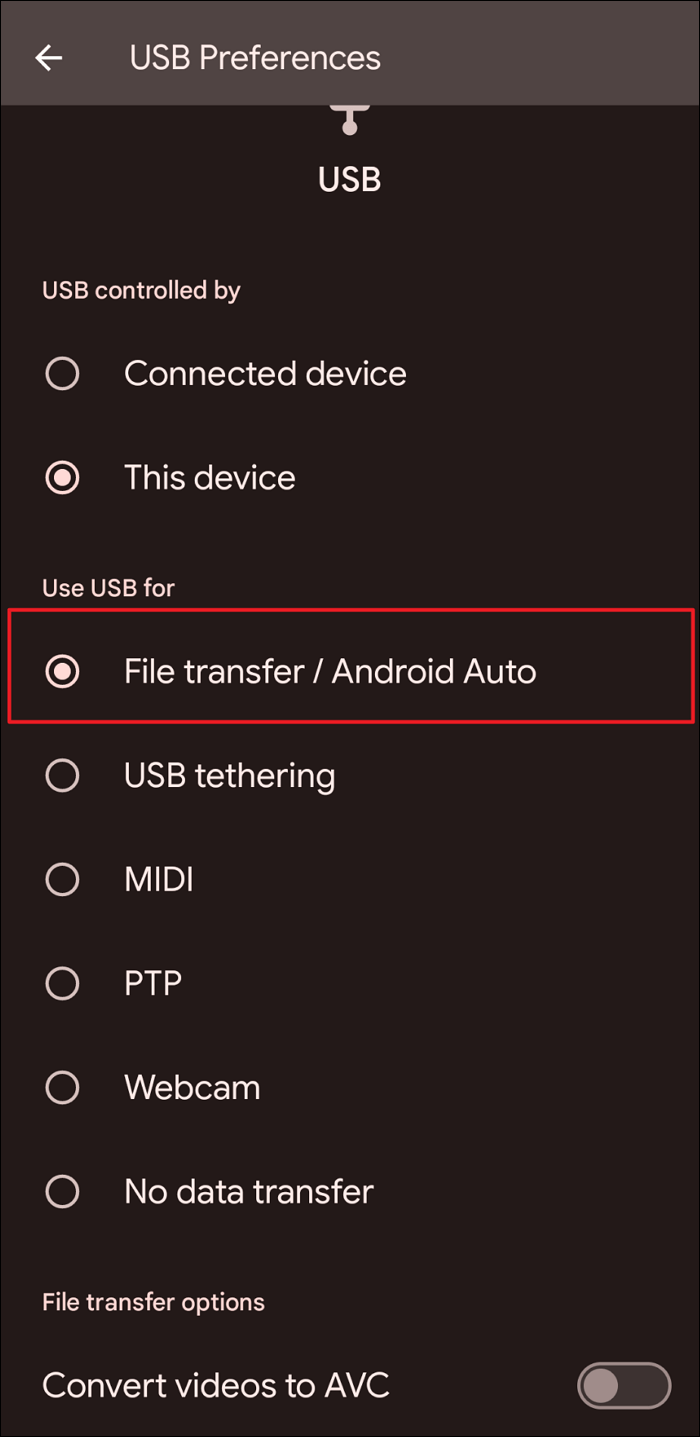
Step 1. Start the process by connecting your Android device with a USB cable. As it connects, you will be prompted to select the mode of connection for the device. Select the "File transfer/ Android Auto" or "PTP" option from the available list to process photo transfer.
![drag and drop dcim to usb]()
Step 2. Direct to your computer and look for the Android device folder from the navigation present on the left. As you lead into the internal storage of the device, find the "DCIM" folder to access the photos. Connect the USB drive to your computer and open its window side-by-side to the Android phone's folder. Drag and drop the DCIM folder onto the USB drive folder and eject it successfully.
![drag and drop dcim to usb]()
Method 2: Move Photos from Android to Flash Drive via OTG
To make your photo transfers easy, you can take the aid of the OTG (On-The-Go) cable to transfer the content into your USB drive through the Android phone. This unique connector helps establish a direct connection between your Android phone and the USB device.
However, this method might only work if the Android device supports OTG cables. Regardless, if you wish to know how to transfer pictures from Android to a USB Flash Drive, look through the steps provided next:
Step 1. The OTG cable has two ends: one that will hold the USB flash drive and the other that will be connected to the Android device. Upon managing it, a notification will appear on your Android showing that a USB device is connected. Tap the notification to access further file transfer settings that can be changed according to the condition.
![use the otg cable]()
Step 2. Lead into your Android device's "File Manager" and direct into its "Internal Storage" space. Look for the "DCIM" folder and select any photo you want to transfer. As you choose it, proceed to the "Move" option, which will ask you to select the folder where you want to paste the photo. Look for the folder representing your USB drive and successfully move the images there.
![move data to usb drive]()
Method 3: Backup Android Photos to Flash Drive with Google
While you discuss various methods to transfer your photos from an Android to a flash drive, you can utilize the services of cloud drives as one transfer technique. Google Drive is an efficient way of protecting and backing up your content on the cloud.
In addition, it can be used as a source to transfer pics between the Android phone and a USB drive. To know how it can be done, follow the instructions presented next:
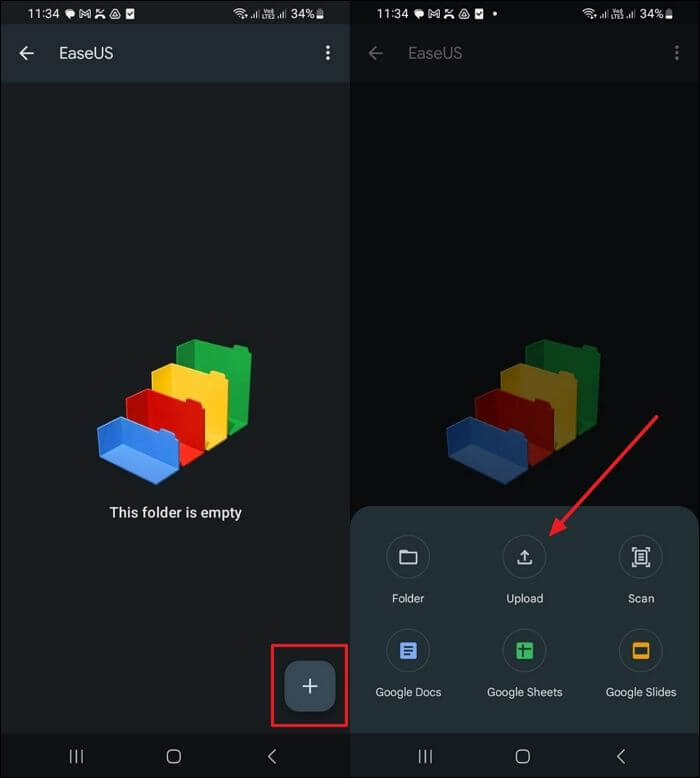
Step 1. Launch the Google Drive app on your Android phone and select the "+ New" button to continue selecting the "Upload" option. You will be navigated to another window where you need to choose the photos that are to be transferred.
![upload your image files]()
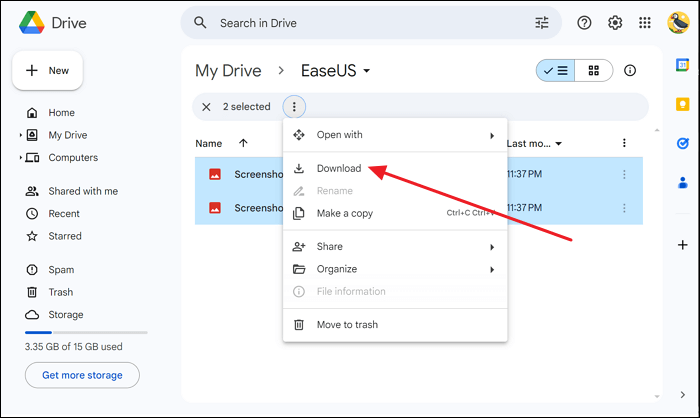
Step 2. When uploading the photos successfully, open Google Drive on your computer with the same account. Look for the pictures you uploaded on the drive and download them onto your computer. Upon downloading, connect the USB drive to the computer and copy and paste your downloaded photos to save them across the flash drive.
![download the image files]()
Bonus: Transfer Photos from Android to iPhone/Android
Every user demands convenience and ease of operation when transferring photos from Android to iPhone without losing quality. While many conventional techniques are available, they are challenging to manage and can be an extra burden if malfunctioning. In this scenario, you need a service that simplifies the data transfer between your Android and iPhone/Android.
EaseUS MobiMover can be your go-to solution for transferring photos between smartphone devices. Known for its versatility, this data transfer and management software also helps back up your iPhone without Wi-Fi, restore data from backup, and move your WhatsApp data. MobiMover offers multiple utilities to make it a convenient option for data transfer.
Key Features Offered by EaseUS MobiMover
- File Management at Convenience: EaseUS MobiMover provides a dedicated file management service to its iOS users to control all data. Through this service, you can add new items under defined categories and import and delete iPhone photos from your PC.
- Backup and Restore: This unique data management software also can backup and restore important iOS data. This quick management service allows you to manage up to 10 different file types.
- Quick Operations: With EaseUS MobiMover, you can transfer WhatsApp data from Android to iPhone or another Android smartphone with a few taps. Furthermore, you won't leave behind any settings or data that would cause inconvenience while setting up a new device.
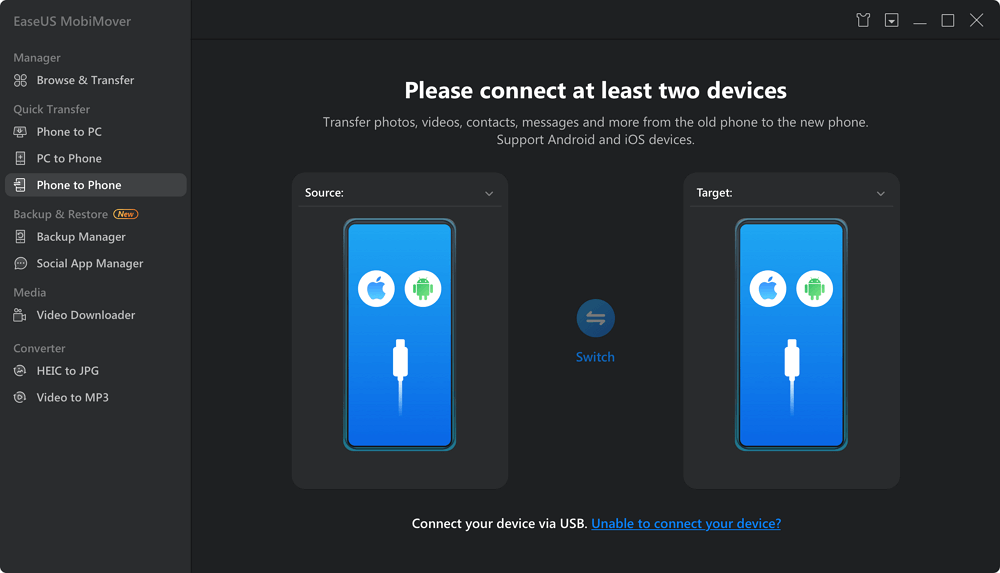
Step 1. Launch EaseUS MobiMover, choose Phone to Phone transfer mode, and connect your mobile devices to your computer. Follow the on-screen instructions to trust this computer and enable USB debugging on your Android phone. Switch your Android phone as the source device and your iPhone as the destination.
![connect your device to computer]()
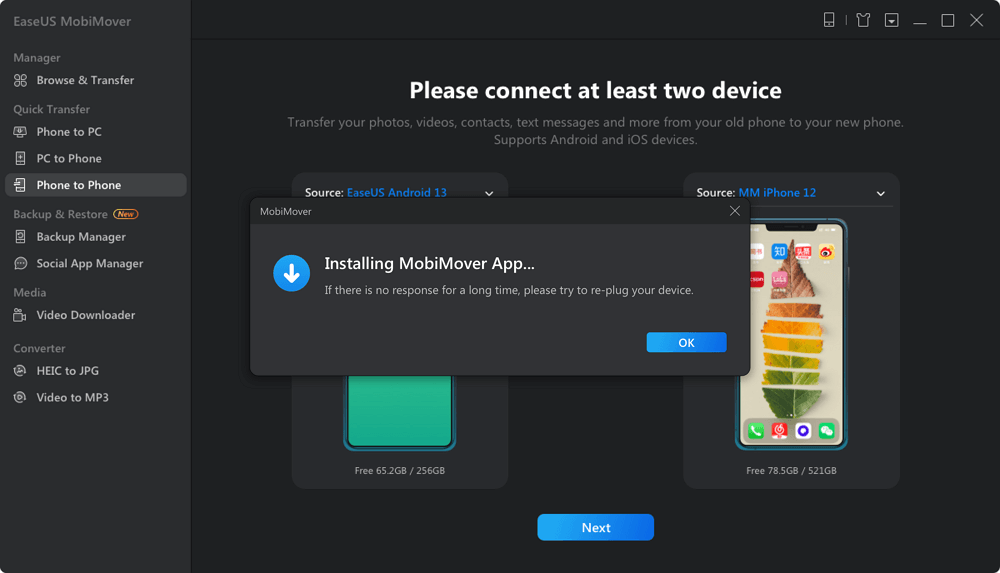
Step 2. Click Next, and EaseUS MobiMover will be downloaded to your Android. Follow the guide to turn off Find My iPhone via Settings. (You need to set MobiMover as your default SMS app temporarily when it is asked, but this software will guide you to set it back to Messages after the transfer.)
![install the app to your android]()
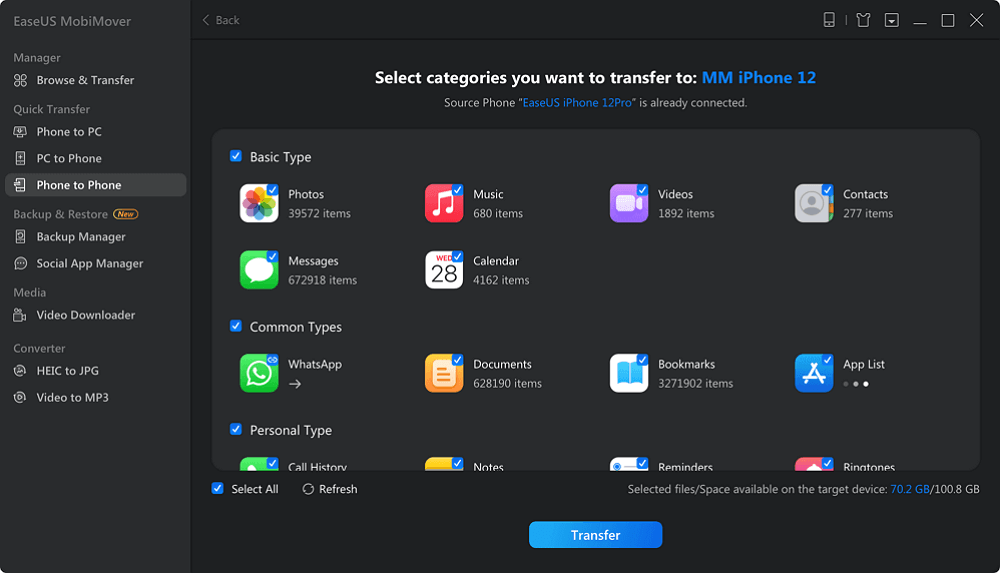
Step 3. Select the files you want to transfer, and from the lower right, you can see whether you have enough space to store the transferred files.
![select files]()
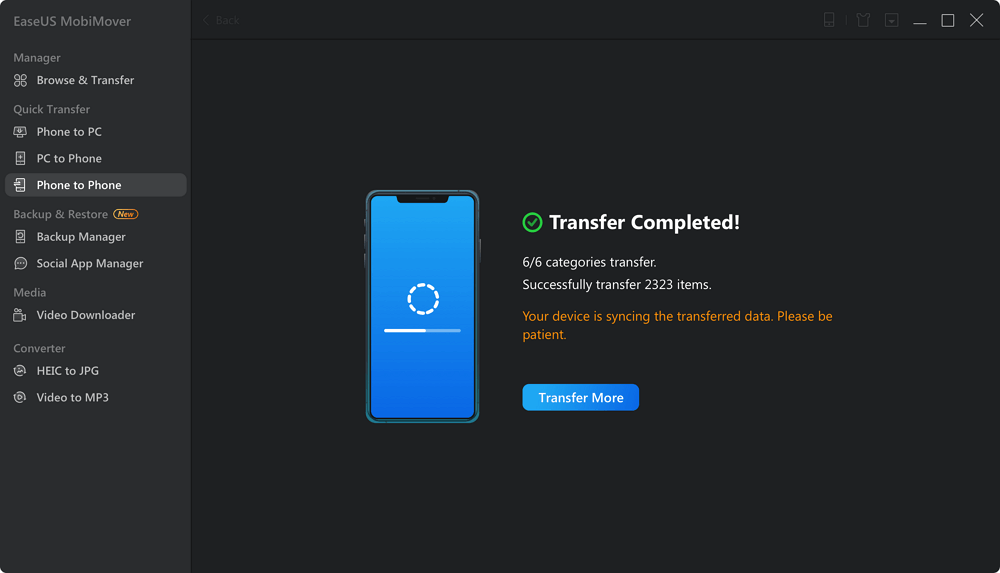
Step 4. Click Transfer to start the data transfer process from Android to iPhone. Keep your devices connected until the whole process ends.
![transfer completed]()
Conclusion
This comprehensive guide provides a complete walkthrough of how to transfer photos from Android to Flash Drive. Using the proper methods, it will be easy to transfer your essential pictures from the Android phone to the USB drive to keep them as a backup. Everything has been covered according to the user's requirements, from conventional methods to using OTG cable or cloud drives for the transfer.
Furthermore, to make your data management and transfer quick, it is always best to have a better option. EaseUS MobiMover provides a dedicated option to transfer data from your Android device to another smartphone. It is an excellent option if you change your smartphone device, which demands effective data transfer.
FAQs on How to Transfer Photos from Android to Flash Drive
Along with highlighting all other details about transferring pics from an Android phone to a flash drive, there might still be some queries that need to be answered. Provided below are some questions a user might have regarding the topic of transferring photos:
1. How do I get pictures off my Android phone?
To get your photos out from the Android phone, all you have to do is follow these simple steps:
- Connect your Android device to the computer and set the USB connection preferences to "File transfer" to enable the transfer of photos from the device.
- Lead into the "DCIM" folder within your Android device's "Internal storage" and copy-paste all photos you want to get off your phone.
2. How do I enable USB on my Android phone?
When you connect your Android phone to the computer, you need to set some options to allow data transfer. This USB setting needs to be set as "File transfer" to enable users to transfer photos from an Android phone.
3. How do I move pictures from an SD card to a flash drive?
To move your pictures from an SD card to a flash drive, you need to use the OTG cable as provided:
- After connecting your Android phone and USB flash drive with an OTG cable, open the File Manager.
- Look for the pictures on your SD card and select them. Proceed to select the "Move" option and continue to select the flash drive folder to move the pictures successfully.