Apple allows the transfer of data from one Apple product to another. It is quite convenient for them to access their files in different situations. Mostly, people would like to move files from iPhone to Mac when they can't sit in front of a table and charge their computers steadily. And many people would transfer important files from their iPhones to Mac computers to make a backup. In a word, it is crucial to let people transfer data between iPhones and Mac computers.
Ⅰ.Why Transfer Files Between iPhone and Mac
There are many reasons that people want to transfer files between iPhone and Mac. But the reasons can be different regarding different transfer directions. Here are some common reasons for people transferring files or data between iPhone and Mac.
👉🏻Reasons for transferring files from iPhone to Mac:
- Backup: Some people want to transfer iPhone files to their Mac computers as a backup of important data.
- Storage: Storing all files on an iPhone can take up a lot of space, and iPhone has limited free storage. Transferring some of the files from an iPhone to a Mac can save free up storage on the phone and therefore save money.
- Editing: Some files, like photos, videos, and PDF files, can be edited better or easier on Mac computers. Therefore, people intend to transfer them from an iPhone to a Mac.
- Migration: If someone is switching from an iPhone to an Android phone, transferring existing files to their Mac is easier than to the new Android phone.
- Collaboration: If someone needs to collaborate with others, it is better to transfer files from their iPhone to a Mac for a bigger screen.
👉🏻Reasons for transferring files from Mac to iPhone:
- Play multimedia files: People might transfer multimedia files like music and videos from their Macs to their iPhones to enjoy during their travels.
- Restore: When people buy a new phone, they might restore some files from earlier Mac backups.
- Accessibility: Some files, like notes, might be easier to access on an iPhone than on a Mac. So people might transfer notes from Macs to their iPhones.
However, it is not possible to transfer everything between an iPhone and a Mac as there are certain limitations and restrictions due to the different operating systems and software used by the two devices. Some certain app data, game saves, and settings may not be transferred in normal ways. However, common files like photos, videos, music, documents, contacts, and messages can be transferred between an iPhone and a Mac.
Ⅱ.Transfer Files from iPhone to Mac - 4 Ways
To transfer files from iPhone to Mac, we often use AirDrop, Image Capture, some external storage devices, and also third-party software to make sure the transfer is successfully made. Check the detailed methods below:
1️⃣AirDrop
To use AirDrop successfully, you must be signed in with your Apple ID on both your iPhone and your Mac. Also, make sure you've turned on Wi-Fi and Bluetooth on both your Mac and iPhone or the device can't be found by another.
- You will need:
- 👉An iPhone
- 👉A Mac computer with enough storage
- 👉A steady WiFi connection
Then, you can follow the steps below to transfer files from an iPhone to a Mac using AirDrop:
Step 1. Choose an item that you want to transfer on your iPhone. It may be a photo, a video, a document, a message, etc.
Step 2. Tap on the "Share" button(which looks like a square with an upward arrow) that lets you do more for the item you chose.
Step 3. When you are in the share window, tap on the "AirDrop" sign, and your iPhone will search for nearby devices that have AirDrop enabled. Then select your Mac device.
Step 4. Then, your files will be transferred from your iPhone to your Mac. After the transfer process, you can find them in the "Downloads" folder by default on your Mac.
![Transfer Files from iPhone to Mac with AirDrop]()
LEARN MORE
To use AirDrop, you need to ensure a steady WiFi connection and make sure your iPhone and Mac are not too far away from each other. All these requirements will make it difficult to transfer files successfully. If you can't promise these, you may choose another method. If you don't know other ways, check how to transfer files from iPhone to Mac without AirDrop.
2️⃣Image Capture
Image Capture is an application that Apple includes in macOS. It comes preinstalled and allows users to download pictures from their iPhones to Mac computers. What's more, you can even use a scanner and this Image Capture to import photos taken with a film camera to your computer.
- You will need:
- 👉An awake and unlocked iPhone
- 👉A Mac computer with enough storage
- 👉A lightning cable to connect iPhone and Mac
- 👉The Image Capture app on Mac (pre-installed)
Now you can follow the tutorial below to start transferring files from iPhone to Mac:
Step 1. Connect the iPhone to your Mac using a lightning cable.
Step 2. On your Mac, launch the Image Capture app and select your iPhone from the left-side toolbar.
Step 3. Select all the files that you want to transfer from the iPhone to your Mac.
Step 4. Choose the location you want to save the transferred files on your Mac in "Import To:". Then click on "Download All" to start transferring.
![Transfer Files from iPhone to Mac with Image Capture]()
LEARN MORE
Image Capture is probably the first you will think about when you need to transfer multimedia files like pictures and videos between iPhone and Mac. Basically, it can meet your requirements. However, It won't work as it has a 4.29GB file size limit. Therefore, check how to transfer large files from iPhone to Mac. Or, more specifically, how to transfer large videos from iPhone to Mac.
3️⃣External Storage Device
Except for inbuilt file-transferring apps, external storage devices, like a USB drive or SD card, are also good choices considering file-transfer between an iPhone and a Mac. However, some people may think it is rather complicated because they need to move the data from an iPhone to an external storage device before transferring it again to the Mac. However, you can't deny that it is safer at some point because you have also made a backup during the process.
- You will need:
- 👉An iPhone
- 👉A Mac computer with enough storage
- 👉A USB drive or SD card
- 👉A cable adapter
Here is a detailed tutorial you may follow:
Step 1. Connect your iPhone or computer to an external storage device, such as a USB drive or SD card. Note that you may need a cable adapter to connect the device to iPhone. See how to connect external storage devices to iPhone.
Step 2. The first time you connect the devices, you will be asked on iPhone whether to trust this computer or not. Select "Trust" here.
![Trust This Computer]()
Step 3. Then you need to copy files to the storage device using a supported app like "Files" or "Pages". For instance, to copy a file from the "Files" app on your iPhone to the storage device, you need to touch and hold the file, then tap "Copy".
Step 4. Disconnect the storage device from your iPhone, and connect it to your Mac. Then, click the "Finder" icon in the "Dock" to open a "Finder" window, select your storage device, and navigate to the file you want to transfer. Then, drag it to the location you want to save the file on your Mac.
If you don't have an external storage device or you simply don't want to choose this method because it is too time-assuming. You may try a third-party phone-to-Mac file transfer app like EaseUS MobiMover.
4️⃣EaseUS MobiMover
When it comes to transferring files from iPhone to Mac, a reliable iPhone data transfer tool like EaseUS MobiMover can be a big help. This app lets users freely transfer files from one iPhone to another or move data between a computer and an iPhone without iTunes.
Therefore, it would be a good option when you need to transfer various files from your iPhone to your Mac computer. Photos, videos, music, contacts, messages, etc., are all covered. Download it and follow the steps below to start transferring.
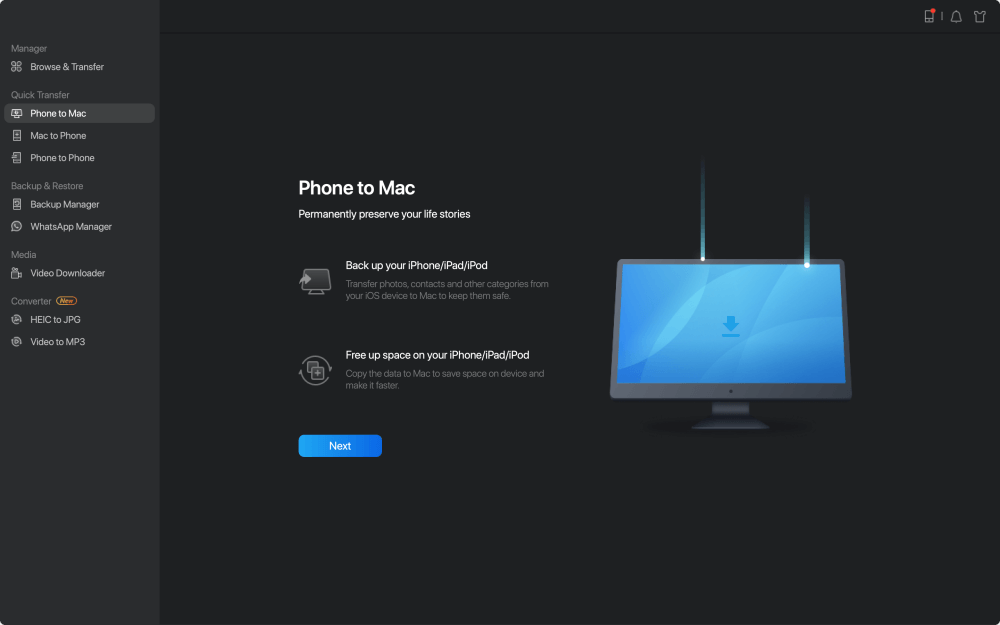
Step 1. Connect your iPad to your Mac with a USB cable and tap "Trust This Computer" on your iPad if you are asked > Run EaseUS MobiMover for Mac and choose the "Phone to Mac" on the main screen > Click the "Next" to continue.
![how to transfer data from iPhone to Mac - step 1]()
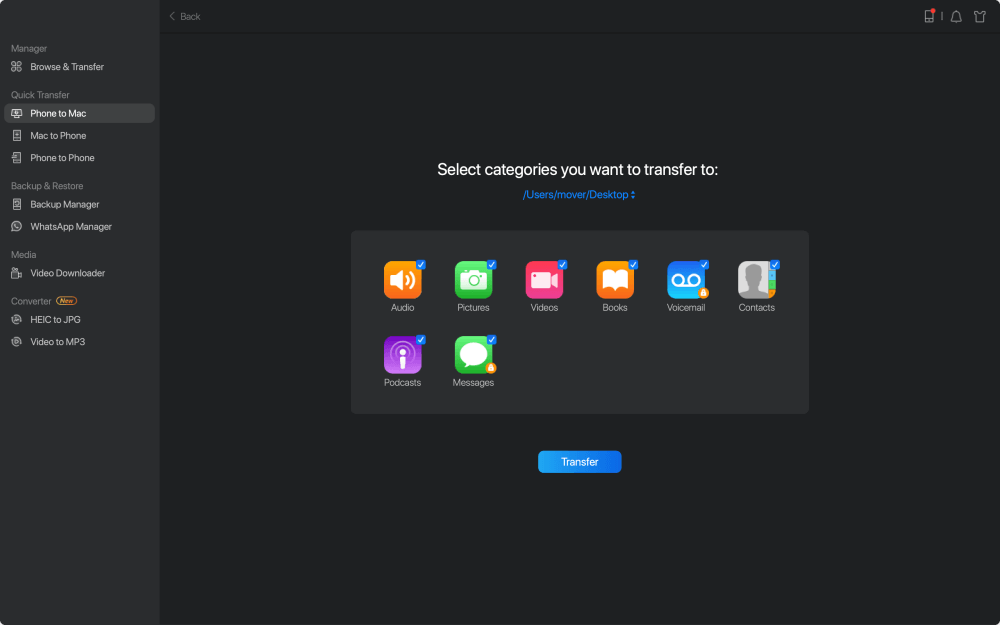
Step 2. Then, MobiMover automatically reads and loads all the supported data on your iPad as the screenshot shows below. You are free to send them all or selectively export one data type at a time. Besides, you can set the destination for saving exported iPad files on your Mac. If you don't customize it by yourself, MobiMover will send them to a desktop folder named by Exported by MobiMover.
![how to transfer data from iPhone to Mac - step 2]()
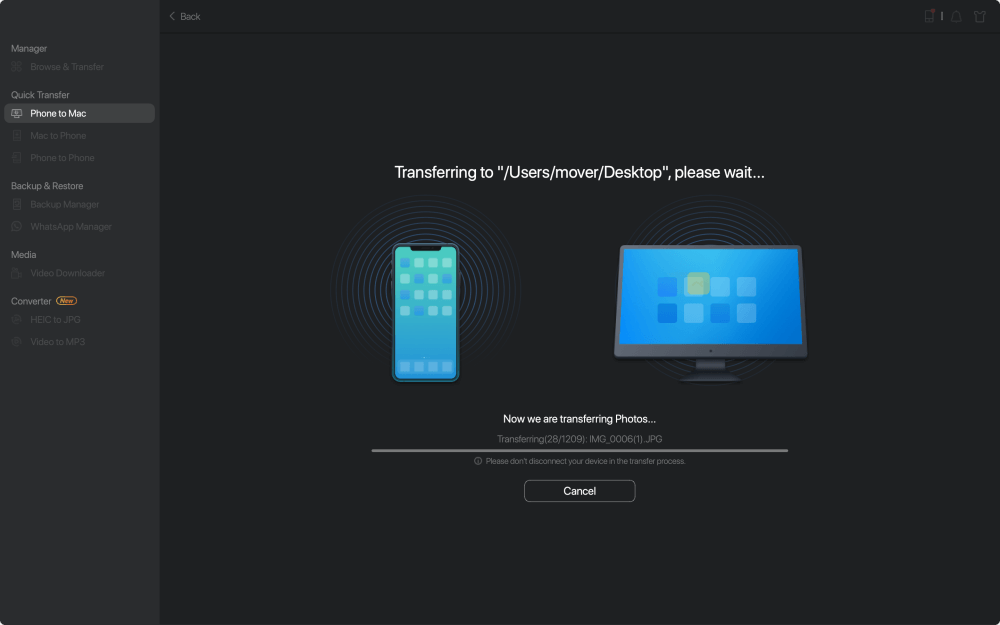
Step 3. Click the "Transfer" to import data from iPhone or iPad to Mac. When the process has completed, you can view, edit, or delete them as you want on your Mac.
![how to transfer data from iPhone to Mac - step 3]()
LEARN MORE
Many methods of transferring files between an iPhone and a Mac require a connection between them through a USB cable, as it is usually more stable than a WiFi connection. Check the detailed operation of transferring files from iPhone to Mac using USB.
Ⅲ. How to Transfer Files From Mac to iPhone - 6 Ways
Now that you've mastered how to transfer files from iPhone to Mac, there will be occasions when you need to send files from Mac to iPhone.
There are several ways to transfer files, including the Apple ecosystem, like iCloud Drive and iTunes. Third-party software choices for more advanced file sharing and management are also available. Overall, transferring data from a Mac to an iPhone is a simple operation that takes no technical expertise or experience.
We cover all ways below, so keep reading to discover one that appeals to you.
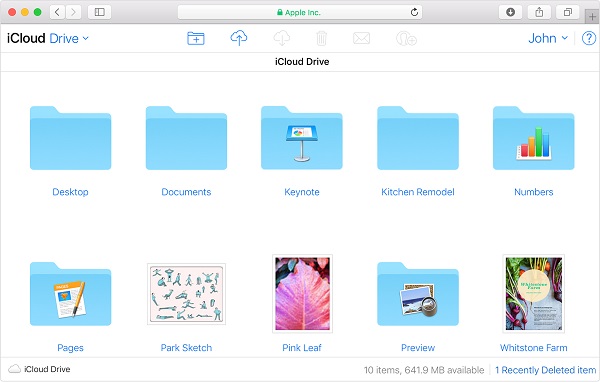
1️⃣iCloud Drive
Applied to: Contacts, photos, videos, emails, settings, documents, and files.
iCloud Drive is an Apple built-in cloud storage service that enables its users to store and share items from iClous.com. from all devices, including Macs, iPhones, and iPads. It allows you to share contacts, photos, videos, emails, settings, documents, and files from one device to another as long as you sign in with the same Apple ID on two devices.
📜Note: Using this method, you need to set up iCloud Drive on both devices to transfer files from Mac to iPhone. You may also encounter
iCloud Drive is not syncing issue.
Step 1. Set and enable iCloud on your Mac and iPhone. You need to make sure your Mac and iPhone are using the same Apple ID.
- Mac: Menu - System Preferences - iCloud - iCloud Drive.
- iPhone: Settings - Profile - iCloud - iCloud Drive.
Step 2. Upload the files you want to send to your iPhone on your Mac, then iCloud Drive will sync files.
![sync files on icloud drive]()
Step 3. Open iCloud Drive on your iPhone and download files from iCloud.
2️⃣Finder
Applied to: Movices, videos, podcast, music, TV shows, audiobooks, books, photos, contacts, calendars.
If your Mac is using macOS Catalina or a later version, you can make use of the Finder on Mac to sync files between Mac and iPhone, which is a Mac built-in utility.
📜Note: Using this way, you are required to prepare a charging cable to connect two devices. If your Mac is using a USB-C, you may need an adapter. An then, you can send files from Mac of iPhone over the cable or WiFi connecntion.
Send files over cable:
Step 1. Connect your Mac to your iPhone using a cable, and make sure it is recognized on your Mac.
Step 2. Click the Finder icon(which looks like a blue smiling face) in the menu bar of your Mac to open a window.
![finder]()
Step 3. Choose your mobile device from the left panel.
![choose your iphone]()
Step 4. If you connect your iPhone to your Mac for the first time, you will pop up a window asking if you trust this device. Click Trust to continue.
![trust this device]()
Step 5. Select the file types you want to share, including music, movies, files, etc., and then you will see a list of apps that your can share.
Step 6. Drap the files you selected from a Finder window onto your iPhone to start the transferring process.
Sync files over a WiFi connection:
Step 1. Connect your iPhone to your Mac with a USB cable.
Step 2. Launch Finder and choose your iPhone from the sidebar.
Step 3. Changer to the General tab, and check the option "Show this iPhone on Wi-Fi".
Step 4. Set the Sync settings according to your needs, and click "Apply".
Step 5. Wait until your iPhone and Mac are connected over WiFi successfully; you can sync files between two devices.
![sync files over wifi]()
LEARN MORE
This part explains how to transfer files from Mac to iPhone with Finder, which needs to connect Mac and iPhone with a USB cable. If you want to explore more ways to transfer files from Mac to iPhone via USB, this post will give you the ultimate guide.
3️⃣iTunes
Applied to: Files, pictures, folders, videos, music
Another available option is using iTunes, whose File Sharing feature allows you to transfer files from Mac to iPhone without any hassle. iTunes is somewhat similar to Finder, asking for a USB cable to connect your devices. Now follow the steps below to share files with iTunes.
📜Note: iTunes has been discontinued since MacOS Catalina, which is replaced by Apple Music, Apple TV, Books, and Podcasts applications. If your system isn't compatible with iTunes, turn to other methods.
Preparations:
- Update your iTunes to the latest version.
- Update your macOS to the latest version.
- Update your iPhone to the latest version.
- Make sure your iPhone works with File Sharing.
Step 1. Connect your iPhone to your Mac via a USB cable, and then launch iTunes on your Mac.
Step 2. Click the iPhone icon in the top-left corner of the main interface.
![click iphone icon]()
Step 3. Click the File Sharing option on the sidebar, then select an app that shows besides, and check what files can be shared on your devices.
![]()
Step 4. Choose a file, and click Add to start sharing your file from Mac to iPhone.When the possess finishes, you can find the file in the corresponding location.
LEARN MORE
However, iTunes is also complained about by many users for its slow speed, various lags, and taking up too much RAM. Besides, not all iPhones support the iTunes File Sharing feature. So, if you are looking for a way to transfer files from Mac to iPhone without iTunes, you'll find your answer in this post.
![related articles]()
How to Transfer MP3 from Mac to iPhone With/Without iTunes
Since macOS Catalina, iTunes has been discontinued and replaced by Music, Apple TV, Books, and Podcasts apps. Besides, the data management features are handed over to Finder. That means when you are looking to transfer MP3 from a Mac to your iPhone, you can either use the Music app or Finder. Read this post to find specific ways to transfer MP3 from Mac to iPhone.
4️⃣Google Drive
Applied to: Photos, videos, music, documents, files, folders
Google Drive is another widely used cloud storage service that allows you to share files between Mac and iPhone. It takes advantage of 15GB of free storage space compared with other clouds and gains great popularity.
Using Google Drive to transfer files from Mac to iPhone is the same as using iCloud.
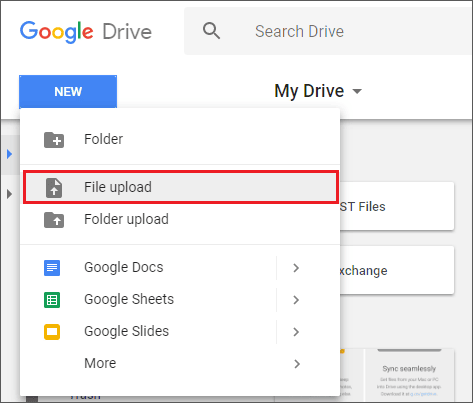
Step 1. Open Google Drive on Mac and sign in with your account.
Step 2. Click the New button on the top-left corner, and choose File Upload or Folder Upload.
![google drive upload files]()
Step 3. Upload files or folders to Google Drive, and it will automatically sync files to the cloud.
Step 4. Sign in to the same account on your iPhone, and you can find the files you just uploaded.
LEARN MORE
Google Drive and iCloud Drive enable data transferring without a cable. If you are seeking more ways to transfer files from Mac to iPhone wirelessly, you'll get your answer on this page.
5️⃣Email
Applied to: Photos, videos, file documents, etc...
Email also allows you to send data between your Mac and iPhone by attaching files. Although this strategy is becoming less popular, it is still an effective choice when other treatments fail. Here are the steps to use Email to transfer files from Mac to iPhone, which is very easy.
Step 1. Launch the email application on your Mac.
Step 2. Create a new email, then choose and attach files to the email. Send the email to your own account.
![open email]()
Step 3. Open the email message on your iPhone, view the attachment, and download it on your iPhone.
LEARN MORE
What if you wish to copy their iMessages from your Mac to your iPhone? This is a typical problem for those who want their conversation history to be consistent across all of their devices. In this post, we'll look at how to 🔍transfer iMessages from a Mac to an iPhone so that users may stay connected without missing any crucial communications.
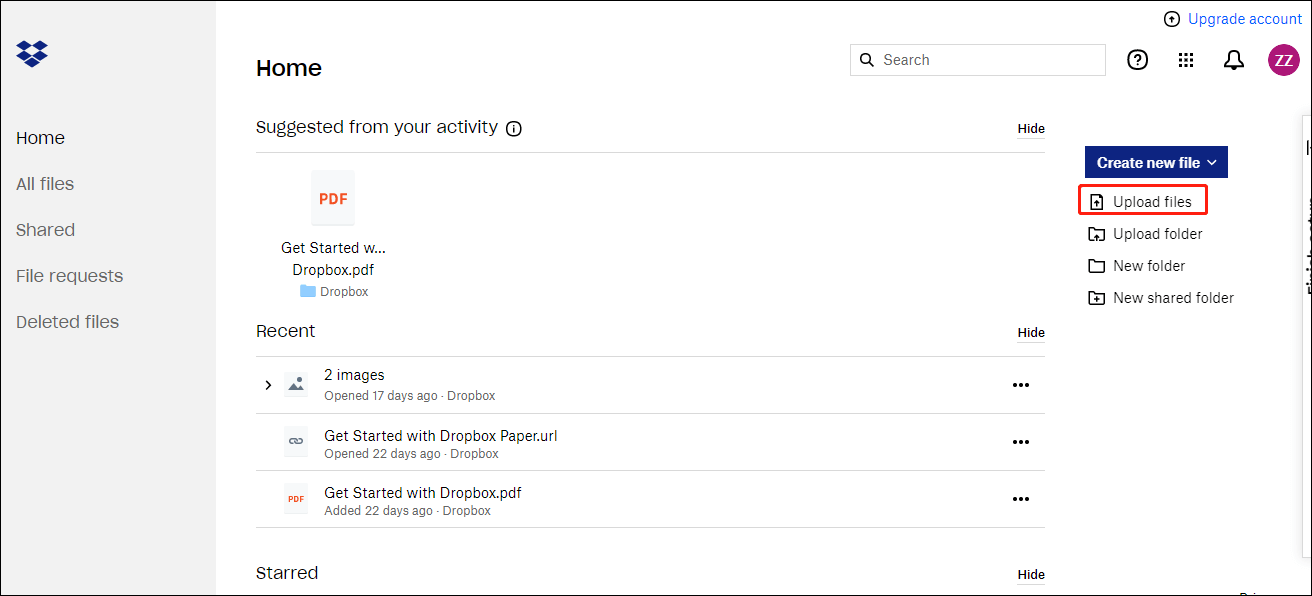
6️⃣DropBox
Applied to: Photos, videos, documents, excel files, PPTs, etc...
DropBox is also a popular cloud service that provides file-syncing features among devices. Use it to transfer your photos, videos, Word documents, etc., from Mac to iPhone.
Step 1. Install DropBox on both your Mac and iPhone, and sign in with the same account. (If you don't have an account, follow the instruction to create one.)
Step 2. Launch DropBox on your Mac, and upload the files you want to share to DropBox. DropBox will automatically sync files.
![uploa dfiles]()
Step 3. Open DropBox on your iPhone, and you can view the uploaded files.
Ⅳ. Transfer vs. Sync vs. Backup
Transfer, sync, and backup are three important concepts that refer to different processes of managing data. These terms are often used interchangeably, but they have distinct meanings and serve specific purposes.
Check the differences between them in the table below:
| |
Transfer |
Sync |
Backup |
| Concept |
The process of moving data from one device or location to another. |
The process of ensuring that data is consistent across multiple devices or locations. |
The process of creating a copy of data in case the original is lost or damaged. |
| Practices |
- Copy files from a computer to a USB drive
- Upload photos to a cloud storage service
- Send files over a network
|
- Update files on a computer and a mobile device
- Sync emails and contacts between a phone and a server
|
- Create a backup of important files on a hard drive
- Use a cloud backup service to store data offsite
- Make a copy of the data on a phone
|
| Direction |
Multidirectional |
Two-way |
One-way |
| Method |
Use file transfer protocols like FTP or SFTP. |
Use synchronization software or cloud services. |
Use backup software or cloud backup services. |
| Goal |
Share files or move data between devices. |
Keep data up-to-date across multiple devices or locations. |
Protect data in case of loss or damage. |
In summary, transfer, sync, and backup are three similar but different concepts related to managing data. Each process serves a distinct purpose and involves different technical and practical considerations. By understanding these differences, you can better manage your data in different ways.
Ⅴ. The Final Words
In conclusion, transferring data between iPhone and Mac is a basic and uncomplicated operation that can be completed fast with the appropriate tools and skills. You have numerous of alternatives for moving your photographs, music, videos, and documents between devices, whether you choose iTunes, AirDrop, or third-party apps. You can keep your data safe and up to date on both your iPhone and Mac by performing regular backups and syncing. So, the next time you need to transfer data, don't be afraid to experiment with these approaches to make your life easier.