PAGE CONTENT:
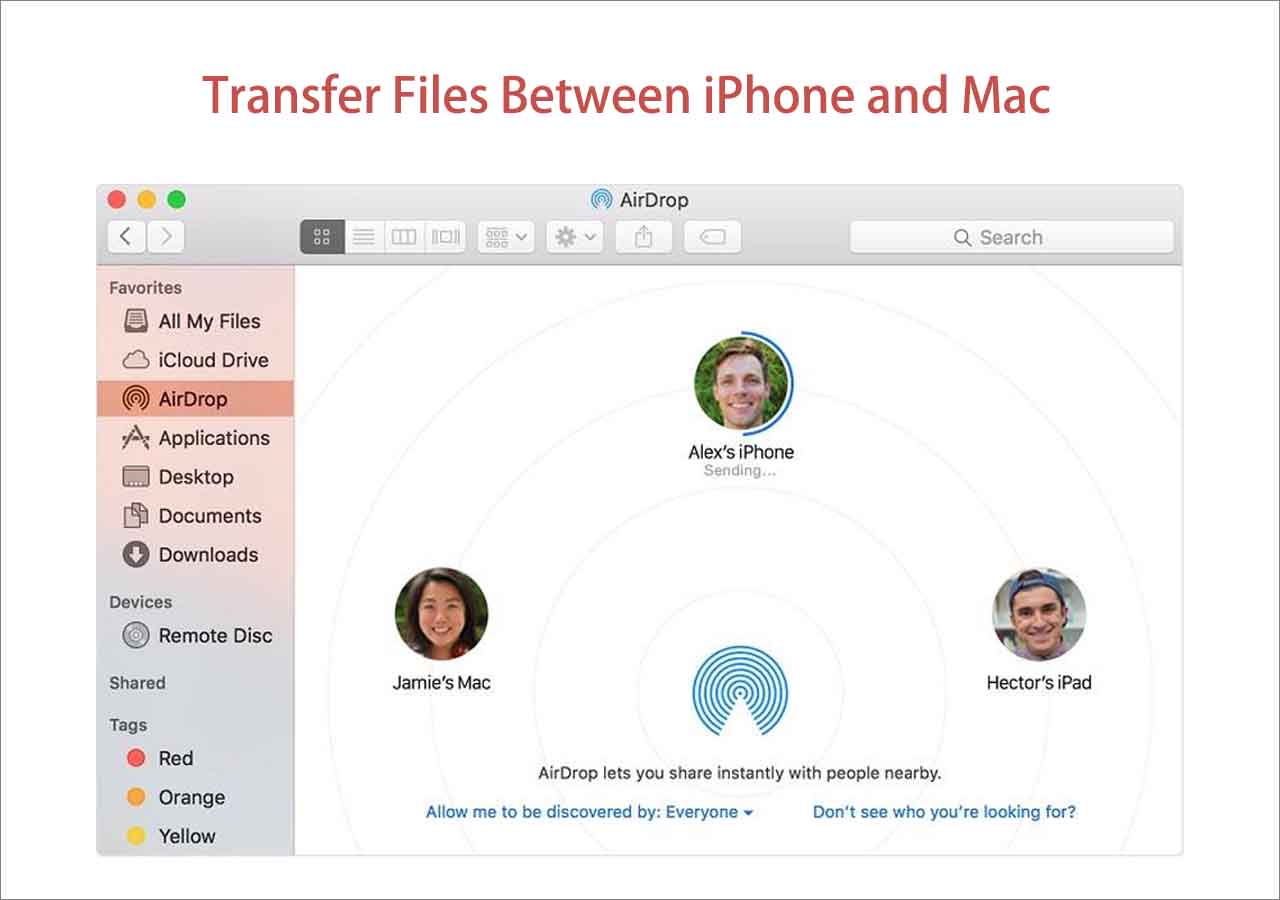
It is quite simple to transfer files from iPhone to Mac with AirDrop. As a wireless ad hoc service, it is capable of more. You can also use AirDrop to transfer photos from iPhone to iPhone or from Mac to iPhone. But this method is not available if the two Apple devices are not nearby at the same place.
And in this article, we will talk about how to transfer files from iPhone to Mac without Airdrop from two aspects: data transfer from iPhone to Mac wirelessly or using a USB cable.
Overview of the different solutions:
| Alternatives |
Effectiveness |
Difficulty |
| 🥇EaseUS MobiMover |
Very effective - able to transfer data among iOS devices and Mac OS computers |
Simple |
| 🥈iTunes or Finder |
Effective - |
Moderate |
| 🥈iCloud |
Effective - an Apple cloud service with 5 GB of free storage |
Moderate |
| 🥉Email or Text Messages |
Less effective - recommended to transfer small files for the sake of transfer speed |
Simple |
Now follow us to learn how to use these methods to transfer files from iPhone to Mac from scratch.
Part 1. How to Transfer Files from iPhone to Mac Without AirDrop via a Cable
In the first part, we will explore transferring files from iPhone to Mac via a USB cable. Generally speaking, using lines is a very common and reliable way to transfer data between two devices.
However, you cannot move data directly via a cable due to Apple's privacy and security policies. So you have to introduce another tool to help you with how to transfer photos from Mac to iPhone and vice versa. And in the following, we've gathered two practical tools for you.
1. iPhone Data Transfer Software
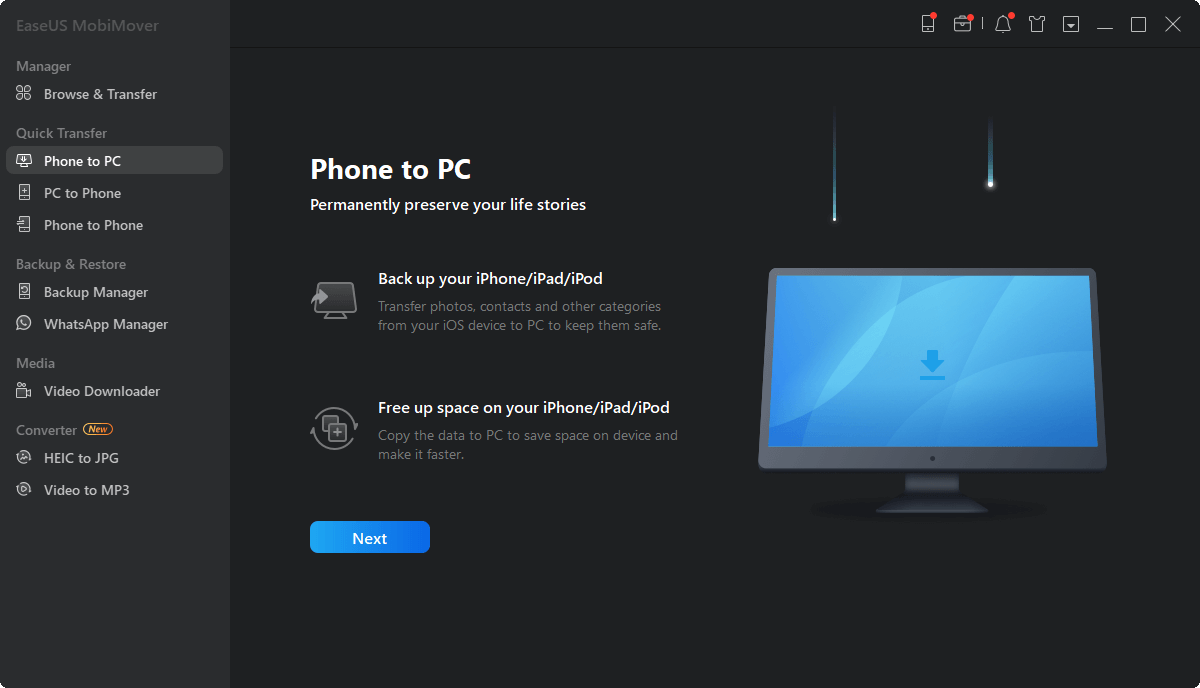
First, we want to introduce a versatile and reliable iPhone data transfer software - EaseUS MobiMover Pro🆓. With this efficient tool, you can transfer files from iPhone to Mac, Mac to iPhone, iPhone to iPhone, or Mac to Mac.
In terms of its file transfer type, it enables users to transfer contacts from iPhone to Mac and move their WhatsApp data, videos, ringtones, or other content. It is free with varying paid options. 👇Free Download👇
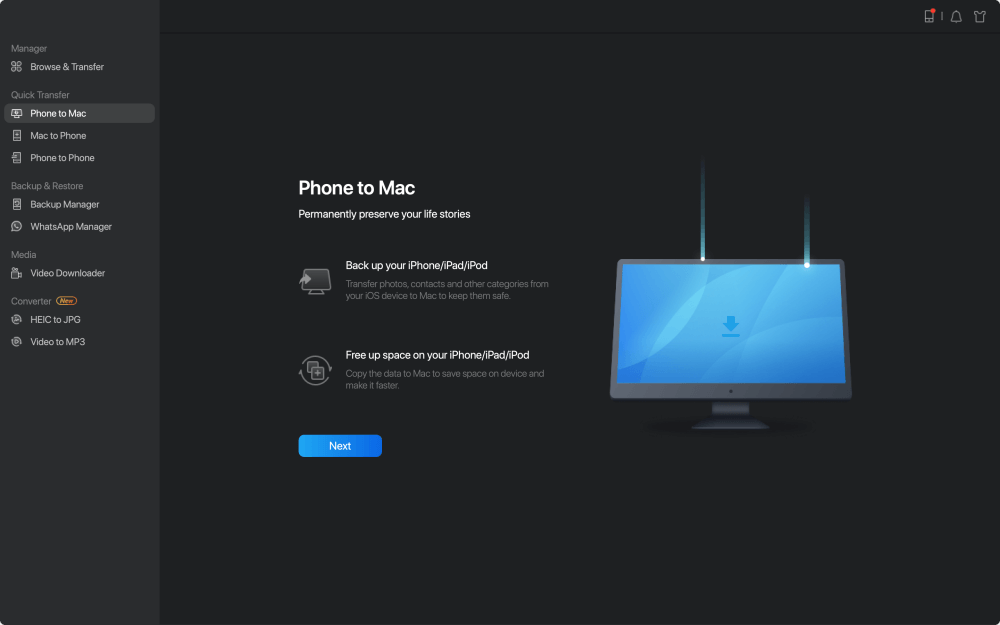
Step 1. Connect iPad to your Mac with a USB cable. Once connected, tap "Trust This Computer" on your device's screen. Open EaseUS MobiMover and select "Phone to Mac" on the main screen. Click "Next" to start transferring data from iPad to your computer.
![how to transfer files from iDevice to Mac - step 1]()
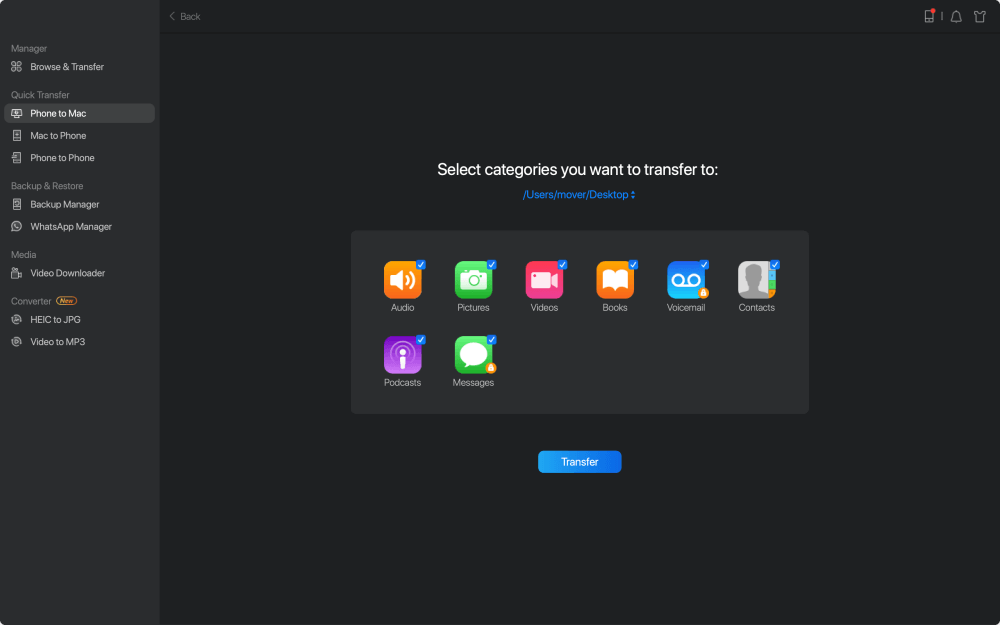
Step 2. MobiMover will read and load all the compatible files on your iPhone/iPad automatically. Choose Contacts/Messages/Pictures/Audio/Video or other specific types of apps to transfer. The transferred content is kept on Desktop by default, so you need to change the default location before clicking "Transfer".
![how to transfer files from iDevice to Mac - step 2]()
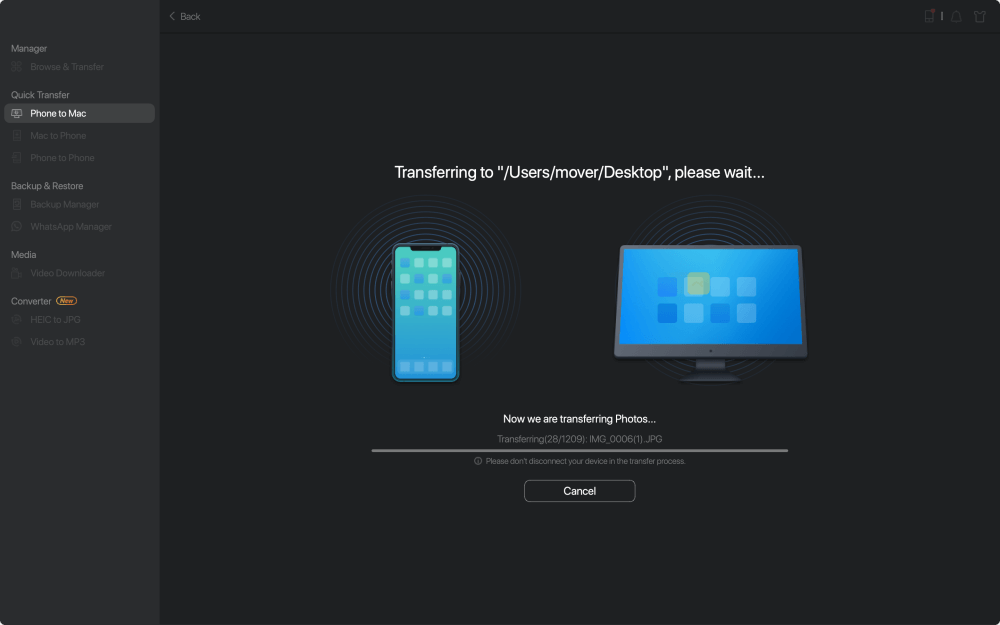
Step 3. MobiMover will immediately begin to transfer data from iPad to Mac without iTunes. Don't interrupt the USB connection during the course. When it completes, you can open and check the transferred content. Some files, like contacts and messages, are kept as .html files, so you need to use a web browser to open such a type of file.
![how to transfer files from iDevice to Mac - step 3]()
That's all it takes to move data from iPhone to Mac via EaseUS software. If you want to transfer videos from iPhone to Mac only, you can refer to the article below for the top four solutions:
2. iTunes or Finder
As a media player, iTunes often transfers music from iPhone to Mac. In addition to that, it is also able to move and share files between iPhone and Mac.
- Tip
- If you have a Mac running macOS 10.14 or earlier, iTunes is your option; if your Mac is macOS 10.15 or later, you can use the Finder app to move data directly.
Download the latest version on your Mac to use iTunes to share files. And your iPhone should also be updated to the newest version.
Now follow the steps below to transfer files from iPhone to Mac via iTunes:
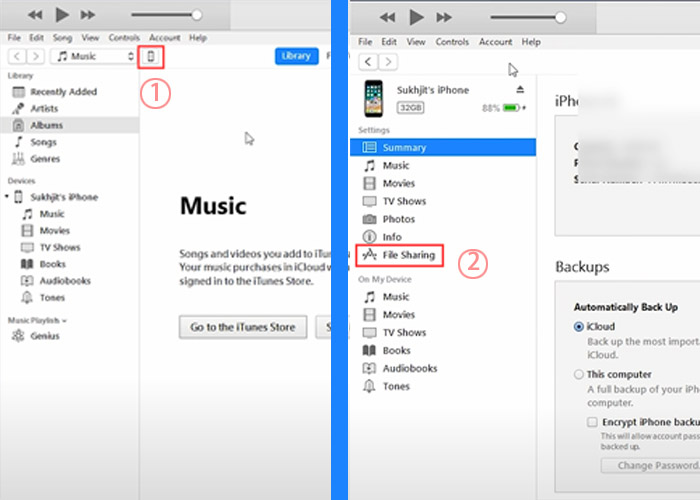
Step 1. Connect your iPhone and your Mac with a USB cable.
Step 2. Open iTunes on your Mac and then click the Device icon.
Step 3. Click File Sharing in the left sidebar.
![click File Sharing]()
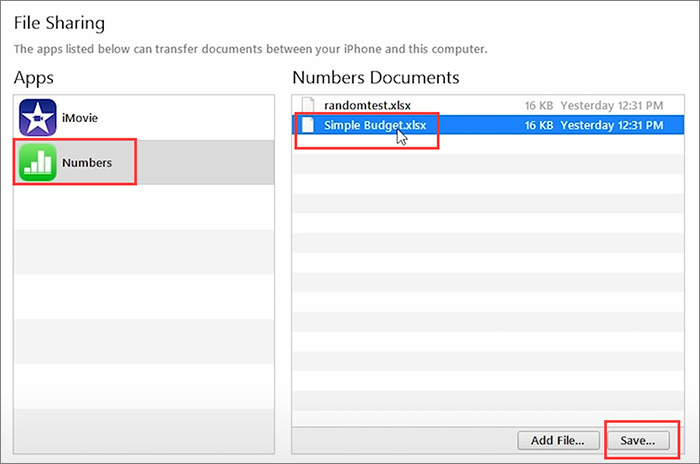
Step 4. Then select an App that you want to transfer its data.
Step 5. On the right side, select the documents that you would like to transfer now.
Step 6. Click the Save button to download it to your Mac and then click OK to dismiss.
![click Save]()
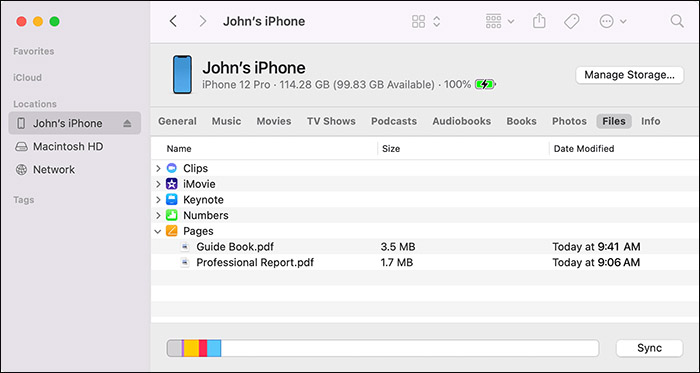
If your Mac is macOS 10.15 or later, you can transfer data from Finder directly:
Step 1. Connect your iPhone and your Mac with a USB cable.
Step 2. Open Finder and select your iPhone device in the left menu.
Step 3. Select apps to transfer data.
![transfer data from Finder]()
If you only want to transfer photos, you can use Image Capture to sync photos from iPhone to Mac. That would be easier.
Part 2. How to Transfer Files from iPhone to Mac Without AirDrop Wirelessly
In this part, we will share with you how to transfer files from iPhone to Mac wirelessly. Actually, using AirDrop to transfer files is also a wireless way to move data. In the following, we will explore a few tips to transfer data from iPhone to Mac remotely. Here we go.
1. iCloud or Other Cloud Storage Services
iCloud is a cloud storage service developed by Apple Inc. And it is combined with Apple ID tightly. Most Apple users use it to back up and sync essential data on their iPhones. And here, we will show you how to use iCloud Drive to transfer data from iPhone to Mac.
- Notice:
- iCloud only offers 5 GB of free storage. Check the available space before you use it and ensure there's enough room for the files waiting to be transferred.
When you're ready, perform the steps below to use iCloud to sync your iPhone data:
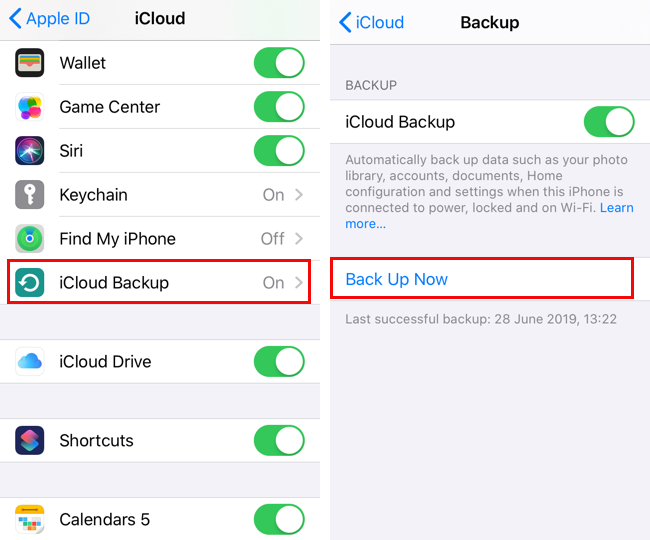
Step 1. Go to Settings > [your name] > iCloud on your iPhone.
Step 2. Toggle on the apps that want to sync.
Step 3. Then tap Backup to toggle on iCloud Backup.
![back up iPhone via iCloud]()
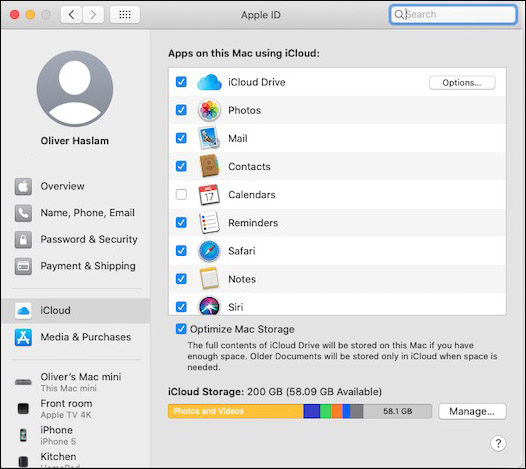
Step 4. On your Mac, go to System Preferences > iCloud.
![iCloud on Mac]()
Step 5. Then download the data that you just synced from your iPhone.
If you want to transfer individual documents or other files from iPhone to Mac, follow the steps below:
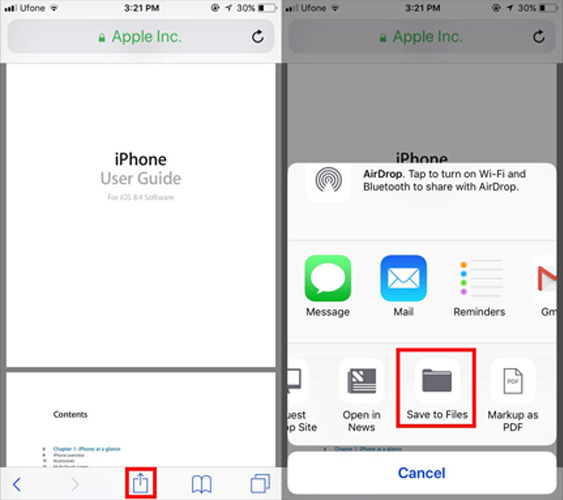
Step 1. Open the file you wish to transfer to your Mac.
Step 2. Tap Share > Save to Files > iCloud Drive > Save.
Step 3. On your Mac, go to Finder > iCloud Drive to find the file and download it.
![transfer files from iPhone to Mac via iCloud Drive]()
You can also use this feature on your iPhone to import messages from iPhone to Mac or other content that is allowed accordingly.
2. Email or Text Messages
Except for those common ways above, here we've gathered two less-effective methods as a backup. It is quite easy to use Email and text messages to transfer data between two devices. They are usually used to transfer separate files or documents.
Here's how:
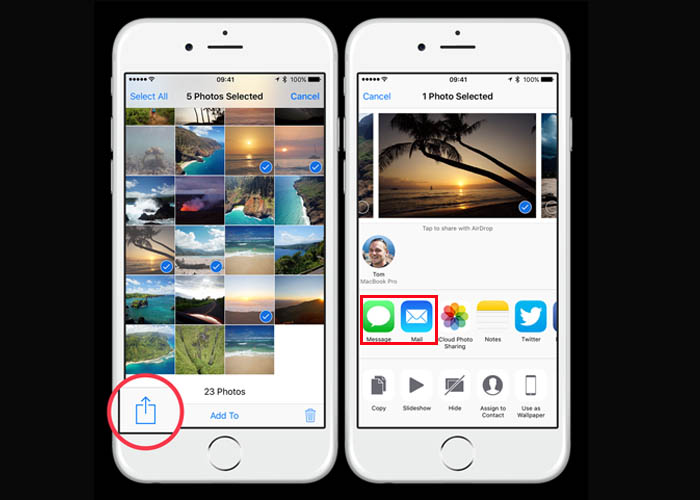
Step 1. Find the files that you would like to transfer on your iPhone.
Step 2. Then tap Share and select Mail/Messages.
Step 3. Then send this email/message to yourself.
Step 4. Check the email/message on your Mac and download the files.
![transfer data from iPhone by sharing]()
Conclusion
If you find this article helpful, click the below to share it with your friends. If you have any queries regarding the topic, feel free to contact me, and do let me know of the future issues you wish to see articles from us.
FAQs on How to Transfer Files from iPhone to Mac Without AirDrop
For more information on transferring files from iPhone to Mac without AirDrop, check some commonly asked questions on today's topic. We hope this section clears all the doubts and sets you free. Let's check FAQs now.
1. How Do I Get All My Apple Devices to Sync?
You can connect all your devices to the same iCloud account. You should also ensure that they all have a stable Wi-Fi connection. After that, you should turn on all the apps you want to sync through iCloud, i.e., Photos, Mail, Messages, Calendars, Contacts, etc. When you make changes on one device, they'll automatically reflect on the other devices.
2. Can I Merge Photos from 2 iCloud Accounts?
Yes, you can merge photos from two iCloud accounts. When you turn off sync, you can save photos on your iPhone. Next, you can merge the photos on your iPhone to a new iCloud account.
3. Can I transfer data from one iPhone to another wirelessly?
Apple's Quick Start is the simplest way to transfer data from iPhone to iPhone wirelessly. You can also use a third-party transfer tool (such as EaseUS MobiMover) to help you do that.

