Whether you want to create a backup of text messages or read them easily, transferring these messages from your iPhone to your Mac is a one-size-fits-all approach. It is not difficult to migrate messages between different Apple devices because either iCloud, iTunes, or a third-party transfer tool can do it easily. And in this guide, we'd like to introduce three practical ways to import messages from your iPhone to your Mac.
Quick Navigation - How to Sync Messages from iPhone to Mac
- Tip 1. EaseUS MobiMover - Export messages directly to your Mac in HTML or PDF format.
- 💡Pros: Fast, no data loss, supports multiple file types.
- Tip 2. iCloud Message Sync - Keep your messages synced across devices automatically and securely via iCloud.
- 💡Pros: Seamless, real-time syncing, no cables needed, messages backed up in iCloud.
- Tip 3. Text Message Forwarding - Allow your Mac to send and receive SMS/MMS messages through your iPhone.
- 💡Pros: Syncs SMS, MMS, and iMessage, work over Wi-Fi.
- Tip 4. iTunes/Finder - Back up your whole iPhone, including messages, to your Mac.
- 💡Pros: Back up your text messages to your Mac and store locally.
Tip 1. Transfer Text Messages from iPhone to Mac as PDF
One of the easiest and quickest ways to transfer text messages is to use EaseUS MobiMover, a reliable iOS data transfer software. With it, you can migrate as many messages as you want from an iPhone to a Mac at high speed. No registration is needed, and no Internet is required. Aside from text messages, it also supports 25+ other types of iOS files, including contacts, videos, music, notes, photos, and more. Most importantly, you can use it to export text messages from iPhone to PDF on your Mac if you need to.
- Easily export SMS, MMS, and iMessages from your iPhone to Mac in readable formats such as HTML and PDF.
- Move data between iPhone and Mac seamlessly, supporting both export and import operations.
- Browse your messages on the Mac before transferring, and you can select specific conversations or messages to export.
- Transfers happen locally via USB, minimizing privacy risks associated with cloud syncing.
How to Transfer Messages from iPhone to Mac with a USB cable:
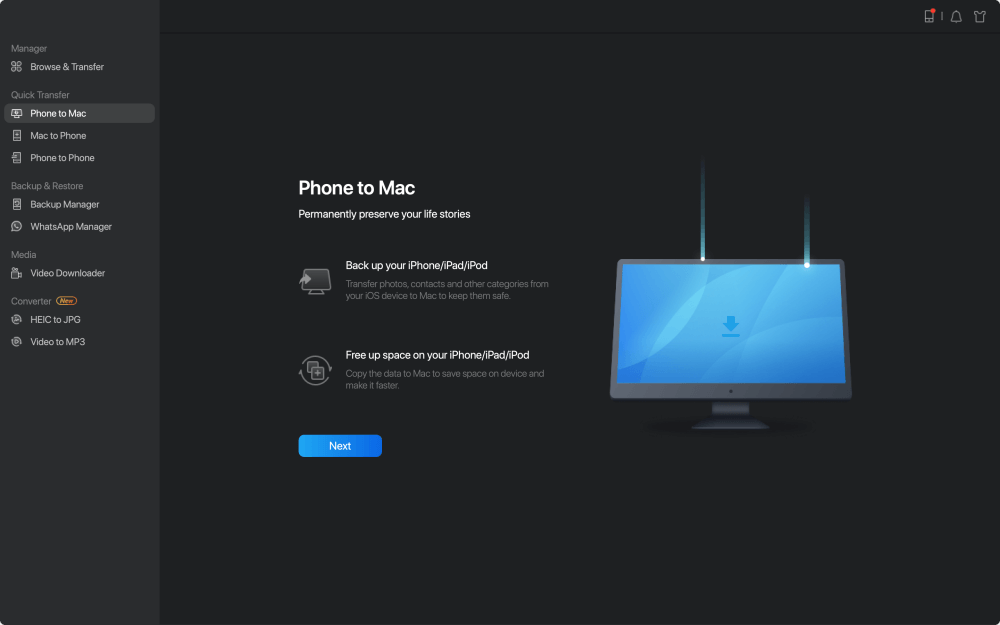
Step 1. Connect your iPhone to your Mac and launch EaseUS MobiMover. Tap "Trust" on your iPhone screen to trust this Mac. Choose "Phone to Mac" and click "Next."
![How to transfer text messages from iPhone to Mac - Step 1]()
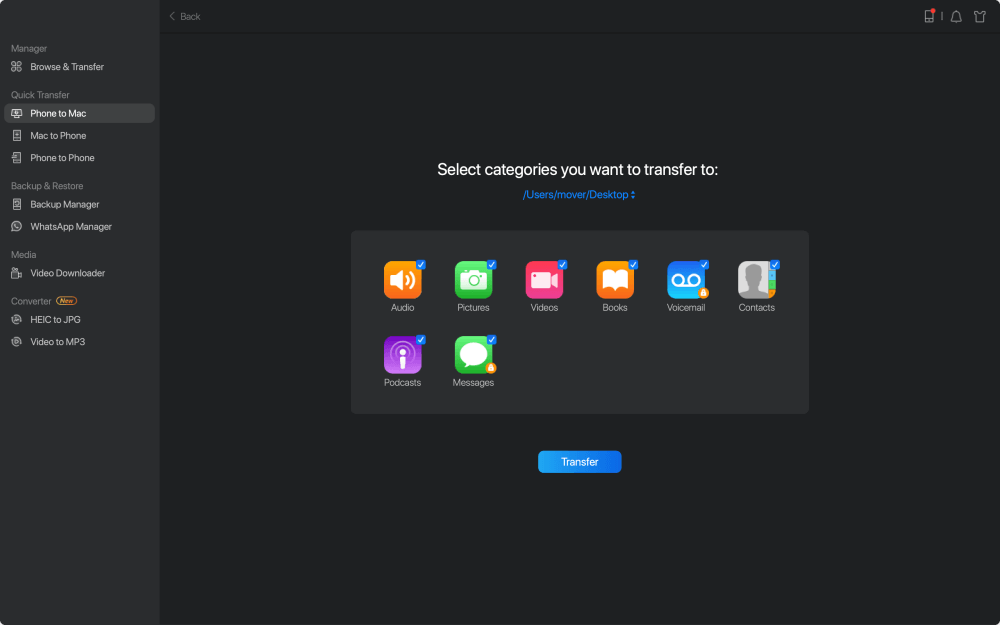
Step 2. Select the category/categories you'd like to export from iPhone to your Mac. Since you want to save iPhone messages to your Mac, tick the "Messages" category. You can change the default path to other locations. Click "Transfer".
![How to transfer text messages from iPhone to Mac - Step 2]()
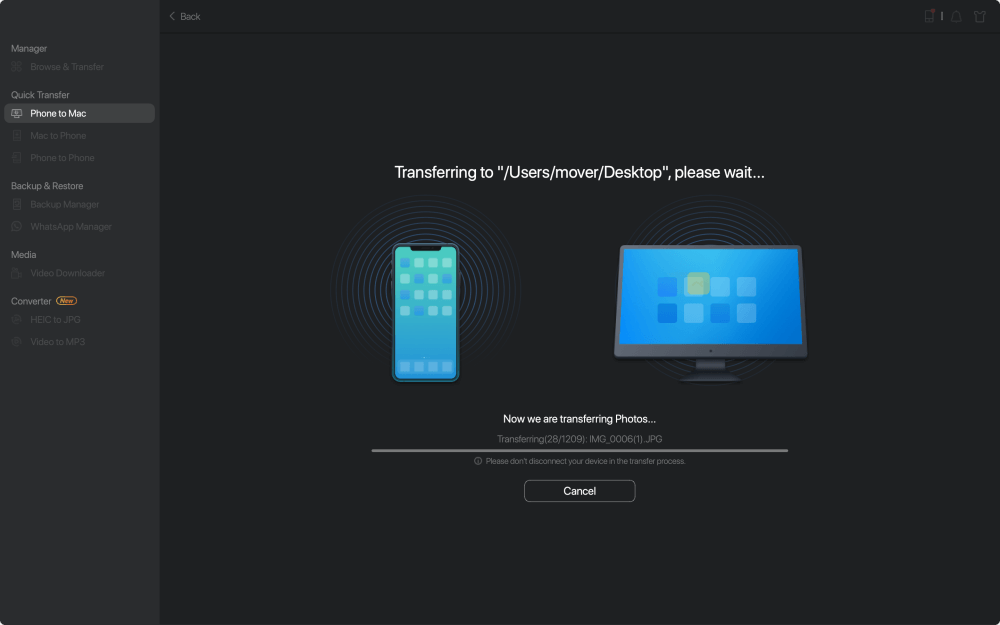
Step 3. Wait for the transfer process to finish. The messages will be saved as an HTML file on your Mac. Thus, you can view the details with a browser whenever you want.
![How to transfer text messages from iPhone to Mac - Step 3]()
In addition to being an iOS data transfer software, MobiMover can also serve as an iPhone content manager, which enables you to delete/edit the existing files on your iPhone or add new items to your device from the computer. In a word, MobiMover is an unmissable tool for you as long as you are an iDevice user. Don't hesitate to download EaseUS MobiMover on your computer and make it your good helper.
Tip 2. Sync Text Messages from iPhone to Mac via iCloud
With iCloud Drive, you can sync files across your iPhone, iPad, and Mac, which makes it incredibly convenient to transfer text messages from iPhone to Mac. But before starting, three things are worth noting.
- Make sure that both iPhone and Mac log in with the same Apple ID.
- Make sure your iPhone runs iOS 11.4 or above, and your MacBook or iMac runs on macOS 10.13.4.
- These messages you synced will disappear on Mac if you delete them on iPhone.
How to sync messages from iPhone to Mac:
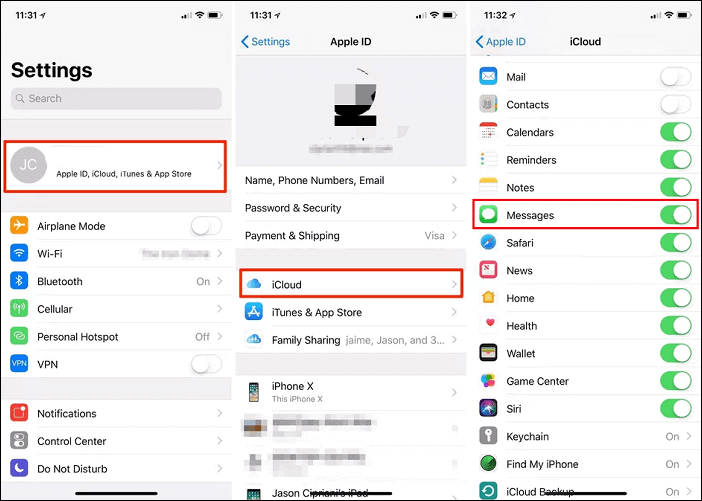
Step 1. Enable Messages on iCloud by going to Settings >Apple ID > iCloud > Toggle "Messages" to on (green).
![Enable Messages in iCloud]()
Step 2. Open your MacBook or iMac and ensure you're logged in to the same Apple ID as your iPhone > Launch Messages app on your Mac.
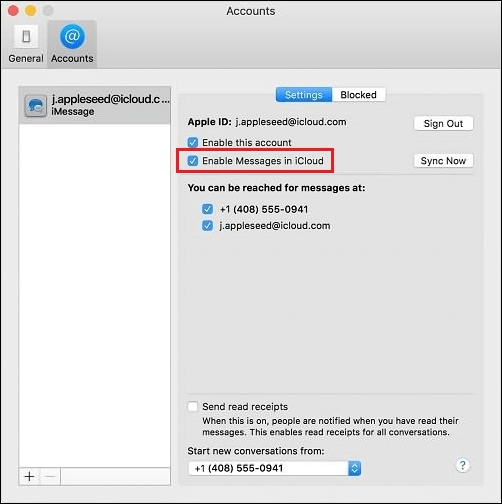
Step 3. Go to the "Preferences" for Message > "Account" > Select your Apple ID from the accounts list > Tick the "Enable Messages in iCloud."
![Enable Messages on iCloud Mac]()
Step 4. Once enabled, all messages on your iPhone will be synced to your Messages app on Mac. If not, you can click on the Sync Now button to start.
Note: The above-introduced two methods can also be transferred messages from Mac back to the iPhone.
iCloud is a helpful way to download text messages from iPhone.
Tip 3. Forward Text Messages from Your iPhone to Your Mac
By setting up text message forwarding, you can send and receive SMS and MMS messages from your phone on any Mac that meets the Continuity system requirements. Here are the steps.
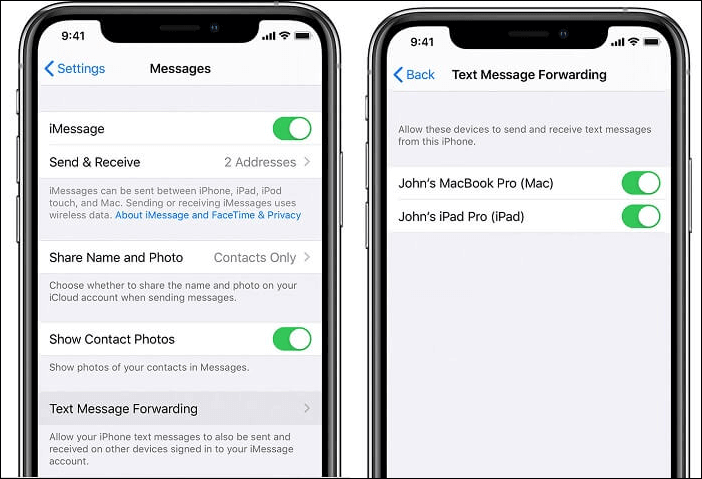
Step 1. On your iPhone, go to Settings > Messages > Send & Receive. On your Mac, open Messages, choose Messages > Preference > iMessage. Ensure your iPhone and Mac are signed in to iMessage with the same Apple ID.
Step 2. On your iPhone, go to Settings > Messages > Text Message Forwarding. Choose your Mac as the device you want to forward messages to.
Step 3. After that, you can receive messages from your phone on your Mac as long as your iPhone is turned on and connected to Wi-Fi or a cellular network.
![Forward iPhone messages to Mac]()
Note: If you're not using two-factor authentication for your Apple ID, you'll receive a verification code on each device. You'll need to enter the code on your iPhone.
Tip 4. Extract Messages from iPhone to Mac via iTunes/Finder
On macOS Catalina and later, iTunes has been replaced by Finder for managing iPhone backups. You can create a full backup of your iPhone on your Mac via Finder/iTunes, which includes your text messages, such as SMS, MMS, and iMessages. However, these backups are stored as encrypted files and aren't directly readable. You can restore the backup to your iPhone. This method is useful for backing up, archiving, or transferring messages without relying on iCloud or wireless syncing.
Step 1. Connect your iPhone to your Mac with a USB cable.
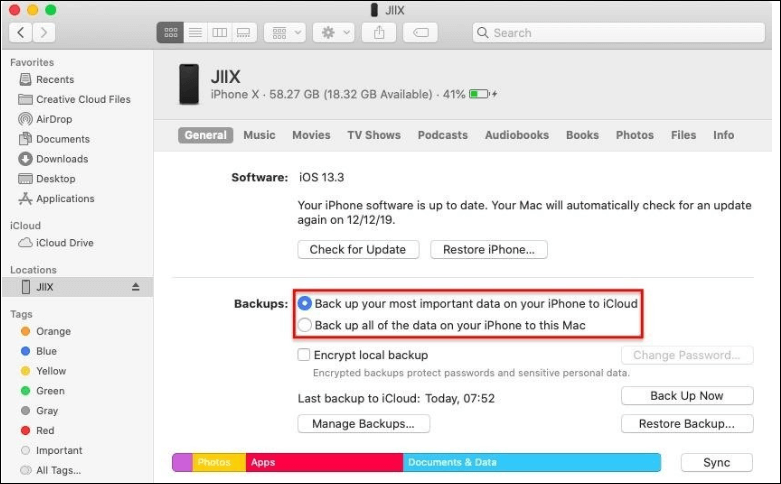
Step 2. Open Finder or iTunes and select your iPhone under Locations.
Step 3. In the General tab, select Backup all of the data on your iPhone to this Mac.
![backup-all-data-to-this-mac.png]()
Step 4. Optionally, check Encrypt local backup to save passwords and health data, and click Back Up Now.
Since the backup file is not directly readable, you cannot access your text messages on your Mac. If you want to extract messages as PDF, you can use MobiMover.
Bonus Tip. How to Text Someone from My Computer for Free
If you are a businessman who often handles affairs on the computer, you may need to send text messages on the computer. Here in this section, we will give you and those who have the same need some approaches to get the work done.
1. Using Email - You can send a text message through email if you know your friends' phone number and cell phone provider. All you need to do is to put your text messages into the email and press send.
2. Using iMessage - For Apple users, you can send iMessage between two MacBooks. To do this, you can open the Messages app on your Mac, input your recipient's phone number (or Apple ID), and then type the content you want to send. Finally, click on Send.
3. Using the SMS website - Many SMS websites can help you send messages for free. But some of them may ask you to sign up and register to see responses. If not, they will require you to provide an email address to receive responses.
4. Using Google Voice - If you don't know the recipient's carrier, then you can use Google Voice to send and receive text messages. By using it, you can choose a brand new number or use your existing mobile number.
In Conclusion
By following this guide, we hope you transfer text messages from iPhone to Mac successfully. Apart from the two methods introduced above, you can also use screenshots. But that may be a big business for users who have a large number of messages to transfer.
For that, we recommend you ask EaseUS MobiMover for help. With it installed on your Mac or PC, you can transfer any files from iPhone to Mac or vice versa. Now you can download it to have a try.
FAQs About Importing Messages from iPhone to Mac
Below are some frequently asked questions about importing messages from iPhone to Mac. Check them to see if there is a question you want to know the answer to.
1. Why can't I sync my messages from iPhone to Mac?
If, unfortunately, you can't sync your messages from your iPhone to your Mac, below are some reasons for this problem and the corresponding solutions.
- There is something wrong with the sync process, so you need to turn off iMessage and turn it back on by going to Settings > Messages > Toggle off iMessage > Turn it back on. On your Mac, open the Messages app and click on Preferences> Accounts > Sign Out > Sign back in.
- Make sure you log in with the same Apple ID on both your iPhone and Mac.
- There is something wrong with your iOS or macOS operating system. Therefore, you can update your iOS and macOS to the latest version.
2. How do I sync my iMessages to my Mac?
Apple makes syncing iMessages between an iPhone and a Mac very easy. Here are the steps.
Step 1. On your iPhone, go to Settings > Messages > Send & Receive. The information shown on the screen will be used later.
Step 2. On your Mac, open the Messages app. Click "Messages" from the top menu bar and select "Preferences" > "iMessage."
Step 3. Make sure the Apple ID is the same as the one you use on your iPhone. Then, check all the boxes in the "You can be reached for messages at" section.
3. How to get text messages on Mac without a phone?
As we all know, all Apple products are compatible with iMessage. These products include iPhone, iPad, iPod touch, MacBooks, iMac, etc. All of these devices are compatible, so you can send iMessages using your phone number from your Mac or other devices without using your iPhone.
NEW
HOT
