Transferring files between Mac and iPhone can be easy if you use the right method. In this post, we collect several workable ways to get the job done. Depending on whether you have iTunes or not, you can choose any of them to transfer files. For your convenience, we list the advantages and disadvantages of each method. We hope you can find the right way that works best for you.
PAGE CONTENT:
- Part 1. How to Transfer Files from Mac to iPhone Without iTunes
- Part 2. How to Transfer Files from Mac to iPhone with iTunes
Part 1. How to Transfer Files from Mac to iPhone Without iTunes
In this section, we will introduce five ways to transfer files from Mac to iPhone without iTunes. Each way has its pros and cons, you can choose your desired one based on your needs.
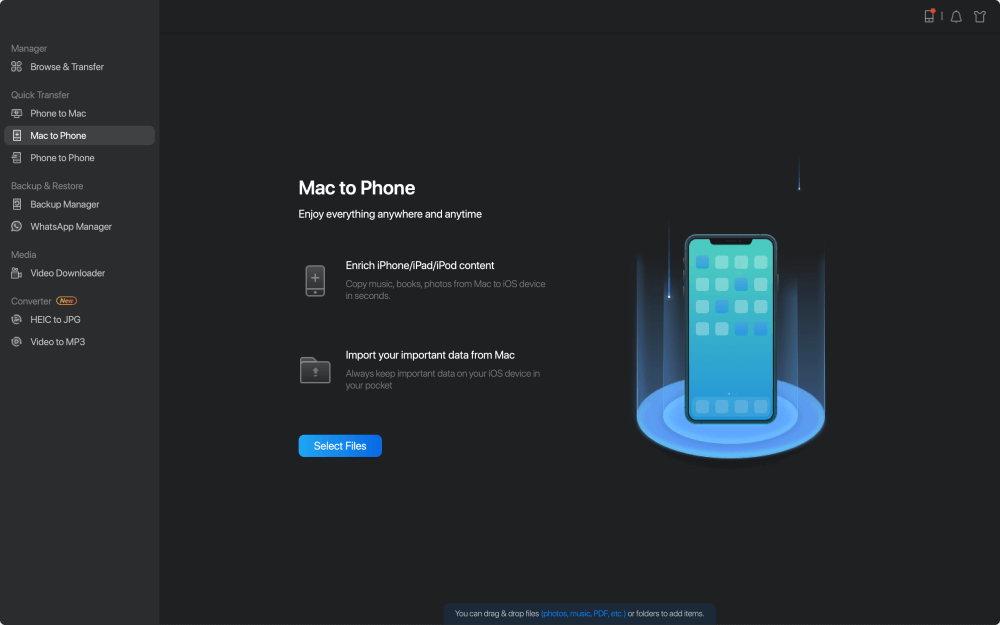
Option 1. Via EaseUS MobiMover
To transfer files, especially large files, an effective transfer tool that can save your time and money is required. If you're looking for one, EaseUS MobiMover Pro is exactly what you need. With it installed on your Mac, you can transfer all kinds of iPhone data between two iOS devices or between iOS devices and Mac, back up iPhone to Mac, or manage your device by editing, deleting, and transferring. Furthermore, it allows you to download any videos from any site.
Are you interested in this powerful tool? If you are, just download it on your Mac to have a try.
Step 1. Connect your iPhone to your Mac, and click "Trust" when a prompt appears on your iPhone asking you whether to trust this computer > Run EaseUS MobiMover and choose "Mac to Phone" to move data from Mac to iPhone > Click on the "Select Files" to move on.
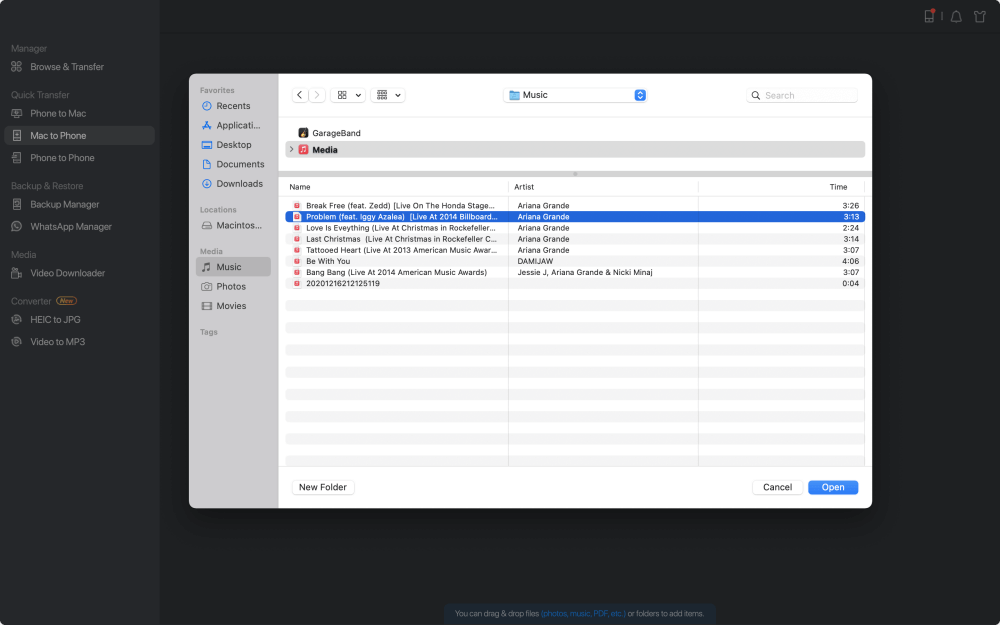
Step 2. Go to browse the files you want to transfer. After choosing the desired files, click "Open".
Step 3. You can preview the selected files on the right pane, with their detailed file names and file sizes. To add more items to transfer, you can click "Add Contents" or directly drag files or folders from your Mac to the appointed area. Finally, click "Transfer" to start transferring the content from your computer to your iPhone. Don't disconnect your iPhone while transferring. MobiMover enables you to move lots of data at a time without any quantity and size limitation.
Option 2. Via iCloud
iCloud is Apple's recommended way to transfer files. With iCloud, you can sync all files across different iOS devices that have the same Apple ID. (If iCloud Drive is not syncing, learn how to fix it first from the article.)
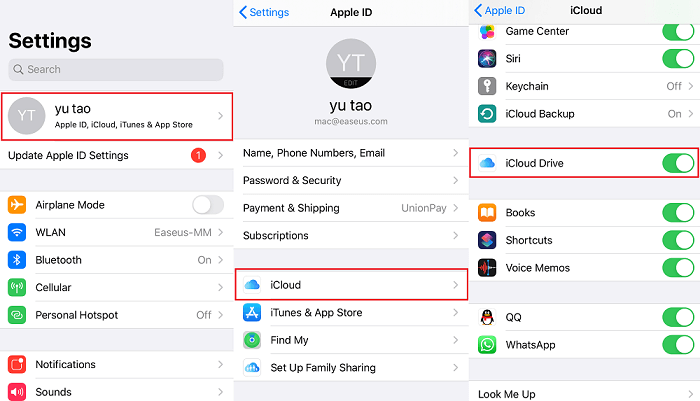
Step 1. Turn on iCloud Drive on your iPhone and Mac.
On the iPhone: Go to the Settings > [your name] > "iCloud" > Scroll down to turn on "iCloud Drive."
![Enable iCloud Drive on iPhone]()
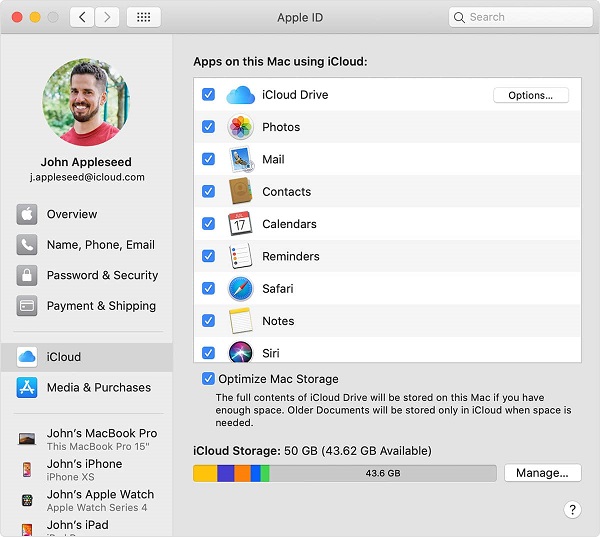
On Mac: Go to the Apple menu > "System Preference" > "iCloud" > "iCloud Drive."
![Enable iCloud Drive on Mac]()
Step 2. Open icloud.com on your Mac and sign in with your Apple ID.
Step 3. Drag files from the desktop or folder on your Mac to the iCloud Drive window or a folder icon in the iCloud Drive window.
Step 4. Then, the files will be synced to your iPhone.
Option 3. Via AirDrop
With AirDrop, you can wirelessly send files to a nearby iDevices on the same Wi-Fi network. No USB is required. All you need to do is turn on AirDrop on your Mac and iPhone, then follow the instructions to get the work done. But it is worth reminding that AirDrop cannot support photo transfer, so you need some other tips to transfer pictures from Mac to iPhone. Before getting started, there are a couple of things that should be noted.
- Make sure your Bluetooth and Wi-Fi have been turned on.
- Put both devices together.
- Make sure your device is one of the devices running iOS 7 or later, or Mac computers running OS X Yosemite.
After learning about the necessary prerequisite to use AirDrop, you can follow the steps to airdrop files from Mac to iPhone.
Step 1. Turn on AirDrop on your iPhone and Mac.
Step 2. Open the document you'd like to transfer. Then, press Control and click a document file to open more information, from where choose "Share."
![Use AirDrop to Send Files from Mac to iPhone]()
Step 3. From the "Share" menu at the top of the screen, choose "Send a copy."
Step 4. Choose "AirDrop."
Step 5. Select your iPhone as the recipient.
Step 6. On your iPhone, tap "Accept" to receive the file.
Option 4. Via Email
If you are looking for an easy, fast, convenient, and free way to send files between Mac and iPhone, Email is the optimal choice. With Email, you can transfer files whenever and wherever as long as you have an internet connection. But on the other hand, Email certainly has its cons. For example, email messages can contain the virus, and if you send large files like photos and videos, it would very slow.
The process of transferring files with email are vary depending on the email you use. For the detailed steps, you can follow the instruction of each Email service to do it.
Option 5. Via Cloud Services
Instead of using a USB, you can transfer files from Mac to iPhone via Cloud services like Google Drive, OneDrive, and Dropbox. Among these services, Google Drive is the most recommended since it offers up to 15GB of online storage for free, expanding to 16TB on premium versions. Here's how to do it.
Step 1. Download and install Google Drive on your Mac and iPhone.
Step 2. Log in to Google Drive with the same Google account.
Step 3. Upload files from Mac to Google Drive.
Step 4. Go to Google Drive on your iPhone and download the files.
![Use Google Drive on Mac]()
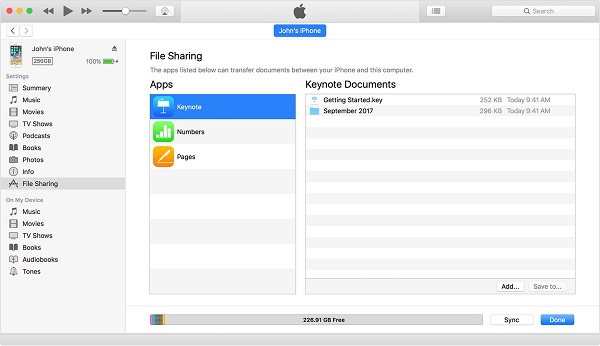
Part 2. How to Transfer Files from Mac to iPhone Use iTunes File Sharing
File Sharing is one of iTunes's features that enables you to quickly and easily transfer files between computer and iOS devices. To use this method, you need to prepare:
- The latest version of iTunes on your Mac.
- The latest version of macOS.
- An iPhone or iPad running the latest version of iOS or iPadOS.
- iOS or iPadOS apps that work with File Sharing.
Step 1. Open iTunes on your Mac.
Step 2. Connect your iPhone to your Mac using a USB cable.
Step 3. Click your device icon in iTunes.
Step 4. Click "File Sharing" in the left sidebar.
Step 5. Click "Add," select the file you want to transfer, then click "Add."
Step 6. When the process completes, you can check the files in the corresponding app or location.
![Transfer files from Mac to iPhone]()
The Final Words
Now, you may have known all possible ways to transfer files from Mac to iPhone. As you can see, sharing files between iOS devices can be very easy if you using the right method. If you think this guide helps you a lot, just add it to Favorites so that you can quickly open it when you need it. Plus, we will keep this page updated so that you can get more and new information.