- Company
- About Us
- Partner
- My Account
- Support
- Support Center
- Download
- Chat Support
- Pre-Sales Inquiry
- Premium Service
Featured Articles
- 01 Backup iPhone to PC
- 02 Back Up iPhone Without iTunes
- 03 Backup Photos from iPhone to External Hard Drive
- 04 Does iPhone Backup Replace Previous Backup?
- 05 Backup iPhone to Flash Drive
- 06 Backup iPhone wirelessly
- 07 Backup iPhone to OneDrive
- 08 Backup iPhone to Synology Nas
- 09 Backup WhatsApp iPhone to Mac
I. What Does Backup iPhone Mean & Why It Is Necessary
Backup iPhone is a process that involves creating a copy of your data and storing it in a secure location. Creating a backup of your iPhone is a crucial step to ensure the safety and security of your data. In the event of unexpected data loss due to device failure, theft, or accidental deletion, having a backup of your iPhone will allow you to restore your data quickly.
📜There are numerous reasons why you might need to back up your iPhone
- 💡Restore data when your iPhone is stolen. Consider losing or having your iPhone stolen. You risk losing all your data, including contacts, messages, images, and documents, if you do not have a backup. You may quickly restore or retrieve your data to your new handset if you find your lost device with an iPhone backup.
- 💡Transfer the iPhone backup to a new device. Another situation in which a backup is essential is while upgrading to a new device. Transferring data from an old device to a new one might be difficult, but with an iPhone backup, the process is simplified. You may rapidly move your data and settings to your new device without fear of losing vital information.
- 💡Prevent accidental data deletion. Accidental data deletion is another typical case in which an iPhone backup might rescue you from losing valuable data. Whether you mistakenly delete a critical message or an important contact, a backup allows you to restore your data to a previous condition.
- 💡Prevent iPhone malfunction. Furthermore, maintaining an iPhone backup might help you avoid losing data due to device malfunction or software issues. If your iPhone fails unexpectedly, a backup can assist you in recovering your data and restoring your device to its last known functional state.
- 💡Free up more storage space. Most iPhones use 128GB or 256GB storage, which is very limited. Suppose you have lots of precious videos and photos on your iPhone and need to keep them; what can you do with limited storage space? Backup allows you to save your important data while freeing up more space for iPhone.
Overall, backing up your iPhone is critical, and it is recommended that you do so frequently. An iPhone backup can benefit you and save you a lot of trouble if you lose your handset, upgrade to a new one, mistakenly delete data, or experience device issues.
There are various methods to create a backup of your iPhone. In this ultimate guide, we'll walk through specific steps to back up iPhone on Windows PC and Mac. Besides, we'll cover ways to back up your iPhone to external hard drives and Synology NAS. No matter what devices you use, you'll find the solution here.
LEARN MORE
Knowing what "Backup iPhone" means and its importance, you must be wondering what contents can be backed up. 🔍 Does backing up your iPhone backup everything? Read this post, and you'll get your answer.
Another common question in backing up iPhones is: 🔍Does iPhone backup replace the previous backup? If you want related information, this post is here for you.
We have collected and evaluated all viable tools for backing up your iPhone in terms of efficacy and difficulty. Before deciding, consult the table below to select the tool you like.
| Backup Options | Effectiveness | Difficulty |
|---|---|---|
|
EaseUS MobiMover (Windows PC | Mac) |
High - Ultra simple operation to back up and transfer iPhone files to both Windows PC and Mac successfully | ⭐ |
|
iTunes (Windows PC | Mac) |
Medium - Wokrs on both Windows PC and Mac, but it has been discontinued and doesn't work with the newest system version. | ⭐⭐⭐⭐ |
| iCloud | Medium - Back up your iPhone automatically when you connect your device to Wi-Fi and power, but it only provides 5GB of free storage. | ⭐⭐⭐ |
| DropBox | Medium - Cloud service offers 2GB of free storage space, sync and share iPhone backup on different devices | ⭐⭐ |
| Google Drive | Medium - Cloud service offers 15GB of free storage space, sync and share iPhone backup on different devices. | ⭐⭐ |
| Finder | High - Works on macOS Catalina or the later version to back up iPhone to Mac | ⭐⭐⭐⭐ |
II. How to Backup iPhone on a PC
It is expected that many people are using a Windows PC and iPhone at the same time. How to save your iPhone data on a Windows PC without losing any data? Don't worry; the following part shows four viable options with step-by-step instructions.
LEARN MORE
The article Backup iPhone to PC explains three easy ways to store iPhone data on a Windows PC. If you are running Windows 10, this guide will assist you in resolving the issue quickly.
1️⃣EaseUS MobiMover
If you are looking for the easiest and safest solution to transfer data from iPhone to Windows PC, EaseUS MobiMover is your best choice. It is a professional all-in-one iPhone transfer and backup program, ensuring a quick and secure iPhone data backup and restore. When you have too many videos and photos on your iPhone, transferring those files to PC is an excellent way to free up more storage space and keep your data backed up.
Besides, MobiMOver also allows you to transfer photos from your iPhone to an external hard drive or a flash drive. It also ensures you select files to back up instead of simultaneously backing up the entire device. MobiMover has gained tremendous popularity for backing up WhatsApp chats and attachments, so you don't need to worry about chat history losing if you backup WhatsApp iPhone to Mac or Windows PC with this EaseUS Software.
- 📝What to prepare
- A USB cable to connect your iPhone and PC
- A PC with that running Windows 11/10/8/7
- Ensure PC has enough storage
- Download and install EaseUS MobiMover on your PC
Now follow the steps below to back up your iPhone to Windows PC
Step 1. Connect your iPhone/iPad to your PC with a USB cable and click "Trust" on your device. Then launch EaseUS MobiMover and click "Backup Manager" > "Back up".
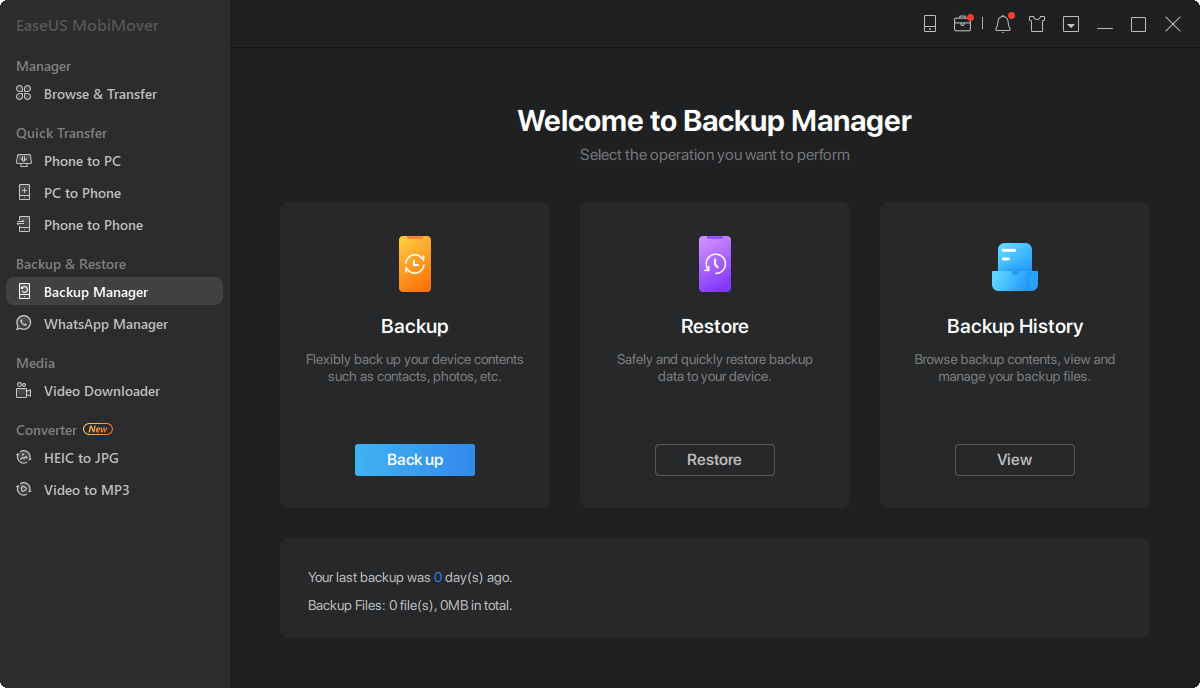
Step 2. Check the types of files you need to backup. Afterward, click the backup button to start backing up your iPhone or iPad.
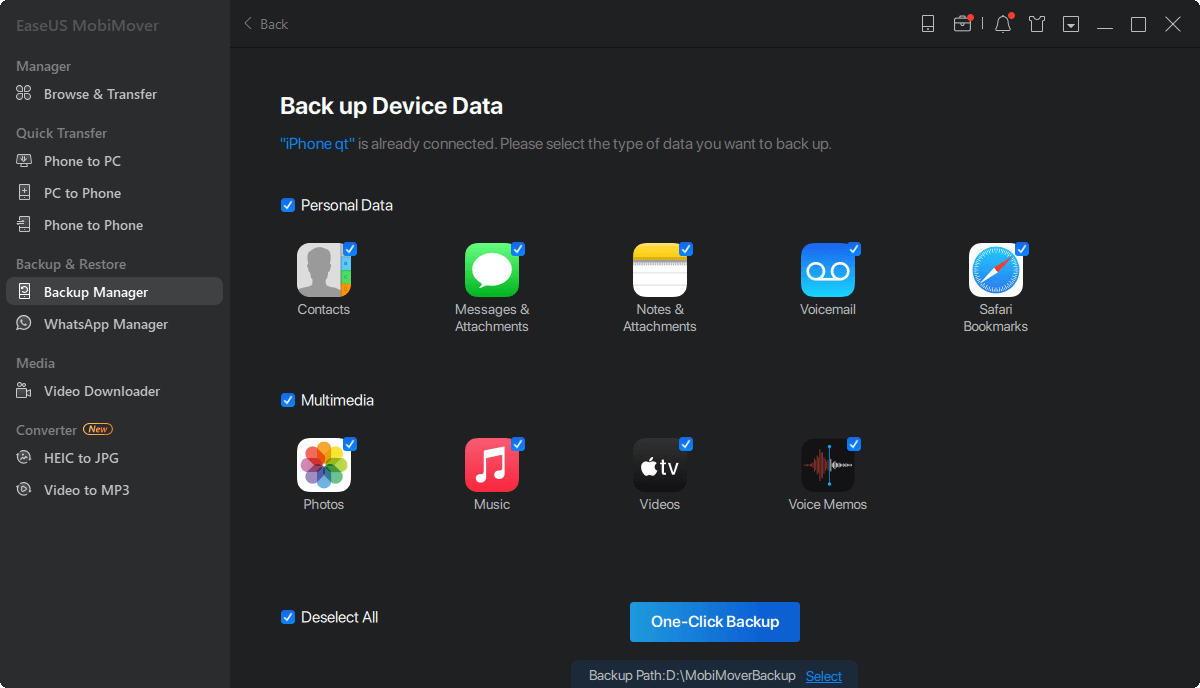
Step 3. Depending on the size of the content, the time the backup will spend varies. Wait patiently for the backup to complete.
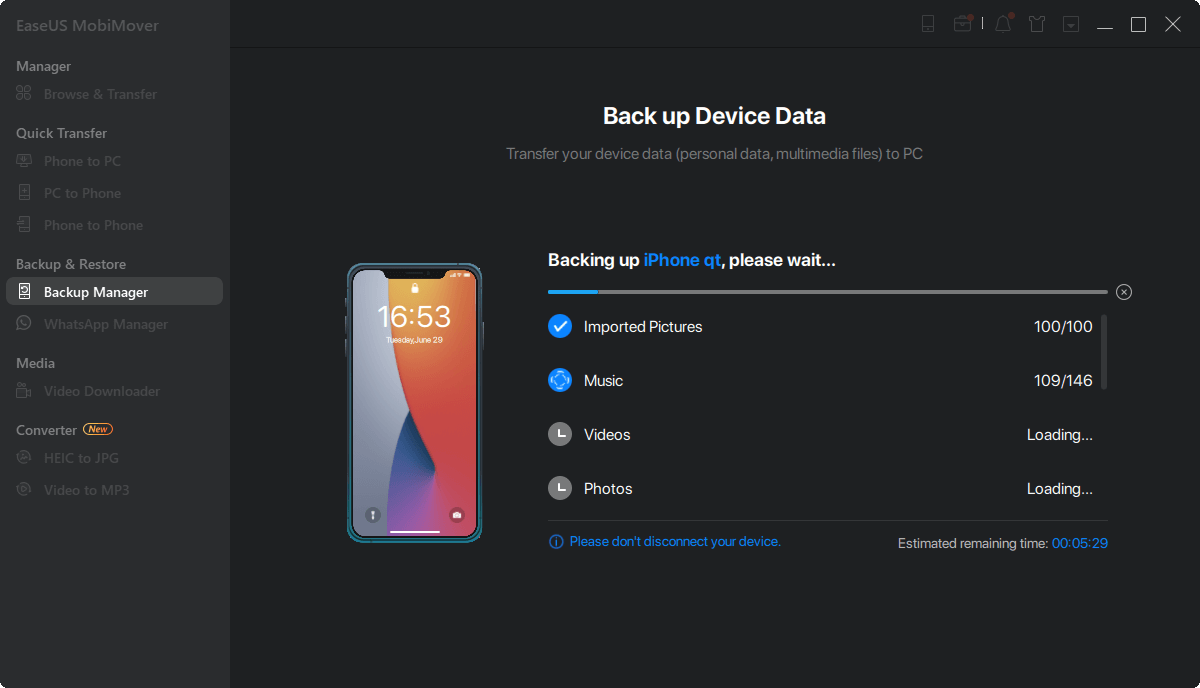
LEARN MORE
Now you have learned how to back up your iPhone via EaseUS MobiMover by connecting your iPhone to PC. If you want to know how to 🔍backup your iPhone to Mac wirelessly, refer to this post, and you'll get your answer.
2️⃣iTunes
Regarding backing up iPhones on PC, iTunes may be the first choice of 70% of customers due to its free and straightforward solution. It will back up your iPhone with Windows 10 PC easily if you connect them via a USB or USB-C connector, and the backup is accessible anytime.
However, because of its shortcomings, not everyone enjoys iTunes. The truth is that Apple Music, Apple TV, Apple Books, and Apple Podcasts have all replaced iTunes to back up iphone on macOS Catalina or higher. So iTunes is not an option if you use macOS Catalina or a later version. 🔍iTunes Shutting Down: The iTunes Alternative Worth Trying.
Furthermore, when using iTunes to backup iphone on MacOS Ventura or lower, you cannot opt to back up or restore a single file or photo, which means you can only generate a comprehensive backup of your iPhone and must convert them all at once if necessary.
- 📝What to prepare
- Update your iPhone and iTunes to the newest version
- A PC with Windows 7 or above verion
- A USB or USB-C cable
- Ensure your PC has enough storage
Steps to back up iPhone to PC via iTunes
Step 1. Download iTunes on your Windows PC.
Step 2. Launch iTunes, connect your iPhone to your PC with a USB or USB-C cable and choose Trust on iPhone.
Step 3. Tap the iPhone icon in the iTunes App on PC in the top-left corner.
Step 4. Click Summary > Back Up Now to start the backup process.
If you want to protect your backups, check the option Encrypt local backup and set a password
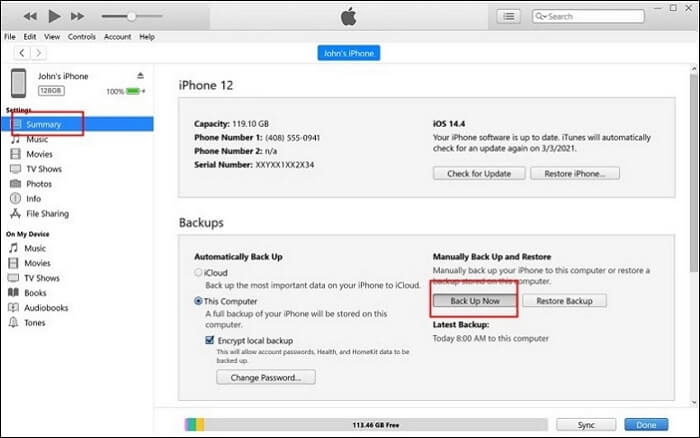
Step 5. You can check your iPhone backup via the path: iTunes > Edit > Preference > Device.
LEARN MORE
This part covers the specific steps to back up iPhone with iTunes. There are cases when iTunes is unavailable or seek other ways, and you can read the post on how to backup your iPhone without iTunes.
3️⃣Dropbox
Cloud storage services are becoming more popular, and storing your iPhone backup in the cloud will give your data an added layer of security. Dropbox is a popular cloud storage service that provides 2GB of free storage space and allows you to back up your iPhone data to a Windows PC without requiring a physical connection between the two devices. When you configure your iPhone to back up to Dropbox, all data is automatically stored, and you can view the backup on any device as long as you sign in with the same account.
Every coin has two sides, and Dropbox is no exception. Because Dropbox is a cloud-based service, accessing the backup files requires an Internet connection. Furthermore, if you have a large amount of data to back up, you must pay for additional storage.
Dropbox is a good alternative if you need backups on any device and have a sufficient budget for backup management.
- 📝What to prepare
- A Dropbox account
- A stable Internet condition
- A Windows PC
- Download Dropbox app on your iPhone and PC
Step to back up iPhone on PC to Dropbox
Step 1. Sign in to the same Dropbox account on both iPhone and PC.
Step 2. On the iPhone Dropbox, click the + icon to choose Record Audio, Upload Photos, or Create or Upload files.
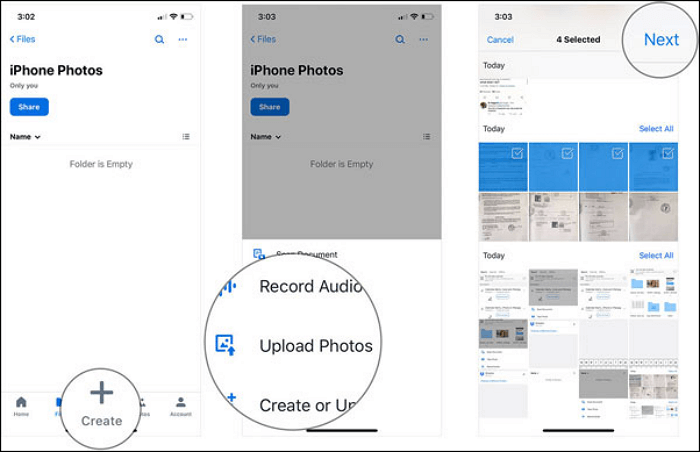
Step 3. When you upload files or photos to Dropbox successfully, you can check them on your PC Dropbox.
💡If you want to back them up to PC, download the files from Dropbox.
LEARN MORE
There are many cloud storage services available to back up iPhone files. This guide explains detailed information on how to 🔍backup iPhone to OneDrive. If you have a OneDrive account, read it and keep your iPhone data safe.
4️⃣Google Drive
Google Drive is another well-known and highly-rated cloud service with a large user base. It provides 15G of free storage space for your files, emails, photographs, videos, and other media. When you back up data from your iPhone to Google Drive, you can view it from any device, including a Windows PC.
Google Drive, like Dropbox, only allows you to save files created on your iPhone but not system files. You'll also need an Internet connection to view the backup. Furthermore, because Google Drive is a third-party cloud service, customers may face data leakage and privacy violations.
However, Google Drive is generally a straightforward and convenient way to back up and save iPhone data.
- 📝 What to prepare
- A Google Drive account
- A stable Internet condition
- A Windows PC
- Download Google Drive app on your iPhone and PC
Step to backup iPhone to Google Drive
Step 1. Sign in to the same Google Drive account on both iPhone and PC.
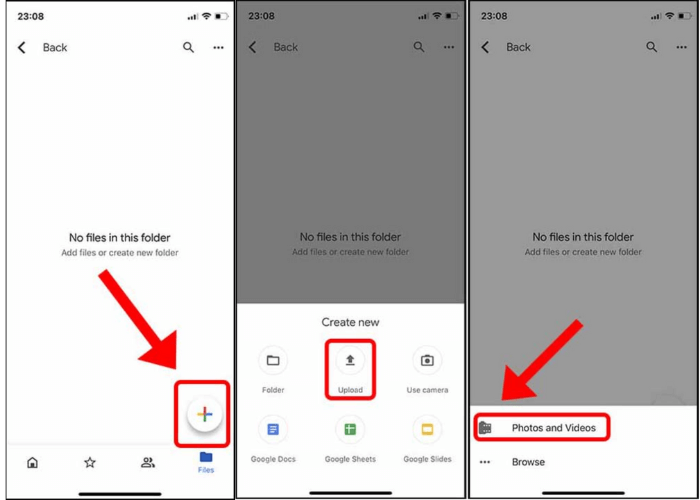
Step 2. On the iPhone Google Drive, click the + button in the bottom-right corner.
Step 3. Click to Upload > Photos and Videos to choose the files you want to backup.
Step 4. Wait for the process to finish, and open Google Drive on your PC. Now you can see the uploaded files on Windows PC.
If you need to store the file on PC, download and save it.
III. How to Backup iPhone on Mac
After learning how to back up your iPhone on Windows, you must be curious about Mac devices, right? Many users use Mac because of the Apple ecosystem, so it is necessary to know how to back up files and data from your iPhone on Mac. Here we will show you four standard solutions to help you back up your iPhone to Mac effortlessly. Without further ado, let's move on!
1️⃣ iCloud
When backing up iPhone on Mac, iCloud comes to our mind first, as there is no need to use the Mac. That means you can do it directly on your iPhone without plugging it in! Now, let's check how it works:
- 📝What to prepare
- An iPhone
- A stable Wi-Fi connection
- Enough storage in your iCloud
Steps to back up iPhone on Mac via iCloud:
Step 1. Unlock your iPhone, open the Settings app, and tap your Apple ID (or your name) at the top of the screen.
Step 2. Tap iCloud and choose the iCloud Backup option in the Apple ID menu.
Step 3. Next, you can select Back Up Now to start your task immediately.
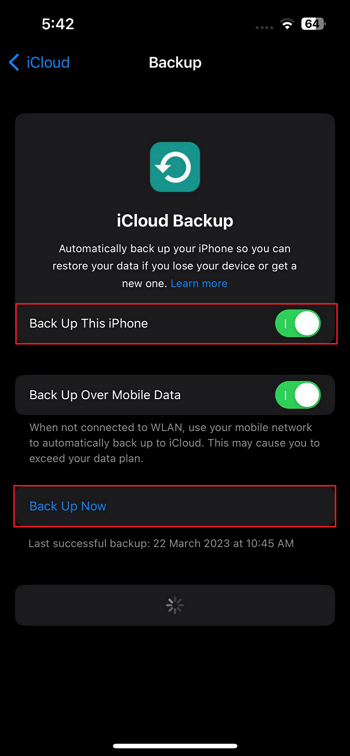
Once done, you can access your backup data (contacts, images) from anywhere with Wi-Fi (as long as you know your Apple ID and password, of course!). Although it is very convenient, you cannot view or access the backup content without restoring the iPhone. Moreover, it only provides 5GB of free storage, and you must purchase extra storage for large files.
2️⃣ iTunes
Aside from iCloud, you can backup iphone to iTunes on Mac. Once done, you can restore your backup whenever your iPhone has problems. Compared to iCloud, iTunes local backup on a drive is faster to back up and restore.
- 📝What to prepare
- A Mac running macOS Mojave or earlier
- USB cable to connect your iPhone and Mac
- The latest iTunes
Steps to back up iPhone to Mac using iTunes:
Step 1. First, connect your iPhone to your Mac with a USB cable. When prompted, unlock your iPhone and Trust your Mac.
Step 2. Once your iPhone is plugged into your Mac, open iTunes and choose the "Device" button at the top left of the iTunes window.
Step 3. Next, click the Summary button to find your iPhone information, and choose your desired Backup option.
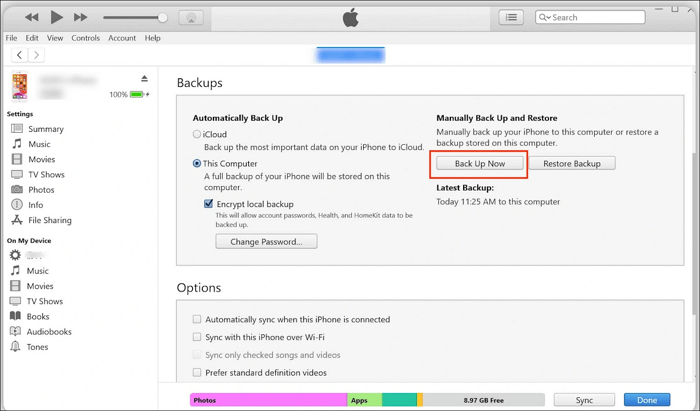
Step 4. Once done, click Back Up Now to start the backup process.
LEARN MORE
Apple canceled the iTunes app on macOS Catalina in 2019; thus, only the macOS released earlier than Catalina can run iTunes. If your Mac is running Catalina and later versions, you can refer to this guide to learn more information: 🔍How to back up iPhone on macOS Catalina
3️⃣ Finder
Another way is to use Finder, a built-in Mac application. If your Mac is running macOS Catalina and later, you can directly check the following tutorial to back up your iPhone on Mac effortlessly:
- 📝What to prepare
- A Mac running macOS Catalina and later
- A USB cable to connect your iPhone and Mac
Steps to back up iPhone on Mac with Finder:
Step 1. Connect your iPhone to your Mac with a USB cable. If it's the first time you connect your iPhone to Mac, you will be prompted to "Trust" the Mac on your iPhone's screen.
Step 2. Open Finder on your Mac, choose your iPhone from the left sidebar, then click the first "General" tab.
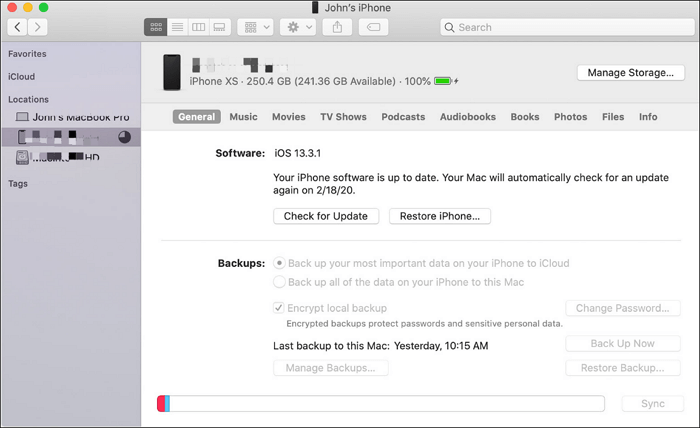
Step 3. Next, you need to choose the backup options:
- Back up the most essential data on your iPhone to iCloud
- Back up all of the data on your iPhone to this Mac
- Encrypt local backup
Usually, we choose Back up all the data on your iPhone to this Mac. If you need to encrypt your backup data, you can select the third option and enter a password.
Step 4. Finally, click "Back Up Now" to start creating backups for your iPhone. Then, you will see the backup progress bar at the bottom of the Finder. (The backup process will take about 15-30 minutes.)
4️⃣ Free iPhone Backup Software
Apart from those built-in iPhone backup solutions, professional iPhone backup software is a trend, as these programs allow you to back up iPhone data to your Mac more flexibly.
One of the most popular iPhone backup software is EaseUS MobiMover Pro. Coming with an incredible user interface, this software makes it easy to operate for all users, even if one is not tech-savvy.
This all-in-one iPhone backup software allows you to back up almost everything from iPhone to Mac, including but not limited to contacts, videos, music, messages, etc. Most importantly, it provides more backup options. For instance, if you need to back up photos from iPhone to Mac, you can choose the images instead of the whole album! Last, you can restore your backup with a straightforward click if needed.
- 📝What to prepare
- Download and install EaseUS MobiMover
- A USB cable
Here's how to back up your iPhone on Mac with professional iPhone backup software:
Step 1. Connect your iPhone/iPad to your PC with a USB cable and click "Trust" on your device. Then launch EaseUS MobiMover and click "Backup Manager" > "Back up".

Step 2. Check the types of files you need to backup. Afterward, click the backup button to start backing up your iPhone or iPad.

Step 3. Depending on the size of the content, the time the backup will spend varies. Wait patiently for the backup to complete.

IV. How to Backup iPhone to an External Hard Drive
If you have a large amount of data to back up on your iPhone, you can backup iPhone to external hard drive on Mac or a flash drivers, as it would be faster, more reliable, and more convenient than backing up to PC or Mac. Moreover, it gives you more control over where and how your iPhone data is stored.
Here are some expected benefits of backup iPhone to the external hard drive:
- 💡Large storage space: Compared to a PC or Mac, an external hard drive has enough space to store all your iPhone backup files.
- 💡High security: An external hard drive is a physical device that can be disconnected from your Mac or PC when the backup process is complete. Your backup files are stored separately, making them less vulnerable to malware attacks, viruses, and other security threats that may affect your Mac or PC.
- 💡Portability: An external hard drive is portable, making it easy to carry around. This is particularly useful if you travel frequently or need to access your backup files from different locations. You can easily connect your external hard drive to any Mac or PC and access your backup files without hassle.
- 💡Backup redundancy: If one backup fails, you can always rely on another backup stored on a different external hard drive. This ensures that your data is always safe and accessible, even in case of unexpected events.
1️⃣ Use A Computer
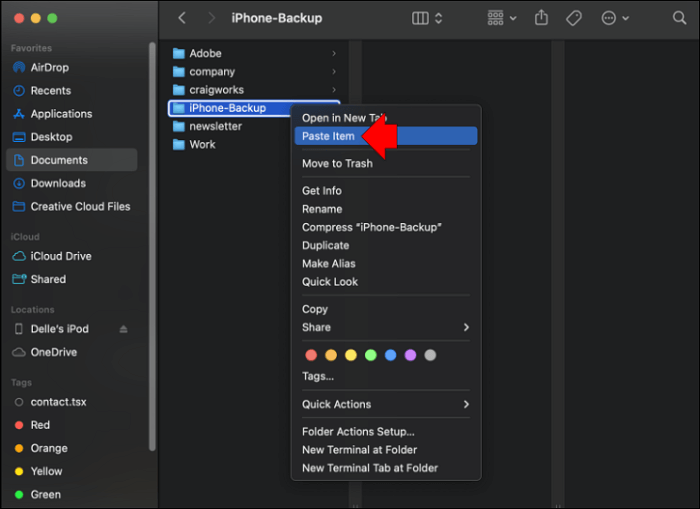
Using a computer is the easiest way to backup iphone to flash drive or an external hard drive. Find your iPhone backup location on your PC or Mac, then copy and paste the files to your external hard drive. However, you need first back up iPhone to PC or Mac.
- 📝What to prepare
- Create an iPhone backup
- A PC/Mac
- A USB cable
- An external hard drive
Step 1. Create an iPhone backup on your computer.
Step 2. Connect your external hard drive and your computer.
Step 3. Find the iPhone backup location on your computer, then copy and paste the backup files to your external hard drive.
2️⃣ Use USB-to-lightning adapters
If you don't have a computer and still want to back up your iPhone to your external hard drive, use the USB-to-lightning adapters. A USB-to-lightning adapter is an electrical adapter that allows for a physical connection between devices that use the USB and Lightning standards.
- 📝What to prepare
- An iPhone
- An external hard drive
- USB-to-lightning adapter
- USB-C connector
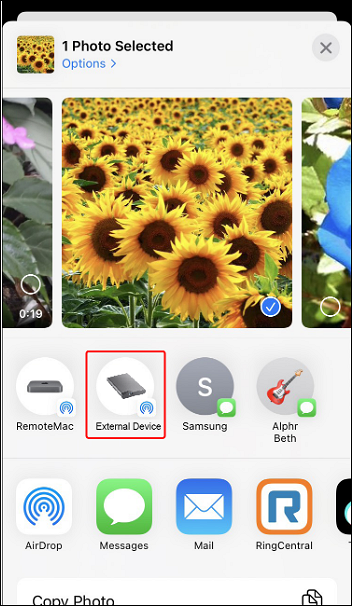
Step 1. Connect your iPhone and the hard drive using the adapter.
Step 2. Open your iPhone and select the files you'd like to back up.
Step 3. Once selected, tap the "Share" button and choose the external hard drive as the destination.
LEARN MORE
Want to back up your iPhone to Synology NAS? Click here to learn 🔍how to back up your iPhone to Synology NAS.
V. Bonus: How to Find iPhone Backup Location
iPhone backups are essential for safeguarding your files, videos, and images. If your iPhone is stolen or your data is accidentally destroyed, the backup will allow you to recover the data without losing anything.
However, you must locate the spot where the backup is saved before restoring. Many methods are covered in this essay, and different backup solutions require different locations to store backups. On each device, we have included all of the default backup locations. Locate your backup using the information provided below.
- 🍎Mac: ~/Library/Application Support/MobileSync/Backup/
- 💻Windows PC: \Users\(username)\AppData\Roaming\Apple Computer\MobileSync\Backup\
- 📹iTunes: iTunes> Edit > Preferences > Devices
- 💭iCloud: Apple menu > System Preference > Apple ID > iCloud > Manage > Backups
LEARN MORE
iPhone backup locations are Want to know more information? Read this guide: iPhone Backup Location.
VI. How to Restore iPhone From Backups
It's time to restore iPhone backups to a new device or another iPhone. Follow the guide below to retrieve your iPhone to its previous state.
1️⃣How to Restore iPhone From iCloud
Restore iPhone from iCloud Backup on iPhone.
Step 1. Turn on your new iPhone, and see a Hello screen. (If you have set up your device, you must erase all settings and restore it to the state like this.)
Step 2. Follow the onscreen instruction until you see the Apps & Data screen, and choose Restore from iCloud Backup.
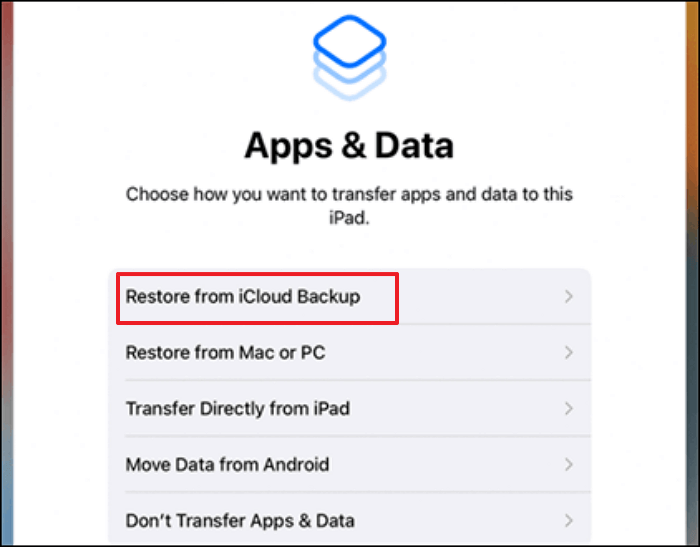
Step 3. Sign in with your iCloud with your AppleID.
Step 4. Select a backup (Ensure to choose the latest backup), and wait for the process to finish.
2️⃣How to Restore iPhone From iTunes
Step 1. Connect your new device to the Mac with a USB cable, and Trust it.
Step 2. Open iTunes on your Mac. (If you are using macOS Catalins or later, open Finder).
Step 3. Click the iPhone icon in the top-left corner.
Step 4. Click Summary > Restore Backup...

Step 5. Choose the latest backup, click Restore and wait for the process to finish.
Step 6. When finished, disconnect your device from your Mac.
LEARN MORE
This part explains the steps to restore iPhone from backup on both iPhone and Mac. For more details, read this post: Restore iPhone from Backup.
VII.The Final Words
In conclusion, it's critical to back up your iPhone to guarantee that you don't lose any crucial information in case of a device failure or data corruption. In addition to third-party apps like EaseUS MobiMover, various options back up iPhones on Windows PCs and Macs, including iCloud, iTunes, and cloud-based services like Google Drive, Dropbox, etc.
After evaluating the various techniques, we propose EaseUS MobiMover as the best option to back up iPhone. MobiMover is simple to use and has many capabilities, including data transfer between devices, backup creation, and backup restoration. Fast transfer speeds, extensive backup choices, and the ability to examine and pick particular files to back up are all its advantages.
With EaseUS MobiMover, you can rest assured that your iPhone data will be safe and secure.
VIII. iPhone Backup FAQs
1. How long does it take to back up an iPhone?
There was no formulaic answer to that question. But generally speaking, it will take 30 mins to 2 hours to back up your iPhone. The process depends on different conditions, including the backup methods, backup files' size, and more.
2. Can I back up my iPhone to my iPad?
Sure! You can back up your iPhone to iPad with iCloud. You need to back up your iPhone data to iCloud, then restore it on your iPad. But you need to ensure you have enough iCloud storage for the operation, and you'll have to erase existing data on the iPad via factory reset.
3. How do I transfer everything to my new iPhone?
You can use Quick Start to transfer everything to your new iPhone.
Ensure your current device is connected to Wi-Fi and Bluetooth is on. Turn on your new device and place it near your current device. Then, follow the onscreen instructions to get started.
Was This Page Helpful?
Gorilla joined EaseUS in 2022. As a smartphone lover, she stays on top of Android unlocking skills and iOS troubleshooting tips. In addition, she also devotes herself to data recovery and transfer issues.
Written by Larissa
Larissa has rich experience in writing technical articles. After joining EaseUS, she frantically learned about data recovery, disk partitioning, data backup, screen recorder, disk clone, mobile transfer, and other related knowledge. Now she is able to master the relevant content proficiently and write effective step-by-step guides on various computer or mobile-phone issues.
Related Articles
-
How to Unlock iPhone with A Compelete Guide in 2026 🔓📱
![author icon]() Jean/Jan 21, 2026
Jean/Jan 21, 2026 -
How to Factory Reset iPhone in 6 Solutions [Every Way]🎯🎯
![author icon]() Gorilla/Jan 21, 2026
Gorilla/Jan 21, 2026