Since data loss occurs on a daily basis, it's really a good habit to back up your iPhone, iPad, or iPod touch regularly so that you can restore your precious data after accidental data loss happens. Given that, here I'd like to show you how to back up your iPhone on Windows 10 in different ways.
How to Back Up iPhone on Windows 10 Without iTunes
Do you want to view iPhone backup files on Windows 10 whenever you want? Do you want to recover files selectively from a backup when necessary? If you do, the iPhone data transfer and device backup software - EaseUS MobiMover, could meet your needs. The data backup & restore feature enables you to:
- Back up iPhone to computer selectively or all at once
- View the files in the backup
- Restore everything or specific items from the backup
Besides, there are data transfer features that work to transfer files to or from your iPhone, iPad, or iPod. Whether you want to transfer files from PC to iPhone or export text messages from iPhone to computer, it could help you.
To back up iPhone on Windows 10:
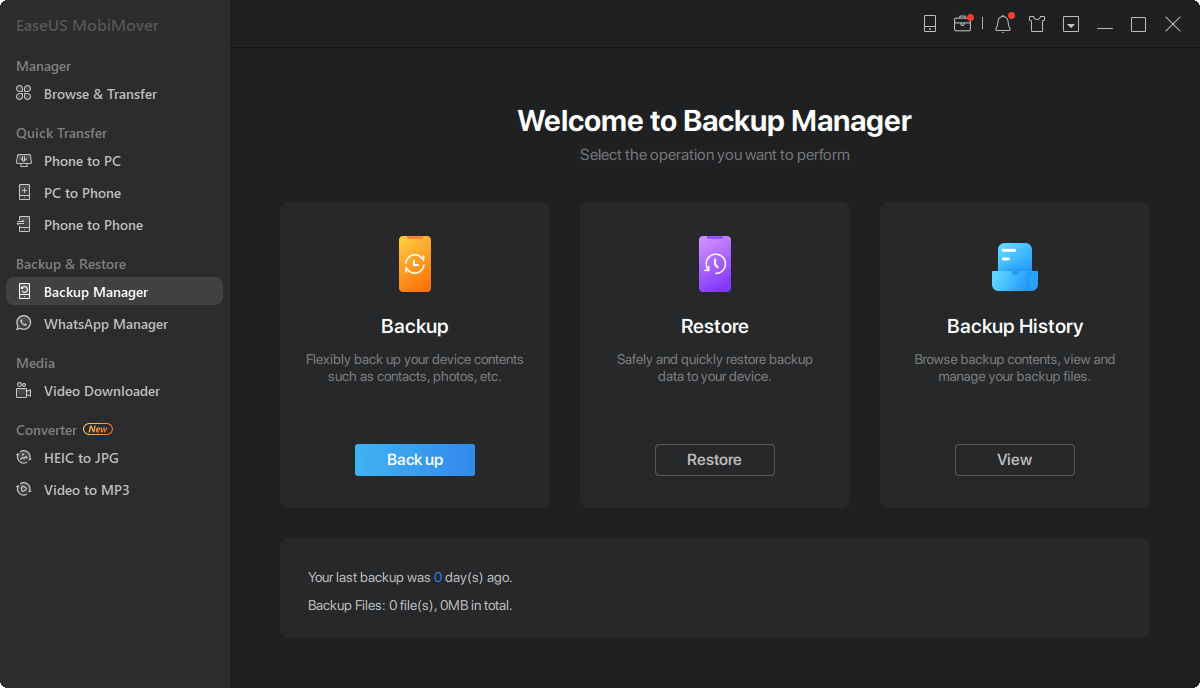
Step 1. Connect your iPhone to the computer and run EaseUS MobiMover. From its main interface, select the "Backup Manager" mode. Then, click "Backup" to proceed to the next stage.
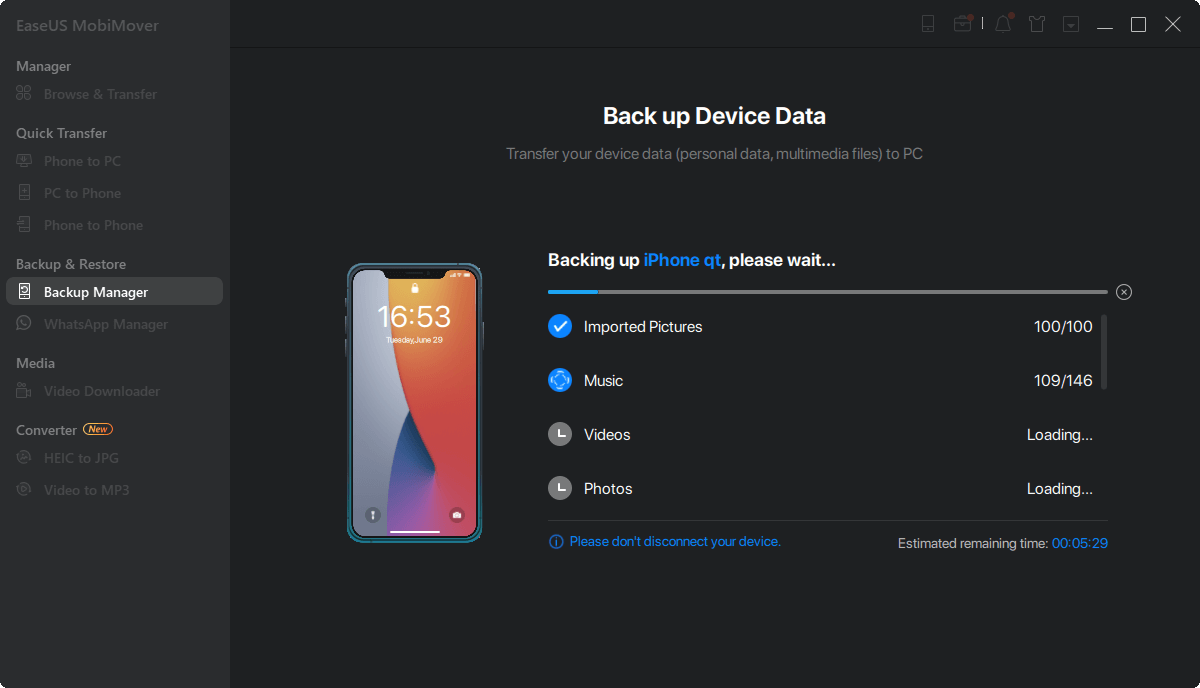
Step 2. You will see all files that are available for backing up. Simply check the box next to the "Select All" to back up all files to computer without iTunes or iCloud. Then, click on the "One-Click Backup" to start the process.
Step 3. Wait for a while and let the software finish data transfer. When it's done, you can restore it to your device whenever you want. But note that this will ease all stuff on your device and replace everything with what's in the backup.
How to Back Up iPhone to Windows 10 with iTunes
When it comes to backing up an iPhone to a computer, the official solution is to use iTunes. iTunes allows you to back up almost everything on your iPhone to the computer. With the backup you made, you will be able to restore your iPhone data or sync everything to another iPhone.
But there are some flaws in backing up iPhones on Windows using iTunes. For example, although you can access the iPhone backup location on Windows, the iTunes backup is unreadable. Thus, you can't access the files in the backup. Besides, when you want to restore data from the backup, you can't choose to recover files selectively, and the existing files on your iPhone will all be replaced by the content in the backup.
If you still want to back up your iPhone with iTunes, read on and follow the steps below to continue.
To back up your iPhone on Windows via iTunes:
Step 1. Connect your iPhone to your computer.
Step 2. Unlock the iOS device and trust the computer.
Step 3. Launch iTunes and make sure your device is recognized by it.
Step 4. Click the "Device" icon and "Back Up Now" to start backing up your iPhone to Windows 10.
![How to back up iPhone to Windows 10 with iTunes]()
After making a backup, many people may want to do more with their iPhone backup. For example, some people want to copy iPhone backup files to an external hard drive. Or some may want to change their iPhone backup location. Whatever you want, here are the steps.
To copy or change iPhone backup files to the external hard drive, you can:
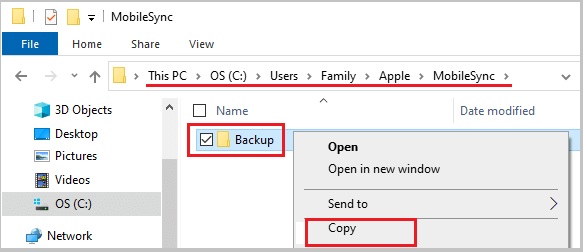
Step 1. Open and create a backup directory named MobileSync in your external drive.
Step 2. Open File Explorer and go to C:\Users\[PC name]\AppData\Roaming\Apple Computer\ MobileSync.
Step 3. Right-click on the current iPhone backup folder and select the "Copy" option.
![Copy backup files]()
Step 4. Head to the new MobileSyc folder you created in your external hard drive (or other location you want to use to house your backup files) and paste the iPhone backup folder there.
Step 5. Go back to the default MobileSync folder and rename the current iPhone backup folder as "Backup (Old)."
If you want to change iPhone backup location to the external hard drive, you should continue to proceed with these steps.
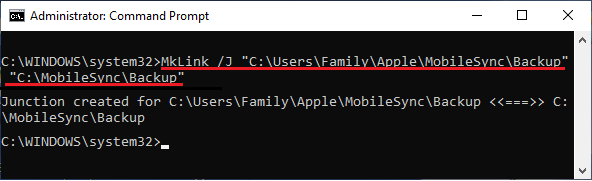
Step 6. Right-click on the Start button and click on "Command Prompt."
Step 7. Type MkLink /J "C:\Users\UserName\Apple\MobileSync\Backup" "C:\MobileSync\Backup" in Command Prompt window.
Step 8. If everything goes properly, you will see a Symlink created in the MobileSync folder. That means your iPhone backup location has been changed.
![Change iPhone backup location]()
How to Back Up iPhone to iCloud
Sometimes you can't back up your iPhone to Windows because your computer can't recognize your iPhone or there is no computer available. In such a situation, you can back up your iPhone without a computer, namely backing up the iPhone to iCloud.
With iCloud, you can back up almost everything on your iPhone, iPad, or iPod. But instead of a computer, iCloud stores the backup in cloud storage. As long as you have enough iCloud storage and a stable Wi-Fi connection, you can back up your iPhone to iCloud immediately.
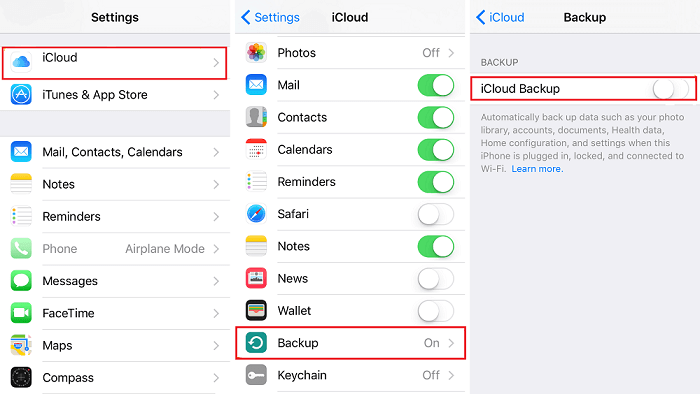
To back up your iPhone to iCloud:
Step 1. Go to the Settings app.
Step 2. Tap your name and click "iCloud."
Step 3. Toggle on "iCloud Backup" and select "Back Up Now."
![How to back up iPhone to iCloud]()
The Bottom Line
These are the common solutions to back up an iPhone on Windows, be it Windows 10, Windows 8, or Windows 7. Since data and settings on your iPhone change frequently, you should make a backup of your iPhone on a regular basis. When unexpected data loss occurs, you can recover data from the backup successfully to avoid complete data loss.
FAQs About iPhone Backup on Windows
The following FAQs can be helpful if you want to learn more about iPhone backup on Windows. Keep reading to know more details.
1. How to view iPhone backup files on Windows 10?
After making a backup to Windows with iTunes, you may want to find and view the backup you just made. But due to iOS limitations, you can't read, edit, add, or delete files stored in your backup even if you find your iPhone backup. Besides, any changes you make to your backup will ruin the backup files. But if you just want to get familiar with the backup path, the following steps might be helpful.
Step 1. In the Search Bar, enter %appdata% or %USERPROFILE%, and press "Enter."
Step 2. Double-click "Apple" or "Apple Computer," select" MobileSync," and then choose "Backup."
Step 3. Then, you will see the backup file you created with iTunes.
2. Can I back up my WhatsApp messages from iPhone to PC?
Of course, you can. There are two options for you to do it. One way is through iCloud, and another is via some third-party transfer tools like EaseUS MobiMover. The main difference between the two approaches is that the former is to make a copy of WhatsApp data locally, and the latter is to back up your WhatsApp data to the cloud. On our previous page, we've introduced how to back up WhatsApp from iPhone to PC in detail. Check it if you want to learn specific steps.
3. How to create an archived backup?
An archived iPhone backup can save your iOS device's current state and prevent it from being overwritten by other backups you made later. Apple usually advises users to create an archived backup before installing a beta iOS in case something goes wrong. You can follow the steps introduced in our guide to back up your data with iTunes and then archive the backup by following these steps.
Step 1. In your iTunes, choose "Preference" > "Devices."
Step 2. Right-click on the backup file and select "Archive. "
Step 3. Then, you'll see the data and a padlock icon next to the backup you archived.
If you're using a Mac computer, you can click "Manage Backups" once the backup completes. Then, right-click on today's backup file and choose "Archive."


 NEW
NEW HOT
HOT