With multiple methods available, transferring files from PC to iPad has been easier. Whether you are moving photos, videos, music, books, or documents, this guide will walk you through seven ways to transfer your files quickly and safely. From USB cable tools to wireless cloud syncing, learn how to move your data between Windows and iPad without hassle.
Transfer Files from PC to iPad with USB
Transfer Files from PC to iPad Wirelessly
How to Transfer Files from PC to iPad via Data Transfer Tool
Supports: Photos, videos, music, notes, ringtones, books (PDF and EPUB), contacts, and more
Transferring files from your PC to your iPad is simple and efficient with EaseUS MobiMover. This tool allows you to quickly and securely add a wide range of file formats to your iPad without overwriting the existing data. With its intuitive interface, MobiMover eliminates complicated syncing processes between different operating systems, allowing you to easily select, preview, and transfer multiple files or entire folders in just a few clicks.
Whether moving media or important documents, EaseUS MobiMover saves you time and effort. What's more, EaseUS MobiMover offers a free version that lets you transfer up to 20 files per day, giving you a risk-free way to test its powerful features.
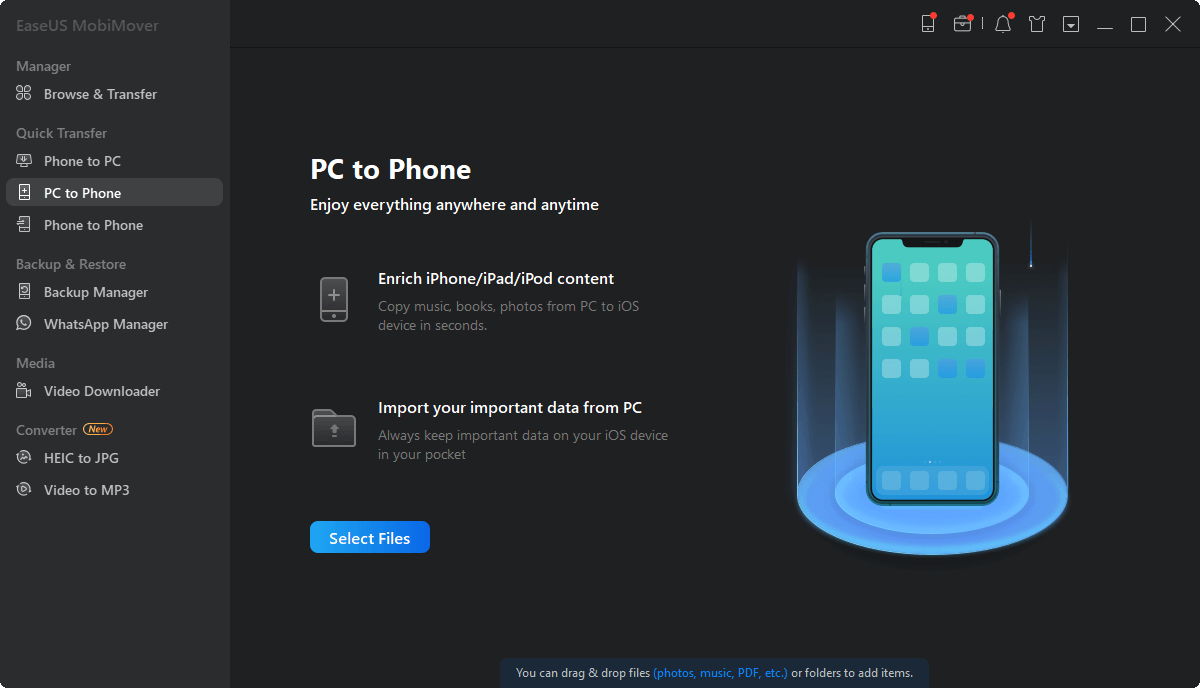
Step 1. Connect your iPad to your PC with a USB cable. Confirm "Trust" on your device when a pop-up prompts and asks you to trust this computer. Open EaseUS MobiMover and navigate to "PC to Phone". You need to click "Select Files" to start.
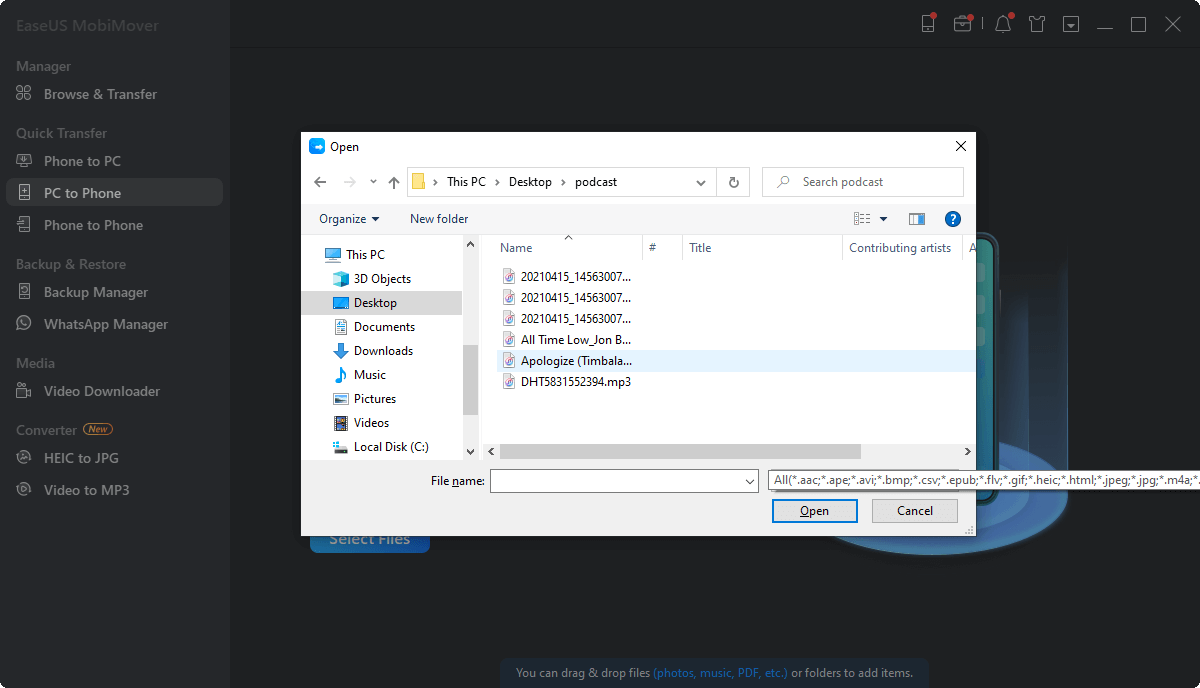
Step 2. Windows File Explorer is now open. Go to browse the files you want to transfer. After choosing the desired files, click "Open".
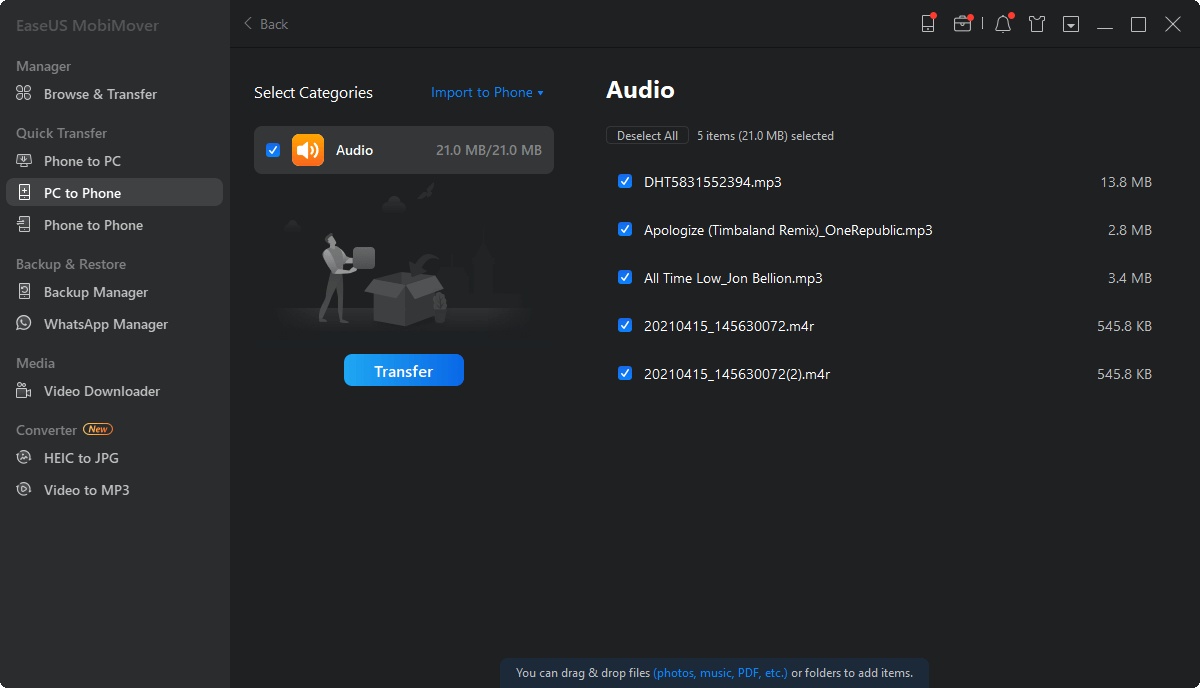
Step 3. You can preview the selected files on the right pane, with their detailed file names and file sizes. To add more items to transfer, you can click "Add Contents" or directly drag files or folders from your PC to the appointed area. Finally, click "Transfer" to start transferring the content from your computer to iPad. Don't disconnect your iPad while transferring. MobiMover enables you to move lots of data at a time without any quantity and size limitation.
Here is a video guide on how to transfer files from PC to iPhone/iPad. If you prefer visual instructions or want to follow along in real-time, this video guides you through the steps effortlessly.
How to Transfer Media from PC to iPad with Windows File Explorer
Supports: Photos and videos
File Explorer on Windows PC provides a straightforward way to transfer files from PC to iPad without iTunes. While it's a convenient solution for media files, File Explorer only supports copying photos and videos, making it unsuitable for transferring other types of content.
Step 1. Connect your iPad to your PC with a USB cable.
Step 2. Unlock your tablet and trust the Windows PC. If asked, enter your iPad password to continue.
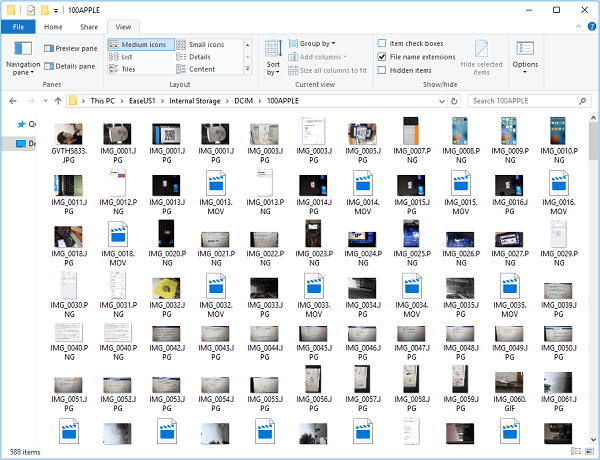
Step 3. Go to "This PC" > [your iPad's name] > "Internal Storage" > "APPLE100" > "DCIM."
Step 4. Copy the photos and videos you want to transfer to your iPad in the folder.
Step 5. Check the transferred items on the Photos app on your iPad.
![How to transfer files from PC to iPad with File Explorer]()
How to Transfer Files from PC to iPad with iTunes
Supports: Photos, videos, music, podcasts, audiobooks, and more
iTunes enables file transfer from PC to iPad in two ways: syncing media like photos, videos, and music, or copying files via apps that support iTunes file sharing. However, syncing with iTunes may overwrite existing media on your iPad, so be cautious when you use iTunes Syncing. Always check if an app supports file sharing before transferring files through iTunes. (Using iTunes is also a proven tip to transfer files from Mac to iPad.)
Option 1. Use iTunes syncing
Step 1. Connect your iOS device to the Windows PC and launch the iTunes window. (You should download the latest iTunes app on your computer.)
Step 2. Unlock your iDevice and trust the computer.
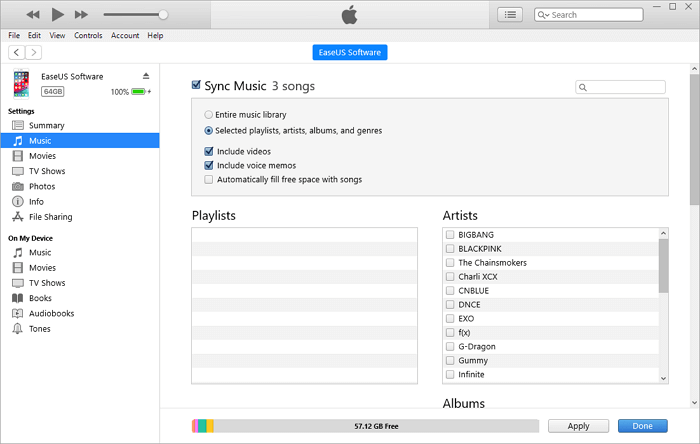
Step 3. Click the iPad icon and choose the category you want to share, including photos, movies, songs, or other types.
Step 4. Check the "Sync [category]" option and select the items you want to copy.
Step 5. Click "Apply" to start transferring files from PC to iPad. Afterward, go to the corresponding app on your iPad to check the items.
![How to transfer files from PC to iPad using iTunes syncing]()
Option 2. Use iTunes File Sharing
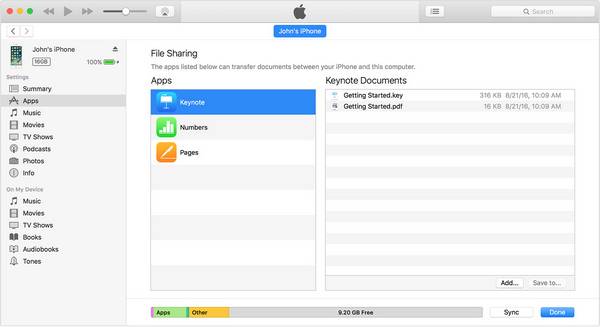
Step 1. Open iTunes and select the app from the list in the File Sharing section.
Step 2. Drag and drop files from a folder to the Documents list, and they'll be imported to your device. You can also click "Add" to find the file or files you want to copy from your computer and then click "Add" to transfer them to your iPad.
![How to copy files from PC to iPad with iTunes file sharing]()
How to Transfer Files from PC to iPad Wirelessly with iCloud
Supports: Photos and videos
iCloud syncs data across all your devices that use the same iCloud account or Apple ID email address. With iCloud enabled, you can upload files from your PC to iCloud and access these items from your iPad. By doing so, you can also transfer photos from Mac to iPad. Since iCloud allows you to share files wirelessly over Wi-Fi, it is a good choice when you have no USB cable.
To share files between your PC and iPad using iCloud, you need to make sure:
- 1. You are using the same Apple ID on your devices.
- 2. There is enough free space in iCloud for you to store the files you want to copy.
Step 1. On your iPad, open the "Settings" app and go to [your name] > "iCloud" > "Photos" to turn on "iCloud Photos."
Step 2. On your PC, upload photos from the PC to iCloud.
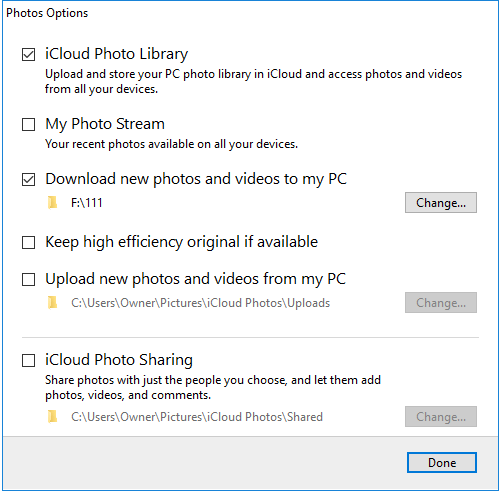
- If you have installed iCloud for Windows, open it and check "Photos." In the new window, select "iCloud Photo Library" and "Upload new photos and videos from my PC". Afterward, copy the photos you want to transfer to your iPad to the "Uploads" folder (Go to "This PC" > "iCloud Photos" > "Uploads" and paste the items here).
![How to transfer files to iPad using iCloud]()
- If you don't have iCloud for Windows, go to iCloud.com, sign in, and choose "Photos." Then, upload photos to iCloud from your PC.
Step 3. Check the photos in the "Photos" app on your iPad.
How to Transfer Files from PC to iPad with iCloud Drive
Supports: Documents including Word, Excel, PowerPoint, PDF, and more
iCloud Drive is a document-oriented file-sharing service under iCloud. With iCloud Drive on, you can share files between your PC and iPhone/iPad over Wi-Fi. Similar to using iCloud Photos, you also need to make sure you are using the same Apple ID on your devices and that there is enough storage available.
Step 1. On your iPad, go to "Settings" > [your name] > "iCloud" and enable "iCloud Drive."
Step 2. On your PC, upload the files you want to transfer to iCloud:
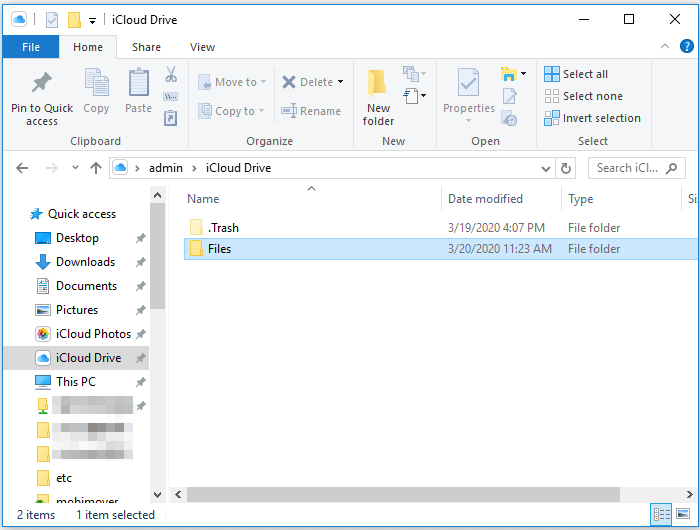
- If you have installed iCloud for Windows, open the settings and enable "iCloud Drive." Afterward, go to "This PC" > "iCloud Drive" and put the files you want to copy in this folder.
![How to upload photos from PC to iCloud via iCloud for Windows]()
- If you didn't install the iCloud control panel, go to the iCloud login page and sign in. Then, choose the "iCloud Drive" option to upload files to iCloud from your PC.
![How to upload PC photos to iCloud via iCloud.com]()
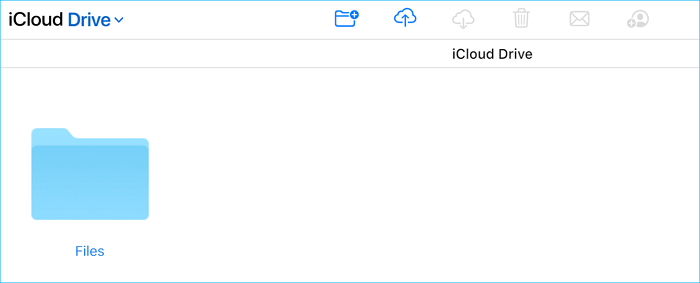
Step 3. After the syncing process. Open the "Files" app on your iPad and click "Browse" > "iCloud Drive" to check the files. You can access these items directly from iCloud or download them to your iPad by clicking the "Download" icon.
How to Transfer Files from PC to iPad with Google Drive
Supports: Documents (DOC, DOCX, PDF, XLSX, PPTX), images (JPG, PNG, GIF), videos (MP4, MOV, AVI), audio files (MP3, WAV, AAC), compressed files (ZIP, RAR), and more
If iCloud Drive is not syncing, you can learn how to fix it first. Other cloud-based services like Google Drive also help file transfer between a PC and an iPhone/iPad with your Google Drive account signed in.
Step 1. Go to the Google Drive website on your PC, and sign in with your account.
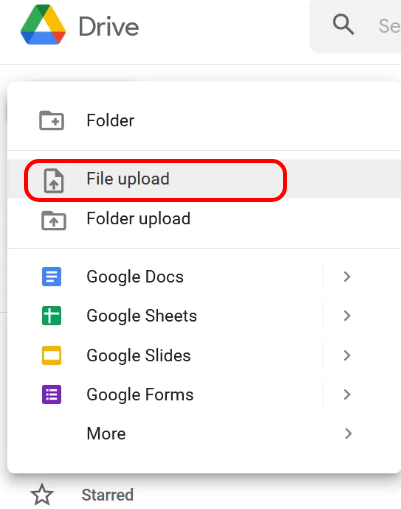
Step 2. Click the New button and choose File Upload or Folder Upload to select the files you want to transfer.
![upload-pc-files-to-google-drive.png]()
Step 3. On your iPad, open the Google Drive and sign in with the same account.
Step 4. Browse the uploaded files and choose to download files for offline access.
How to Send Files from PC to iPad with Email
Supports: Documents (PDF, DOCX, XLSX), images (JPG, PNG, GIF), audio (MP3, WAV), video (MP4, MOV), and compressed files (ZIP, RAR), typically limited by email attachment size (usually up to 25MB)
Email is a simple and quick way to transfer small files from your PC to your iPad without additional apps or cables. While it supports most common file formats, attachment size limits can restrict large file transfers, often requiring alternative methods for bigger files.
Step 1. On your PC, open your email client or webmail and compose a new email.
Step 2. Attach the files you want to transfer (ensure the total size does not exceed your email provider's limit).
Step 3. Send the email to your own email address or an address accessible on your iPad.
Step 4. On your iPad, locate the received email and download the attached files.
FAQs
For more information on how to transfer files from PC to iPad, check the commonly asked questions below.
1. How do I move files from PC to iPad?
The tool you need varies depending on the file type you will transfer. For photos, videos, music, ringtones, contacts, books, and more, you can use iPhone transfer software like EaseUS MobiMover to move files from PC to iPad. While for documents and other file types, using iCloud Drive is a better choice. The former requires a USB cable to work, and the latter only relies on Wi-Fi connections.
2. How do I transfer files from PC to iPad without iTunes?
iTunes is neither the best nor the only choice to transfer files from Windows to iPad. In addition to iTunes, there are iOS data transfer tools, iCloud, and other cloud-based services to help. Take iCloud as an example: upload files from the PC to iCloud, and then turn on iCloud on your iPad. After the syncing process, go to the corresponding app to check the files from your PC.
3. How do I transfer files from PC to iPad via Wi-Fi?
To transfer files in any format from a PC to your iPad wirelessly, iCloud Drive could be the optimal choice. Visit iCloud Drive with a browser, upload the files you want to transfer from your computer to iCloud Drive, and then turn on iCloud Drive on your iPad. When the data syncing process is over, go to the Files app on the iPad and head to Files to check the newly imported files.
Conclusion
In summary, there are multiple effective ways to transfer files from a PC to an iPad, each with its own advantages depending on your needs. Wired methods like MobiMover, USB, and iTunes offer fast, reliable transfers, especially for large files. Wireless options, such as iCloud, iCloud Drive, Google Drive, and Email, provide convenience and accessibility without the need for cables, catering to various file types and transfer volumes. Choosing the right method ensures smooth file management and seamless access to your important photos, videos, documents, and more on your iPad.


 NEW
NEW HOT
HOT