Moving photos from a USB drive to your iPhone or iPad can seem challenging, especially if you want to avoid losing quality. Whether you are switching devices, backing up memories, or simply sharing pictures, there are several ways to transfer photos from a USB to iPhone/iPad. In this guide, you will discover a step-by-step approach, including wired connections, wireless solutions, and cloud-based methods.
| Tips |
Type |
Ease |
Speed |
Compatibility |
Best for |
|
EaseUS MobiMover
|
Wired |
Easy |
Fast |
Windows, Mac |
Direct USB transfer without iTunes |
| iCloud |
Cloud |
Easy |
Moderate |
All Apple devices |
Wireless syncing across devices |
| Email |
Wireless |
Modeeate |
Slow |
Any device with email |
Sending a few photos quickly |
| iTunes |
Wired |
Moderate |
Moderate |
Windows, Mac |
Traditional photo syncing and backup |
| Using Type C hub |
Wired |
Easy |
Fast |
iPhone/iPad with USB-C |
Direct USB access without computer |
How to Transfer Photos from USB to iPhone Directly
To get photos from a USB flash drive to an iPhone without using iTunes, the most popular choice is to use software for iOS data transfer, like EaseUS MobiMover. When you want to transfer files like photos, videos, music, and more between an external storage device (such as a USB flash drive, memory card, and external hard drive) and an iPhone/iPad, you can use EaseUS MobiMover. So, if you are also interested in how to transfer photos from iPhone to an external hard drive, this software is also available.
- Transfer photos safely without overwriting or deleting existing data on your iPhone or iPad
- Do not require an internet connection, so you can move photos quickly without Wi-Fi
- You can choose specific photos or transfer entire photo albums at once
- It includes backup and restore options, HEIC to JPG conversion for photo compatibility
- Download videos from YouTube or other sites to a computer or iPhone/iPad
To transfer photos from USB to iPhone or iPad without iTunes:
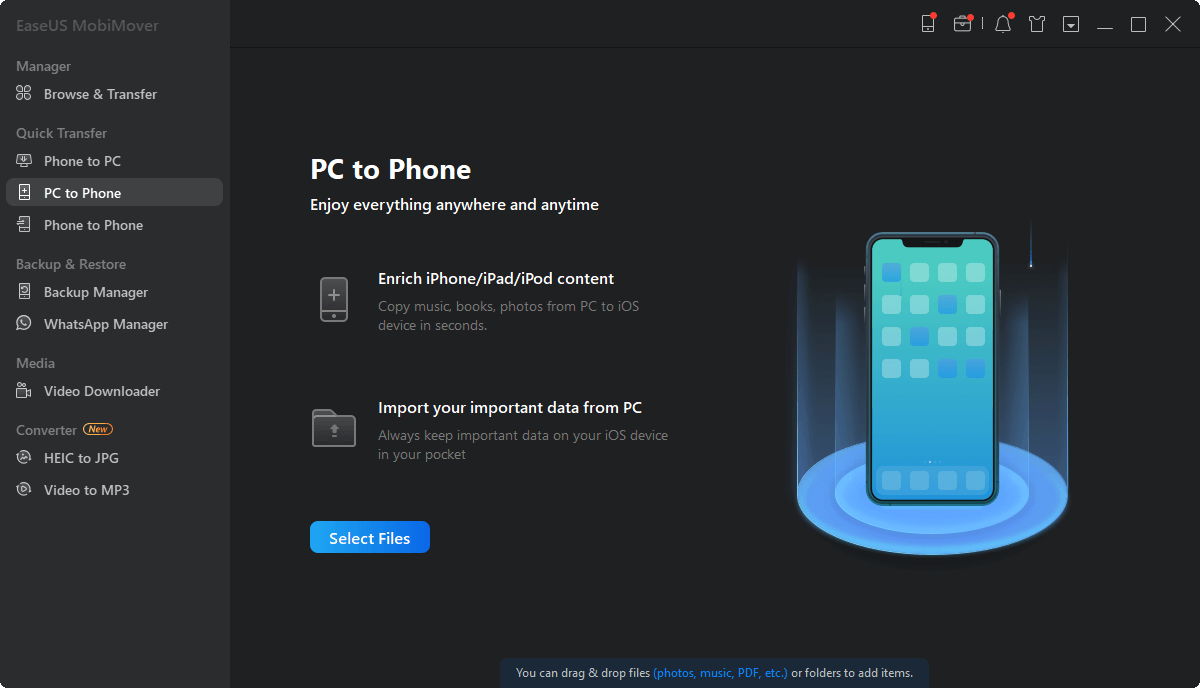
Step 1. Connect your USB and iPhone/iPad to your computer, either Mac or PC. Then launch EaseUS MobiMover > choose "PC to Phone" > click "Select Files".
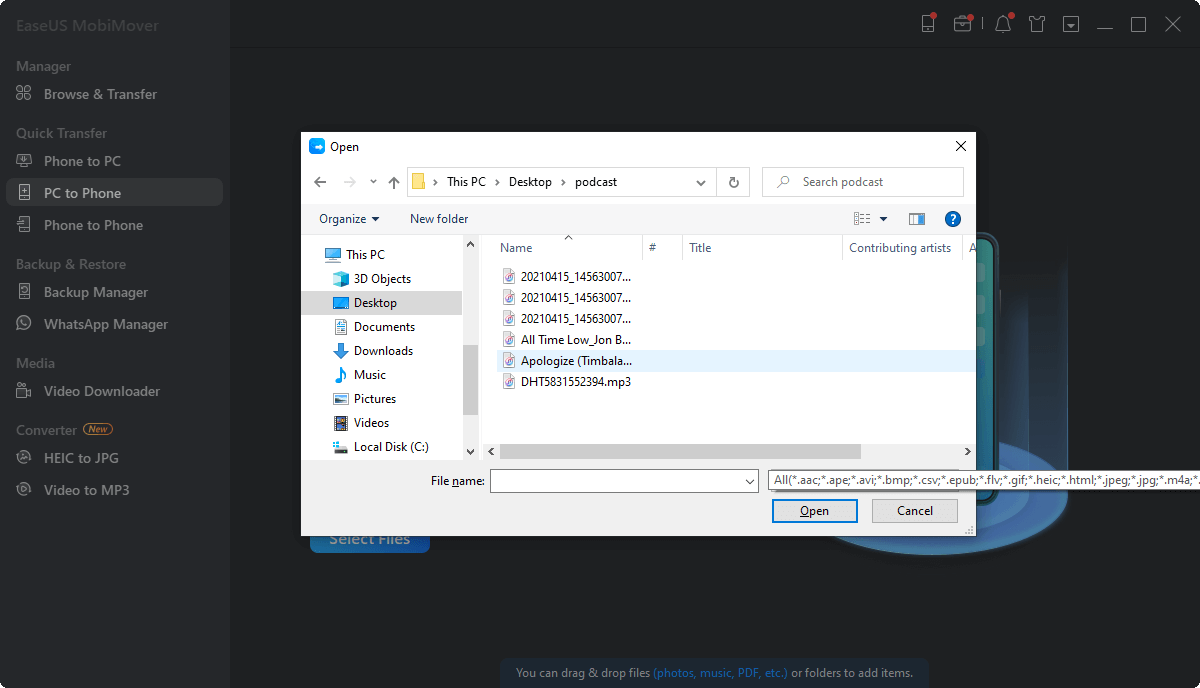
Step 2. Go to your flash drive on the computer to choose images. You can import single or multiple photos to your iPhone or iPad at one time. Then, click the "Open" button to go on.
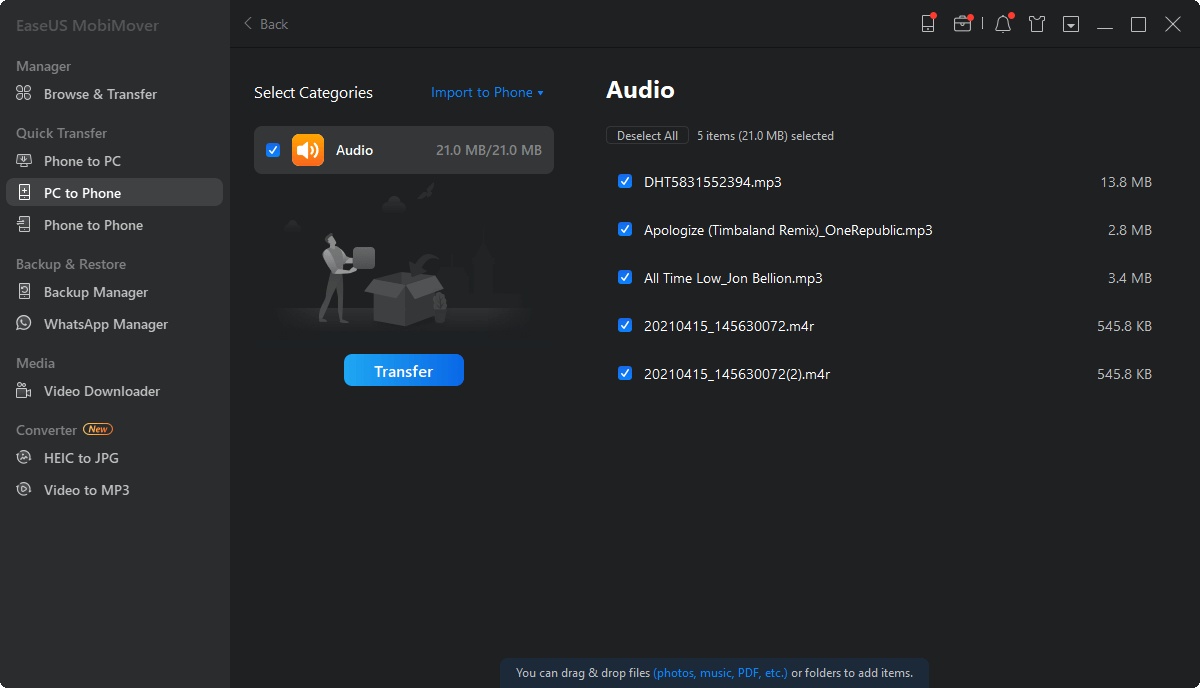
Step 3. If the folder you select contains other files, MobiMover will load all the supported file types automatically. Check the category/categories you want to copy. And click the "Transfer" button to start transferring photos from USB to your iPhone/iPad. When it has finished, go to the "Photos" app on your iOS device to check the items.
If there are other supported items on your USB, you can copy them to your iPhone or iPad with the photos. Without any data loss, you can copy photos from USB to your iOS device with a USB cable. Other than USB flash drives, other storage devices like SD cards, external hard drives, and digital cameras are also supported. Thus, you can also transfer photos from iPhone to SanDisk drives or transfer photos from Canon to iPhone with the help of this iPhone data transfer tool.
Besides, EaseUS MobiMover also allows you to transfer iPhone photos to a computer or an external storage device. That's helpful if you want to make a backup of your precious photos. Apply the steps above to put the pictures to your iPhone/iPad as you want to.
How to Get Photos from USB Flash Drive to iPhone with iCloud
When I say iCloud, I mean all the cloud storage services. Cloud-based services like iCloud, Dropbox, and Google Photos enable you to share files between two devices, including your phone, tablet, and computer. Thus, it's workable to transfer files between a USB flash drive and an iPhone/iPad with the help of a computer using iCloud other services.
iCloud helps you by syncing files across your devices over Wi-Fi. To make it work smoothly, you need to make sure you have signed in to iCloud with the same Apple ID, and there is a stable network connection on your devices.
To transfer photos from the flash drive to iPhone or iPad:
Step 1. Connect the USB flash drive or other external storage devices to your computer with a USB cable.
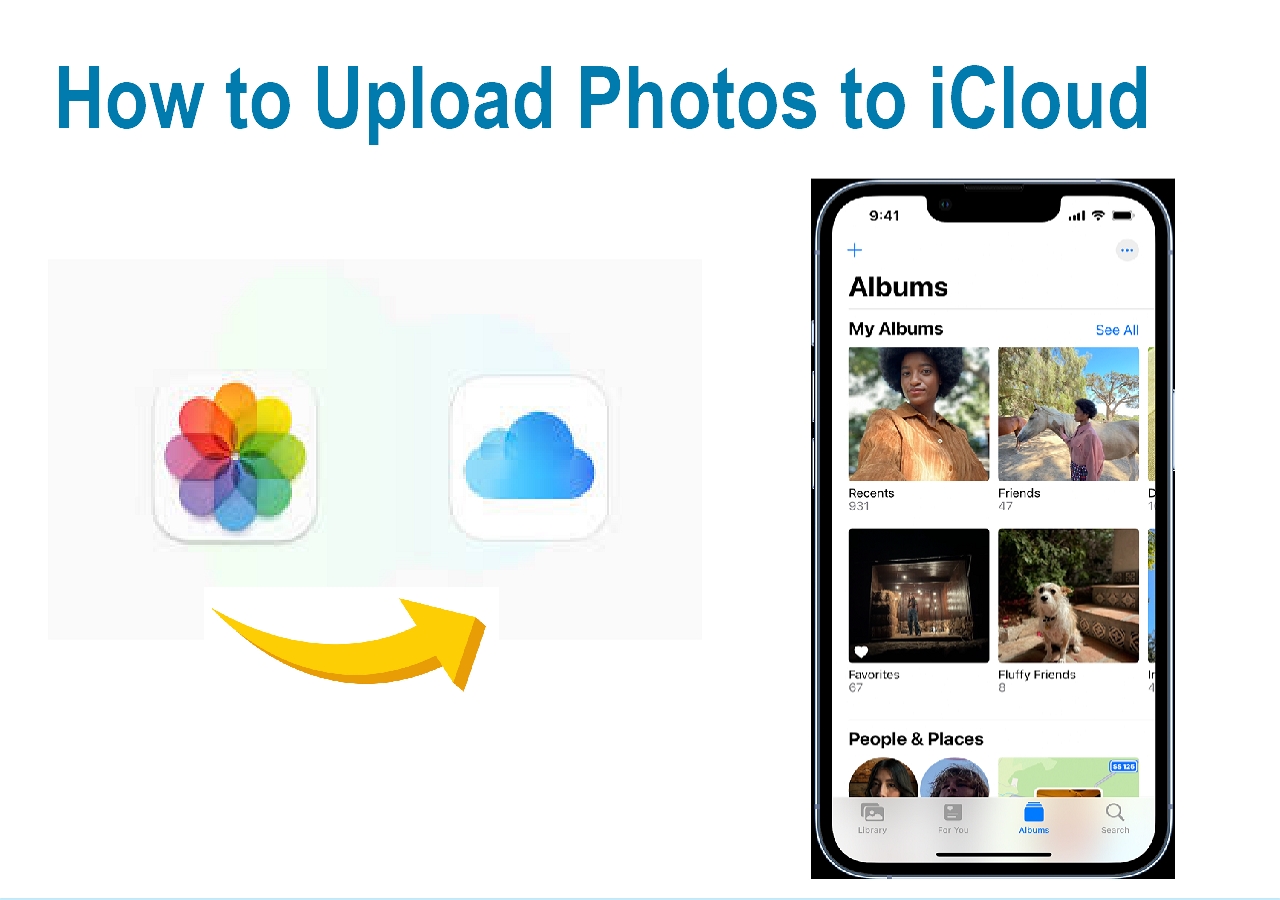
Step 2. Upload photos from USB to iCloud. (These operations are taken on a PC.)
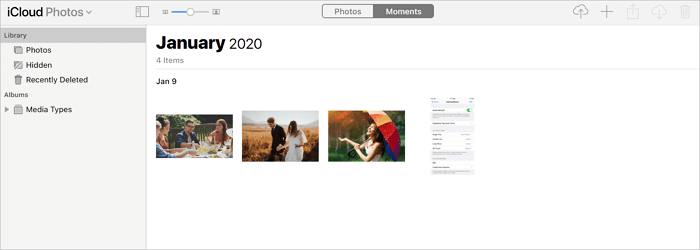
- If you have installed iCloud for Windows, go to "iCloud Settings" > check "Photos" > turn on "iCloud Photo Library" and "Download new photos and videos to my PC". Under the latter option, click "Change" to set the folder as the one on your USB that stores the images you want to transfer.
- If you didn't install iCloud, go to iCloud.com > sign in with the Apple ID you use on your iPhone > choose "Photos" > click the "Upload photos" icon to select the photos on your USB to upload.
Step 3. On your iPhone or iPad, go to "Settings" > [your name] > "iCloud" > "Photos" and turn on "iCloud Photos". It may take a while to finish syncing. When done, you can see the photos shown in the Photos app on your mobile device.
![How to upload photos from USB to iCloud]()
If iCloud photos are not syncing on your iPhone, learn how to fix it from the guide.
Other cloud services work similarly: You first need to download and install the software on your devices, then upload photos to the service from the USB using a computer, and, finally, download the items from the cloud service to the target device.
How to Transfer A Few Pictures from USB to iPhone via Email
Are you looking for a free and easy way to import photos from USB to your iPhone or iPad? If so, why not try email? You can transfer photos to your iOS device wirelessly by sending yourself an email with the photos as attachments. You neither need to connect your iPhone to the computer nor download any software.
Step 1. Create an email and add the photos you want to transfer as attachments.
Step 2. Send the email to your account.
Step 3. Check the email on your iPhone or iPad and download the attachments to your device.
Convenient as it is, it's not advisable to transfer lots of pictures using this way because that's time-consuming. However, if you just have several items to copy, using an email is a good choice.
Further reading: How to Transfer Files from Phone to USB Without Computer
How to Transfer Photos from USB to iPhone Using iTunes
If data syncing is acceptable for you, you may prefer to import photos from USB to your iPhone using iTunes.
Important Notes:
- If you use iCloud Photos, the Sync Photos option in iTunes will be disabled because photos sync automatically via iCloud.
- iTunes syncing may overwrite existing synced photos on your iPhone, so back up important data before proceeding.
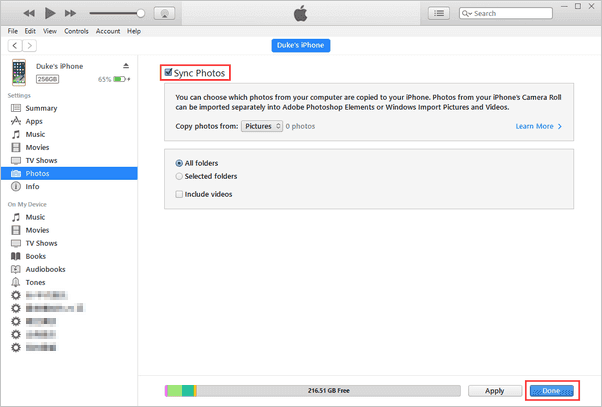
To transfer photos from a flash drive to iPhone/iPad using iTunes:
Step 1. Connect your USB drive to your computer and copy the photos you want to transfer into a folder on your PC or Mac.
Step 2. Run iTunes on your computer. If you don't have it installed, download and install the latest version.
Step 3. Connect your iPhone to your computer using a USB or USB-C cable.
Step 4. Click the "Device" tab and select "Photos". Check the box for "Sync Photos."
Step 5. From the dropdown menu next to "Copy photos from," choose the folder where you saved the photos from your USB drive.
Step 5. Click "Apply" to start syncing photos from the USB flash drive to your iPhone or iPad.
![How to transfer photos from USB to iPhone using iTunes]()
How to Transfer Photos from USB to iPhone Without Computer
If your USB flash drive is equipped with a Type C hub, which means the USB device is compatible with your iPhone, you can transfer photos directly from the USB flash drive to your iPhone without a computer. You only need to download and install an app that supports data sharing on your iPhone.
The app you need varies depending on the USB flash drive you use. For example, if you are using a SanDisk iXpand flash drive, you will need to download and install the iXpand Drive app on your iOS device.
Luckily, no matter which app you have, the steps to transfer photos from USB to iPhone are similar. The general steps to transfer photos from USB to iPhone without a computer:
Step 1. Download and install the data transfer app on your iPhone.
Step 2. Connect the USB flash drive to your iPhone directly.
Step 3. When you see the options to transfer data, select to copy files from the USB.
Step 4. Select the type of content you want to transfer, namely photos in this case.
Step 5. Select the pictures you need to copy and click "Copy to iPhone" to move photos from USB to iPhone.
![How to transfer photos from USB to iPhone via iXpand Drive]()
The Bottom Line
These are the five proven ways to transfer pictures from USB to iPhone or iPad. Whether you want to use iTunes or not, you can find the solution you need. For you to make a better decision:
- EaseUS MobiMover is reliable for transferring large photo batches without risking data loss.
- iCloud offers wireless convenience, but it depends on internet speed and storage limits.
- Email is best for quick, small transfers, but impractical for many photos.
- iTunes syncing is a traditional method, but it risks overwriting data.
- Type C Hub allows direct USB connection to iPhone/iPad but needs compatible hardware and apps.
Carry out the one that is best suited to your needs to get the photos to your iPhone immediately.
FAQs
1. How to transfer photos from iPhone to computer without USB?
If there is no USB available, you can use some cloud services like iCloud or Google Photos. To do this, you just need to upload your photos to such cloud services, sign in to such services on your computer, and then download the synced pictures.
2. How do I transfer files from Windows to iPhone?
You can transfer files from Windows to iPhone via iTunes or iPhone data transfer software or cloud services. Each solution has pros and cons. You can select the right one depending on your specific requirements.
3. How to transfer music from USB to iPhone without a computer?
You can transfer music from a USB to an iPhone without a computer via Cloud services like Dropbox, Amazon Music, Google Play Music, and more. All you need is to have such a cloud service installed on your computer and your iPhone, connect your USB to your computer and upload files from your computer to the USB. Then, open such a service on your iPhone and check the synced data. For more details, you can check our previous guide to transferring music from USB to iPhone.


 NEW
NEW HOT
HOT