📌 Quick Answer: Best Apps to Transfer Photos from iPhone to PC
- Best overall: EaseUS MobiMover (USB, free & paid)
- Best wireless (Apple): iCloud (free up to 5GB)
- Best wireless (Google): Google Photos (free up to 15GB)
- Best auto-upload: Dropbox (2GB free, background sync)
- Built-in tools: Windows Photos App, File Explorer
- Traditional sync tool: iTunes (wired, less flexible)
👉 Choose based on: USB or wireless, storage limits, and whether you need original quality or selective transfer.
Looking for the best app to transfer photos from iPhone to PC or transfer files from iPhone to PC? This guide covers top free and paid options to help you quickly move, copy, or import photos (and even videos) from your iPhone to your Windows PC or laptop. Each app has some unique attributes. The article will also outline these specific apps for transferring photos from iPhone to PC.
1. Best Free App to Transfer Photos and Videos from iPhone to PC - EaseUS MobiMover
If you're looking for powerful yet beginner-friendly software to transfer photos from iPhone to PC, EaseUS MobiMover is one of the best choices. This iPhone to PC photo transfer app connects your iOS device to your computer using a USB cable, ensuring faster speeds without Wi-Fi than wireless options like iCloud or Google Photos.
You can preview all photos and folders to choose exactly what you want to transfer (such as individual pictures, entire albums, or even videos and voice memos), avoiding duplicates or unwanted files. Additionally, the tool preserves original image quality, transferring photos in full resolution without losing quality.
The interface is clean and intuitive. Whether you're tech-savvy or a complete beginner, you'll find it easy to move photos from iPhone to laptop in just a few clicks. The pro version allows you to transfer up to 10 files per day for free, perfect for occasional use.
Click below to try the free app to transfer photos from iPhone to PC for free!
| 😄Pros |
☹️Cons |
- Fast and stable transfers via USB, no need for internet or Wi-Fi
- Free version available (transfer up to 10 files per day)
- Lets you preview images, select by album or category
- Transfers not just photos, but also videos, messages, contacts, and more
- Works on both Windows PC and Mac
|
- Requires a USB connection—no wireless or cloud sync
- Free version has a daily file limit
- Doesn't support automatic syncin
|
Here's how to transfer photos/videos from iPhone to PC or laptop via MobiMover:
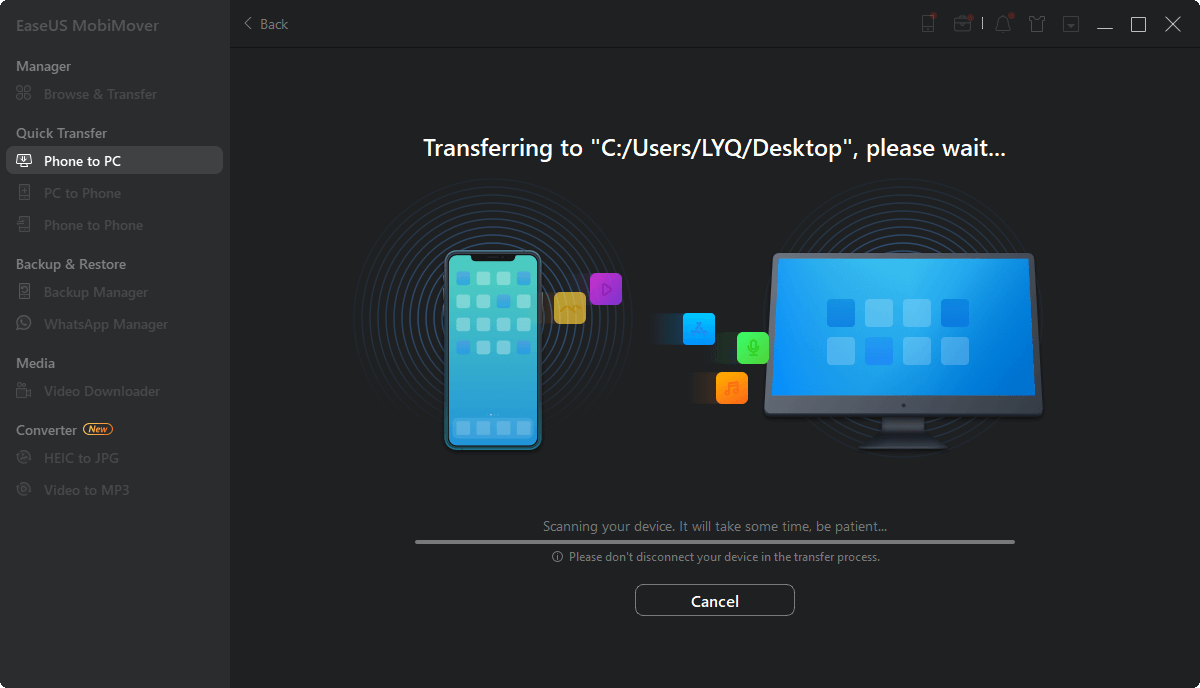
Step 1. Connect your iPhone to your computer running Windows 7 and later or Mac OS X 10.7 and later. Launch EaseUS MobiMover, choose "Phone to PC" on the main screen and click the "Next" button to move on.
Step 2. Select the "Pictures" category as you want to copy from your iPhone to your computer. It's the right choice for you to transfer other supported file types together with photos from your iPhone to the computer to make a backup.
Step 3. Click the "Transfer" button to start transferring photos from your iPhone to the computer. Depending on the size of the files, it may take seconds or a while to import pictures from your iPhone to your computer. Wait patiently for the process to finish and check the items in the selected folder after that.
Beyond photos, MobiMover also enables you transfer other content such as videos, contacts, messages, notes, music, audio and more—making it a versatile solution for iPhone to PC transfers.
2. Wirelessly Download iPhone Photos to PC via iCloud
Apple's iCloud is a great app to transfer photos from iPhone to laptop wirelessly. Download the iCloud app on your PC (or go to iCloud.com) and enable it on your iPhone. Also, ensure you have a stable Wi-Fi connection and enough storage on your iCloud.
Unlike apps such as EaseUS MobiMover, iCloud doesn't allow you to preview or selectively transfer files by album or file type. You can only download photos one by one or in limited batches via the browser interface.
| 😄Pros |
☹️Cons |
- No cables required—fully wireless transfer
- Syncs photos automatically across all Apple devices
- Easy to use and integrates directly with the iOS Photos app
|
- Only 5GB of free storage—paid upgrade needed for larger libraries
- Transfer speed depends on Wi-Fi quality
- No file preview or selective album import
|
Step 1. Use your Apple credentials to sign into iCloud on your iPhone.
Step 2. Next, go to Settings on your iPhone and tap on your device name. Tap on "Photos," then enable "iCloud Photo Library." This will sync your iPhone photos to iCloud.
Step 3. Go to your PC and launch the iCloud Control Panel.
Step 4. Click on "Options."
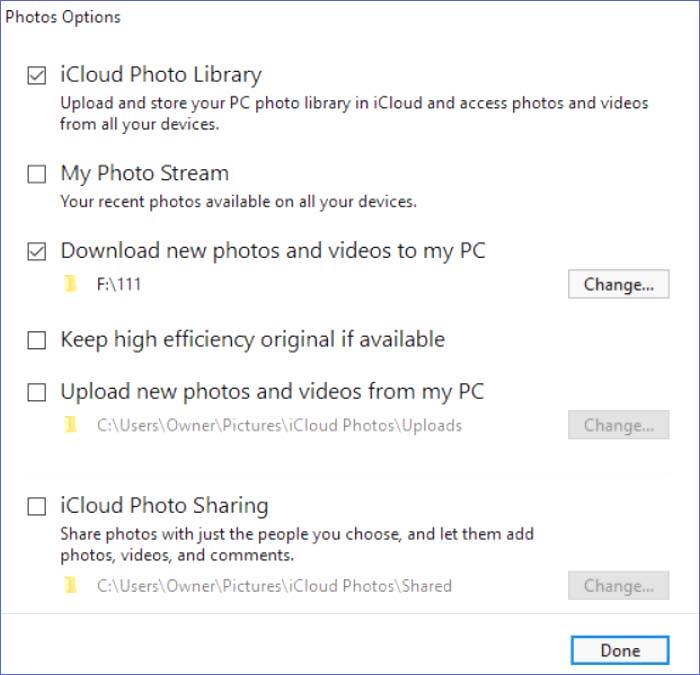
Step 5. Check the box for "iCloud Photo Library." Repeat the same for the "Download new photos and videos to my PC" checkbox and click "Done."
Step 6. Go to your PC's default storage for downloads, and you'll find your iPhone photos downloaded there.
![move photos with iCloud]()
You can transfer photos from PC to iPhone using the same method: upload photos to iCloud from PC first and then sync photos from iCloud to your iPhone.
3. Free Cloud App to Move iPhone Photos to PC – Google Photos
If you're looking for a free and wireless solution to move photos and videos from your iPhone to your PC, Google Photos is one of the most accessible and widely used options. It allows you to back up your iPhone photos over Wi-Fi, and then access or download them from any browser on your PC—without using a USB cable. Google Photos has free storage of up to 15GB you can utilize.
Google Photos remains a popular, free photo transfer app that balances simplicity, accessibility, and cross-device compatibility, especially for users already embedded in the Google ecosystem.
| 😄Pros |
☹️Cons |
- Allows selective preview and download from browser
- Completely wireless and cable-free
- Cross-platform access—works on iOS, Android, and any PC or Mac
|
- May compress photos unless set to original quality
- Requires strong Wi-Fi for smooth transfers
- You need to pay for extra storage once you exceed 15GB.
|
Here's how to use the Google Photos app to transfer photos from iPhone to PC:
Step 1. Download, install, and open the Google Photos app on your iPhone.
Step 2. Use your Google credentials to log into your account.
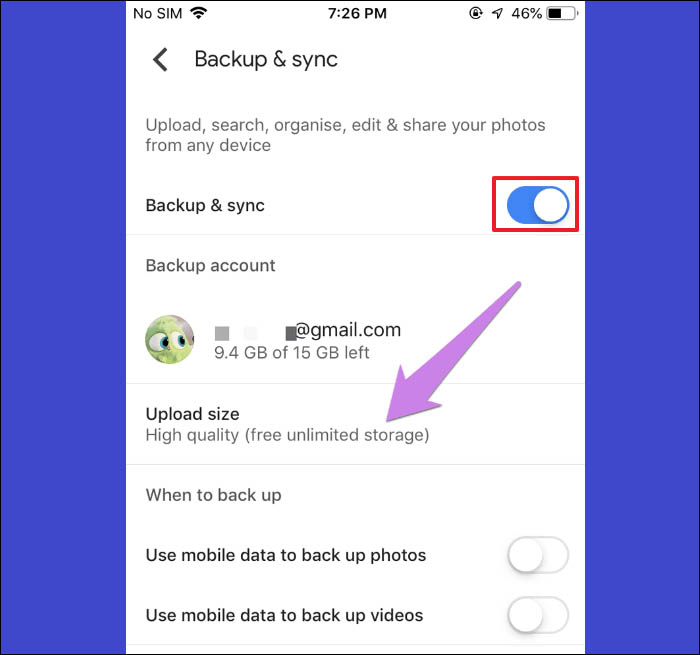
Step 3. Next, go to Settings and select "Backup & Sync," then enable it on the next screen that appears. Choose the "High Quality" upload size option. This will sync photos from your iPhone to Google Photos.
Step 4. Next, open the browser on your PC and visit the Google Photos website. Sign in to your Google account using the same login credentials you used on your iPhone.
Step 5. When Google Photos opens, select the photos you want to transfer to your PC.
Step 6. Once done, click "More" and select "Download." The system will then download the selected photos to your default storage location.
![backup & sync]()
4. Auto-Upload and Transfer iPhone Photos to PC with Dropbox
Dropbox offers a reliable and cross-platform way to transfer photos and videos from iPhone to PC, especially if you prefer wireless syncing and cloud storage. With its built-in Camera Upload feature, Dropbox can automatically import new photos from your iPhone to the cloud, where they're instantly accessible on your PC—no USB cable required.
Dropbox's free plan offers 2GB of storage, which is smaller than Google Photos or iCloud but still enough for occasional transfers. If you need more space, you may need a paid plan.
| 😄Pros |
☹️Cons |
- Fully wireless photo and video transfer
- Automatic uploads, real-time syncing
- Keeps original image and video quality
- Supports both manual and automatic downloads
- Allows background syncing, no need to open the app
|
- Only 2GB of free storage
- Relies on internet speed for both upload and download
- Doesn't preserve iPhone album organization
- No cable-based backup option for offline use
|
Follow the steps below to use Dropbox:
Step 1. Install the latest Dropbox version on your iPhone and Windows computer.
Step 2. On the iPhone device, open the Dropbox app and go to Settings.
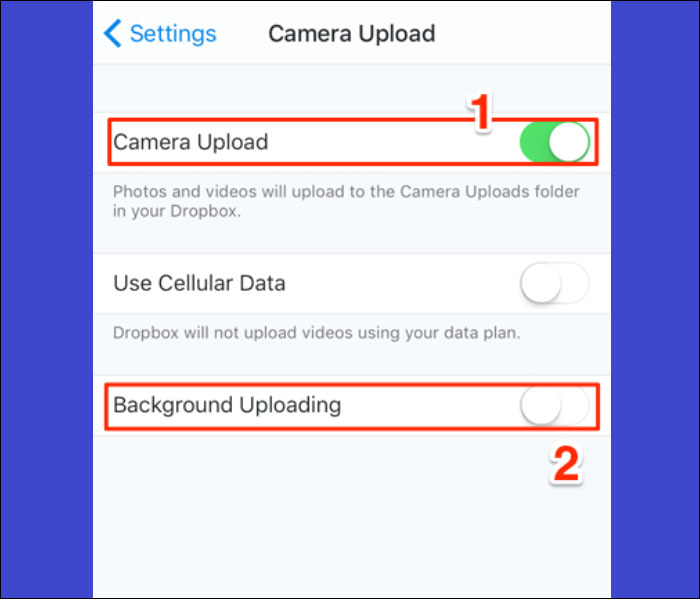
Step 3. Navigate to "Camera Upload" and turn it on. Also, enable the button for "Background Uploading."
Step 4. Next, go to your Windows computer and open Dropbox. There, you will see the photos you synced from your iPhone.
![turn on camera Upload]()
5. Transfer and Sync iPhone Photos to PC Using iTunes
iTunes remains a viable tool for users who want to sync iPhone photos to a Windows PC using a wired connection. Unlike cloud-based apps, iTunes transfers your content offline via USB, which can be faster and more secure in poor network connections.
Unlike apps like EaseUS MobiMover, iTunes doesn't allow you to preview or selectively choose individual photos within the app—you can only sync by full albums or folders. And, iTunes sync is one-directional and will overwrite any previously synced photo content on your PC, which may lead to data loss if not managed carefully.
| 😄Pros |
☹️Cons |
- Offline and cable-based transfer—no Wi-Fi required
- Familiar interface for long-time Apple users
- Preserves original quality photos
|
- No preview or file-level selection—only full album/folder sync
- May overwrite existing PC photos
- Doesn't support video, voice memo, or other media import from iPhone
|
Here are the steps to transfer photos from iPhone to PC using iTunes:
Step 1. Download and install the latest iTunes app on your PC.
Step 2. Using a USB cable, connect your iPhone to the PC and open iTunes.
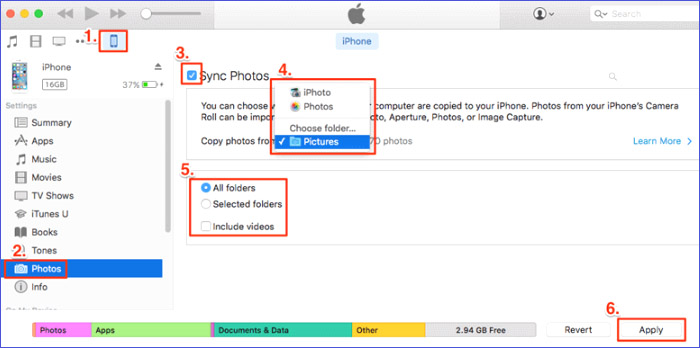
Step 3. Click on your iPhone from the iTunes window to "Photos."
Step 4. Check the option for "Sync Photos." Next, select "All photos and album," then hit the Apply button.
Step 5. Be patient until the syncing process finishes. Next, click on the Done button. Your iPhone photos have now synced to your computer. Open the iTunes library to view them!
![use iTunes to sync photos]()
6. Copy and Import iPhone Photos to Windows PC via File Explorer
File Explorer is a built-in tool in Windows that lets you copy, import, move, or open photos from your iPhone to your PC—no additional app needed. You can connect your iPhone to the PC using a USB cable and access photos using File Explorer.
| 😄Pros |
☹️Cons |
- Fully free and built into all versions of Windows
- Supports direct file browsing and selection
|
- Folder structure can be confusing (files spread across DCIM subfolders)
- No photo preview before copying
- Cannot transfer albums or preserve metadata
|
How to Transfer Photos from iPhone to PC via File Explorer:
Step 1. Connect your iPhone to your Windows PC using a USB cable.
Step 2. On your iPhone, when prompted, tap “Trust This Computer.”
Step 3. Open File Explorer on your computer and locate “Apple iPhone” under “Devices and Drives.”
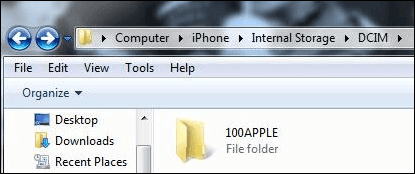
Step 4. Double-click the iPhone icon and navigate to: Internal Storage > DCIM. This is where your iPhone stores photo and video files.
Step 5. Select the folders or images you want to transfer. Then, copy and paste or drag them into a folder on your PC.
![access iPhone photos via PC]()
You can also open photos directly from File Explorer, or move files in bulk to an external hard drive or another local folder.
7. Transfer iPhone Photos on PC via Windows Photos App
If you're looking for a free and easy way to import photos from iPhone to your PC, the built-in Photos app on Windows 10/11 is a convenient solution. It lets you preview, select, import, and organize your iPhone photos directly on your computer. It allows you to browse, share, edit, and transfer your favorite photos to a PC easily.
| 😄Pros |
☹️Cons |
- Built into Windows—no installation required
- Supports photo previews before importing
- Lets you import selected or all images/videos
- Allows easy management, editing, and categorization
|
- Requires USB connection (no wireless support)
- May not detect all folders if iPhone is locked or disconnected
- Doesn't support iCloud-synced photos unless downloaded locally
|
How to Use the Windows Photos App to Import iPhone Photos:
Step 1. Connect your iPhone to your Windows PC using a USB cable.
Step 2. Unlock your iPhone and tap “Trust” when prompted.
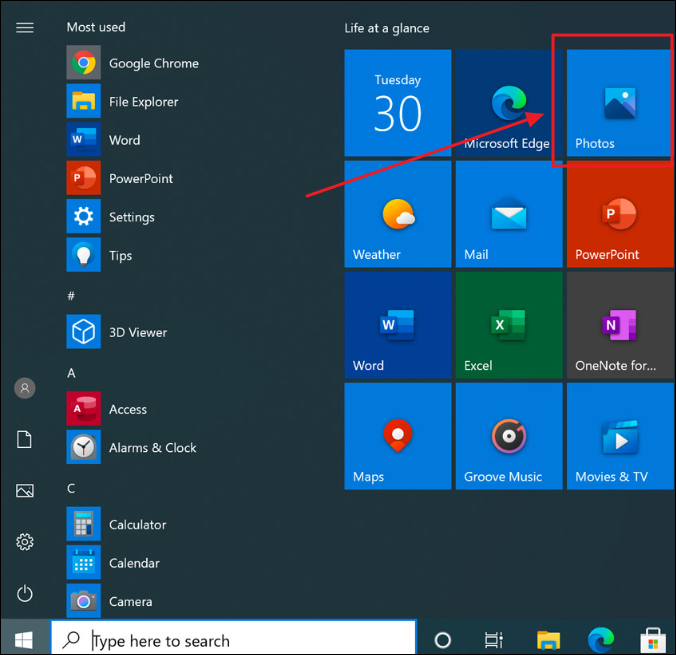
Step 3. On your PC, launch the Photos app (you can search “Photos” from the Start Menu).
Step 4. Click on the “Import” button in the top-right corner, then choose “From a connected device.”
Step 5. Your iPhone will appear as a source. The app will scan your device and display all photos and videos available for import.
Step 6. Select the files you want to move, then click “Import Selected.” You can also choose the destination folder before importing.
![import iPhone photos via Windows Photos app]()
The Photos app allows you to preview and sort images by date, which makes it easy to manage large volumes of photos. Once imported, you can edit, tag, or organize your photos right within the app.
The Bottom Line
To transfer iPhone photos to a PC, you can choose between USB tools like File Explorer and Photos App or wireless apps like iCloud and Google Photos. For the best mix of speed, control, and original quality, we recommend EaseUS MobiMover. It lets you preview, select, and transfer photos and other files easily—even with the free version. Pick the method that best fits your storage, connection, and photo management needs.
This transfer tool is free, versatile, and easy to use. If you choose the pro version, you can transfer unlimited photos, while the free version allows you to transfer up to 20 photos daily. Ensure you download and install EaseUS MobiMover today to enjoy a seamless transfer of photos from iPhone to PC.
FAQs on App to Transfer Photos from iPhone to PC
Here are commonly asked questions about the best apps to transfer photos from iPhone to PC
1. How Do I Transfer Photos from iPhone to iPhone for Free?
You can achieve that using a third-party tool called EaseUS MobiMover. You'll just need to download, install, and launch a free version of the tool on your computer. Next, connect both iPhones via USB, then click on the option for Phone to Phone transfer.
2. Can I Merge Photos from 2 iCloud Accounts?
Yes, you can merge photos from 2 iCloud accounts. When you turn off sync, you can save photos on your iPhone. Next, you can merge the photos on your iPhone to a new iCloud account.
3. How to Transfer Photos from iPhone to Mac?
If you're using a Mac computer, apps like Image Capture and the Photos App are available to help you transfer photos from iPhone to Mac computer or laptop.
Option 1. Image Capture
Image capture allows you to transfer photos from your iPhone to a PC and store, select or edit them as you wish. The features in the image capture app allow you to increase or decrease the size of your image thumbnails. You can also rotate the pictures in any direction and as many times as you like.
Option 2. The Photos App
After connecting your iPhone to your Mac computer, open the Photos App, and you'll see your photos. You can download them on the computer and use the search feature to find photos. If you don't want people to see some of your photos, the app enables you to hide and keep them away from common areas.


 NEW
NEW HOT
HOT