"I have taken about 100 live photos. Short of taking a screenshot of each one, how do I make them jpeg images when I transfer them to my PC?"
Do you have the same requirement as the user mentioned above? If you do, this guide will explain two straightforward methods to convert live photos to still, convert Live Photos to JPG, or convert iPhone photo to JPG.
Now, let's start with converting Live Photos to still photos.
| Tool |
Effectiveness |
Recommended Index |
| Photos App |
Turn off the Live feature within the Photos app to take a JPG photo. |
⭐⭐⭐ |
| A Photo Converter |
Great helper in converting hundreds of photos to JPG. |
⭐⭐⭐⭐⭐ |
How to Convert Live Photos to Still Photos
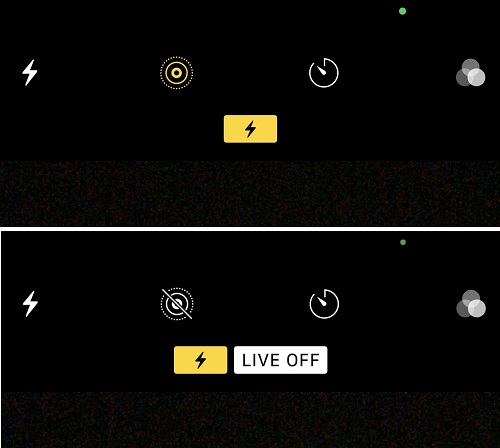
Apple allows you to make a Live Photo still directly within the Photos app. Here are the steps:
Step 1. Open the Live Photo in your Photos app.
Step 2. Tap "Edit" in the upper-right corner.
Step 3. Tap the Live button at the top of the screen to turn off the Live feature.
![Turn off live photos]()
Tips: If you want to set a key photo, move the white frame on the frame viewer, tap "Make Key Photo," then tap "Done." If you want to trim a Live Photo, drag the end of the frame viewer to choose the frame you want.
How to Convert Live Photos to JPG with EaseUS MobiMover
From the above, you can see that converting a Live Photo to a still photo is quite simple. But here's a problem: what if you have hundreds of photos to convert? That must be very time-consuming if you stick to the traditional converting way. In that case, a quicker and simpler solution is to utilize this picture converter and iPhone data transfer software - EaseUS MobiMover.
With this program, you can directly convert all photos to JPG by transferring pictures to your PC or Mac. The process won't compress the quality of your photos. More importantly, it supports batch-transferring pictures, which would be great if you have hundreds of live photos to convert. Other than that, you can also transfer albums to your Mac or PC with this program.
To convert Live Photos to JPG:
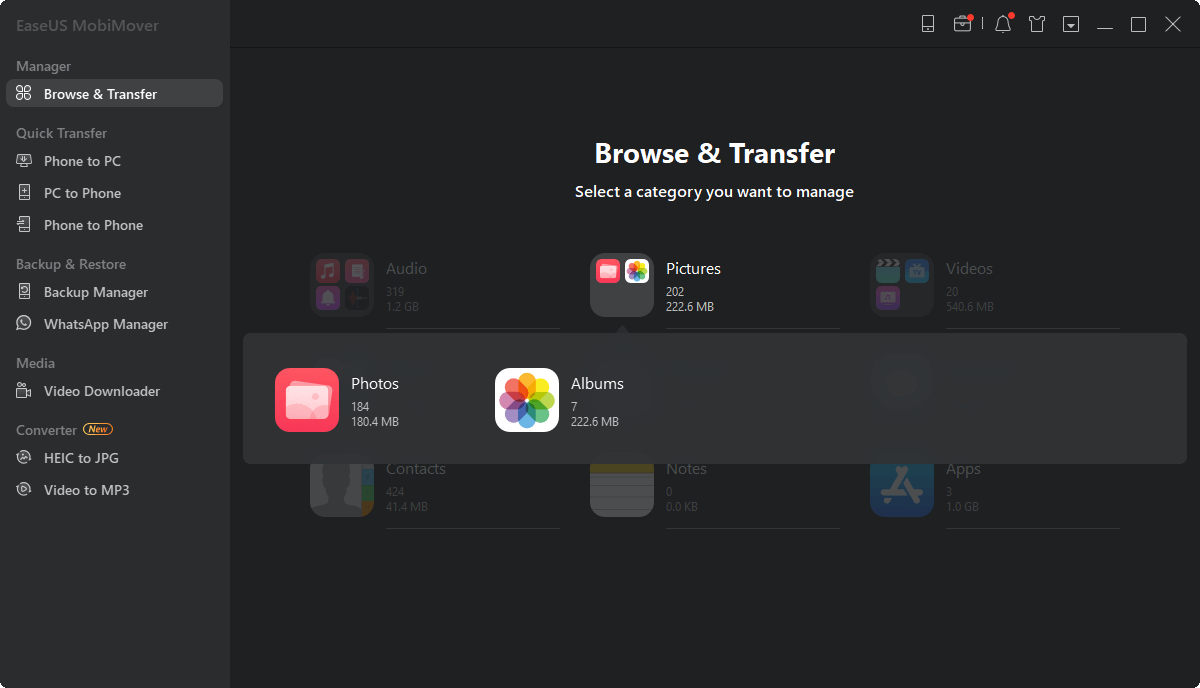
Step 1. Connect your iPhone to your computer and launch EaseUS MobiMover. Choose "Browse & Transfer" on the left side panel, select "Pictures," and then select "Photos" to proceed.
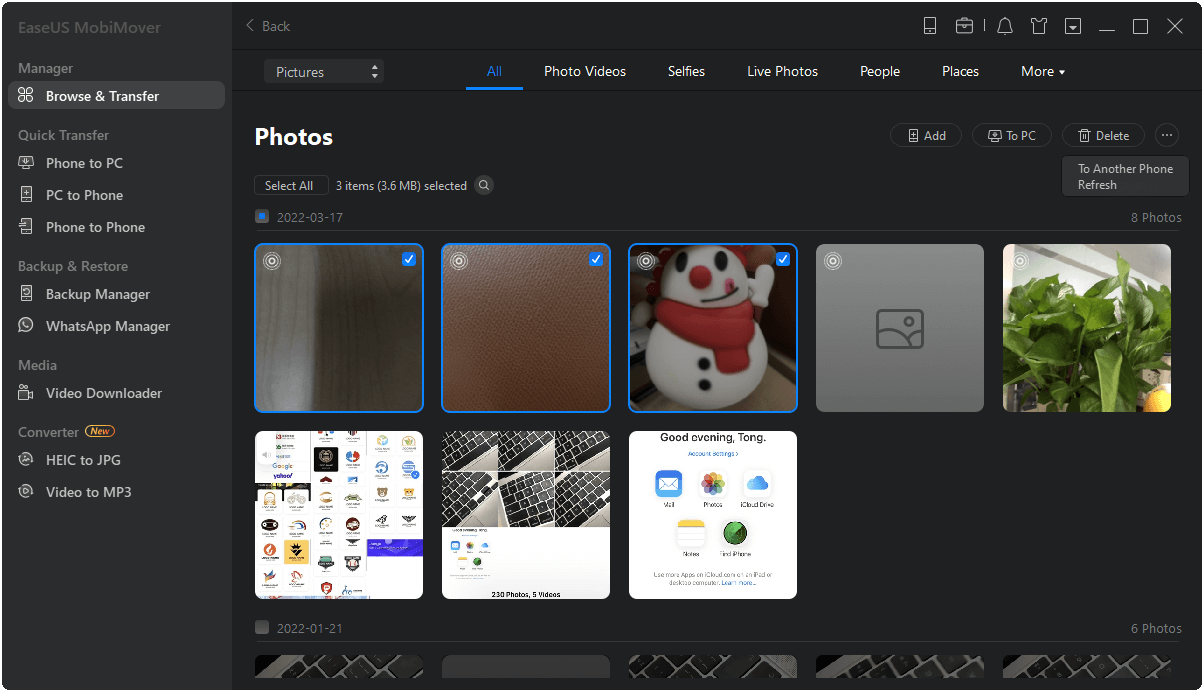
Step 2. Select the "Live Photos" option from the top menu, select the Live Photos you wish to transfer or convert, and then click "To PC" at the right-hand corner of your screen.
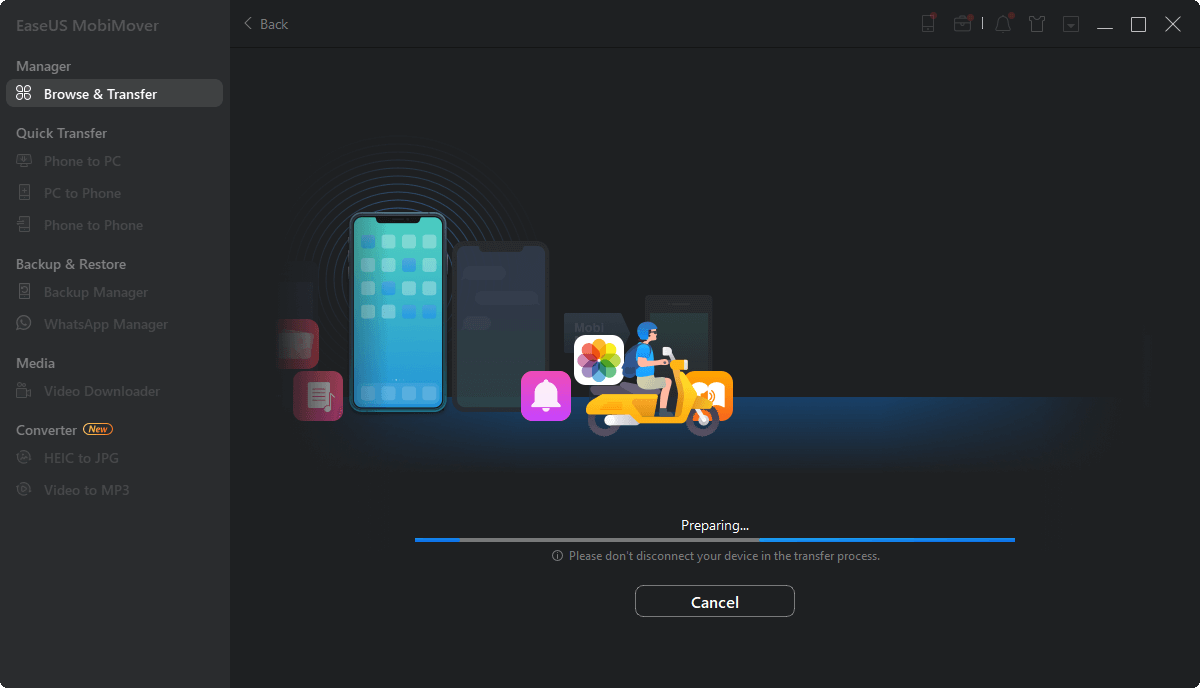
Step 3. Then, EaseUS MobiMover will start transferring photos from your iPhone to your computer. The conversion will happen automatically during the transfer process.
To learn more features and functions of EaseUS MobiMover, you can refer to this list:
- Transfer photos, music, videos, apps, and more data from one iPhone to another
- Back up your photos, videos, contacts, and other data to a PC or Mac
- Manage your iOS data by adding, deleting, and editing
- Download any video from any site
- Convert HEIC photos to JPG with one click
Tips: In addition to EaseUS MobiMover, many online conversion services are also available for conversion. But we don't recommend this way out of concern for data security and personal privacy.
In Conclusion
Converting Live Photos to JPG can be easy with the two methods. If you want to make a Live Photo a still photo, you can directly do it within the Photos app. While if you want to convert them to JPG, you need to use a photo converter like EaseUS MobiMover to help. Apart from EaseUS MobiMover, you can also use the File app to do the same thing. However, using the File app is long and complex, so we don't recommend it.
How to Convert Live Photos to JPG FAQs
1. How do I convert live photos to JPG on Windows 10?
If you want to convert live photos to JPG with a computer, you need to use a photo converter like EaseUS MobiMover to help and connect your iPhone to the Windows 10 computer. Choose the live photos you want to convert and click Transfer to PC, and the conversion will happen during the transfer process.
2. How do I convert HEIC to JPG on iPhone?
Open your Photos app, select the images you want to convert, tap the share icon, and select Copy Photos. Next, you can copy and paste the photos to your Files app on your iPhone, and then your iPhone will automatically turn them into JPEG. You can also EaseUS MobiMover to batch convert HEIC to JPG all at once.
3. How do I change live Photos to not live?
You can turn off the Live Photos feature from the Camera app and tap the Live Photos button. The feature is off when you see a slash through the Live Photos button.
Alternatively, you can use the Duplicate option to change to live photos to not live. Open your Photos app, select the live photo, and tap the share icon on the left side. From all the share options, choose Duplicate to create an image of the new version that is still.


 NEW
NEW HOT
HOT