Have you ever thought about how to transfer files from iPhone to USB flash drive without computer? A USB flash drive is usually used with a computer for data transfer from Android to USB. What about move files from iPhone to USB? If your computer or File Explorer is not available to access iOS data, what would you do?
In this article, you will learn some ways to quickly transfer files from iPhone to USB flash drive with/without computer. Now follow us to move files from iPhone to USB flash drive.
#Key Takeaways:
To transfer files from an iPhone to a USB drive without using a computer, use a Lightning to USB adapter. You can purchase a Lightning to USB adapter from Apple or a third-party retailer. This adapter allows you to connect a USB drive directly to your iPhone and transfer files between the two devices. When you open the Files app, select the files and copy&paste from your iPhone to flash drive.
Part 1. How to Transfer Files from iPhone to USB Without Computer
You may want to back up iPhone before getting a new one if you are switching to a new iPhone or an Android mobile phone. Due to iOS rigorously-controlled phone's file system, it is a good option to send files from iPhone to a USB flash drive for backup. You can connect your iPhone to your USB flash drive via USB cable (a Lightning to USB adapter/OTG adapter) without the engagement of Mac computers or Windows PCs. In this way, you are allowed to transfer photos from iPhone to USB flash drive seamlessly.
![USB adapter]()
To transfer photos, transfer videos from iPhone to USB without computer via an external USB adapter or USB cord for iPhone, follow the steps below:
Step 1. Check your available USB storage and then connect your USB flash drive and your iPhone to the Lightning to USB adapter (OTG cable). (If you devide is iPhone 15, you can use USB-C port.)
Step 2. Open the Files app on your iPhone.
Step 3. Then find the files (such as all your photos, music, and videos) you prefer to transfer. Tap and hold on to them to copy them.
Step 4. Then go back to the Files app, and select your USB flash drive to paste multiple files into it. As long as the USB storage is enough, you can transfer everything from iPhone or Android devices or other storage devices to your flash drive.
That's quite easy to transfer photos, videos or other data from iPhone to USB directly via the file transfer window without Wi-Fi. Just follow the tutorial above step by step, and you will transfer data from iPhone to USB within a few minutes.
Part 2. How to Transfer Files from iPhone to USB with Computer
Sometimes, it is more convenient to take advantage of a computer to transfer photos or other items from iPhone to a USB memory stick. If you don't have a USB adapter for an iPhone, then you can introduce a computer to help you with that.
To introduce a computer to transfer data, you have two options: transfer files from iPhone to PC and then copy them from computer to USB drive; or transfer photos from iPhone to USB flash drive directly. And we will guide you on how to do that from scratch.
Tip 1. How to Transfer Files from iPhone to USB with a Desktop Transfer Tool
This section steps through using a desktop transfer tool to transfer files from iPhone to USB drive directly. Here we recommend EaseUS MobiMover Pro. With this iPhone data transfer tool or iOS file manager, you don't need to transfer large files from your iPhone to your local computer and then copy them to your USB stick.
If you are planning to export your photos (including Google photos) on your iPhone to USB flash drive, this versatile software is able to convert HEIC to JPG with one click. In addition, it is also able to transfer data from iPhone to Windows PC or another iPhone. For Android user, you can also connect Android phone and transfer Android files to iPhone with this phone link app (It's also available to transfer iPhone to Android phones).
Check the available USB storage first and then download this versatile utility and start to use it to transfer files from iPhone to USB or from iPhone to Android device in a few minutes
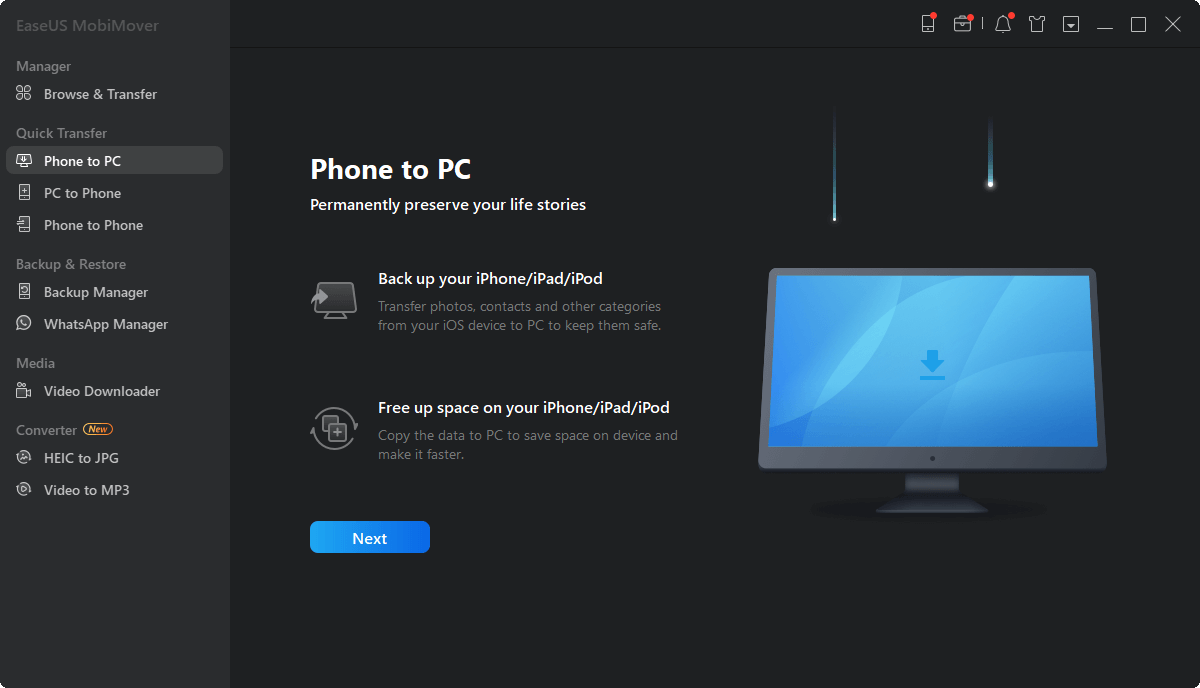
Step 1. Connect your iPhone to your PC with a USB cable. Tap "Trust This Computer" on the device screen if a pop-up appears. Start EaseUS MobiMover and select the "Phone to PC" pattern on the main interface. Click "Next" to start data transfer from iPhone to your computer.
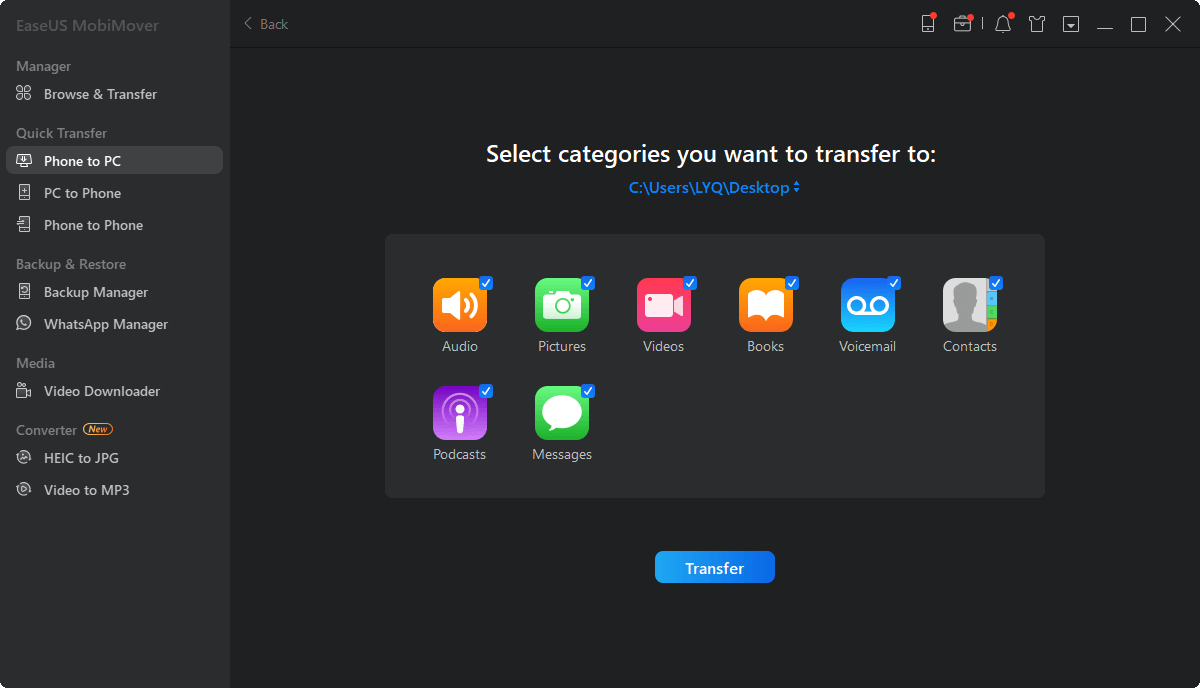
Step 2. MobiMover enables you to transfer everything from your iPhone to the PC with one click, like audio files, videos, pictures, books, contacts and more. You can check one or multiple data categories by checking the boxes. You can also customize a file location to keep the transferred items. If you don't customize the storage path on your own, click "Transfer" directly and MobiMover will save the files to Desktop.
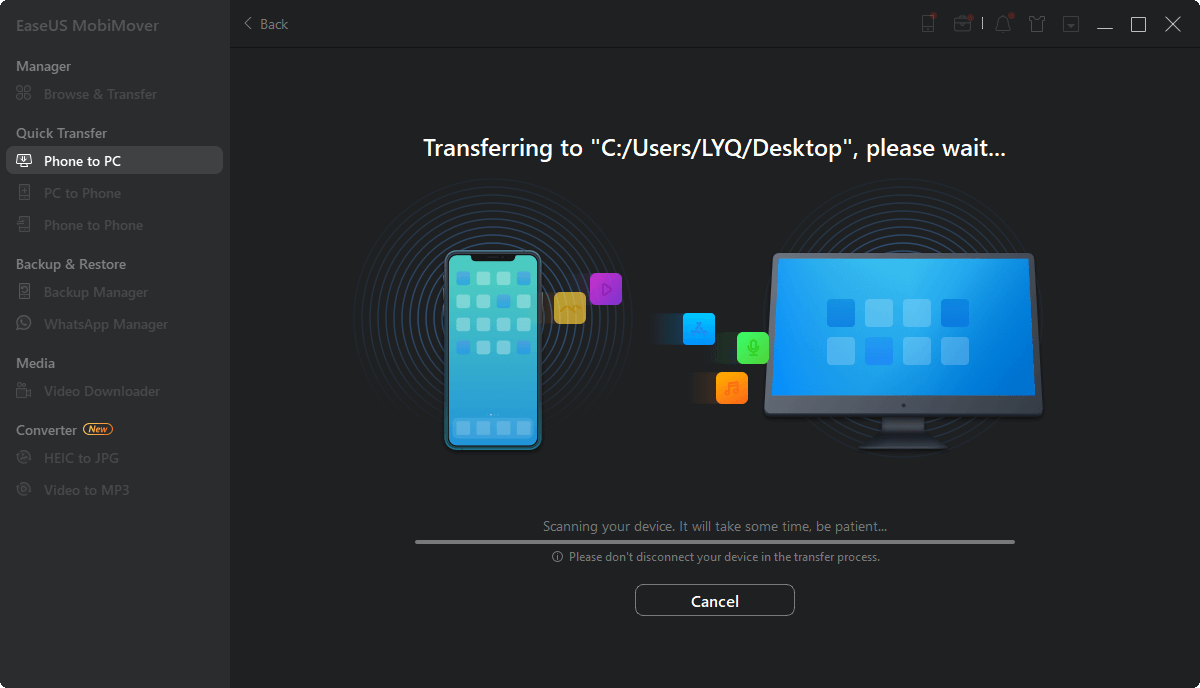
Step 3. MobiMover will start immediately transfer selected files from iPhone to PC without iTunes at lightning speed. Please don't suspend the USB connection until the process finishes. Some contents, like contacts and messages, will be saved as a .html file. You can view them by opening in a web browser.
If you are also interested in how to transfer photos from iPhone to external hard drive, click here for details.
Tip 2. How to Transfer Files from iPhone to USB with iTunes
iTunes is a media player developed by Apple Inc. Most of people would like to use iTunes to transfer music from iPhone to USB without Wi-Fi or OTG cable. And many people often use it to transfer media files from their iPhones to their computers for backup.
There was a time when Apple only allowed users to use the iTunes app to create a computer backup of an iOS device by connecting it via a USB cable to a Mac or a Windows PC. Apple introduced iCloud with iOS 5 in 2011, and since then it has allowed users to back up and restore iOS devices running iOS 5 or later without a cord.
Here's how to transfer files from iPhone to USB flash drive with iTunes:
Step 1. Connect your iPhone and USB flash drive to your computer.
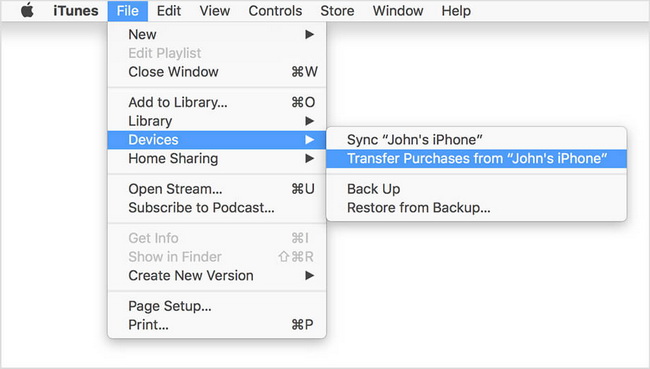
Step 2. Launch iTunes. Select Edit > Preferences > Devices.
Step 3. Tick the checkbox "Prevent iPods, iPhones, and iPads from syncing automatically." Then click OK.
Step 4. Then go to Files > Devices > Transfer Purchases from iPhone.
![transfer files in iTunes]()
Step 5. Then select your USB drive as the output path to start the file transfer.
In fact, iTunes is not a perfect and ideal option to transfer files from iPhone to USB drive. With iTunes, it's not available to transfer files selectively. And you can only transfer items you purchased.
Tip 3. How to Transfer Files from iPhone to USB with iCloud
iCloud is an official cloud-based service, designed to store, transfer, and back up data. However, due to the limited 5 GB of free storage space iCloud offers, people usually use iCloud to transfer essential content, such as photos. Note that iPhone stored photos in HEIC format which is not supported by a Windows computer. Learn "How to Open HEIC Files on Windows" for more information if you want to open HEIC files in Windows for review.
To transfer files from iPhone to USB with iCloud, perform the following steps:
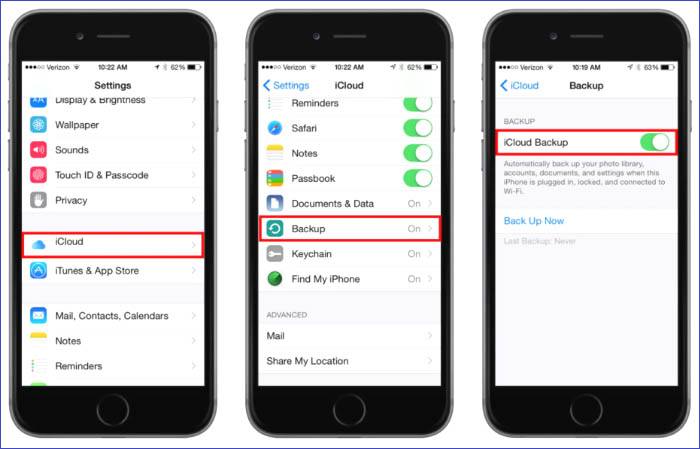
Step 1. On your iPhone, tap Settings > [your name] > iCloud. (Make sure the network or Wi-Fi connection is ready.)
Step 2. Then sync the apps according to your demand by turning on the toggle of these apps.
![perform iCloud backup]()
Step 3. Connect the USB to your computer.
Step 4. Go to iCloud.com to sign in with your Apple ID and password.
Step 5. Then select the files that you want to complete the wireless file transfer process.
Step 6. Click the Download button and then select your USB stick as the saving path to download files from iCloud to your USN stick. Wait for the file transfer process to complete.
Note that if you are using Google Photos on your iPhone, you can also select files to back up to Google Drive. (It's aslo workable to sign into Google Photos Web) You can also use Google Drive to backup other content.
Conclusion
In this article, we have shared four solutions to address how to transfer files from iPhone internal storage to USB with/without computer. If you happen to have a USB adapter with a Lightning port, you can connect your iPhone to your USB stick directly to transfer data. However, if you prefer to transfer data via a computer, it is recommended to try EaseUS MobiMover without worrying about the transfer speeds. You can also use the file transfer tool to transfer files from your Android device to iPhone.
You are also welcome to go to EaseUS official website for more relevant information about this software. In addition, you are able to view our other products or related articles if you're interested. As always, we appreciate your suggestions, commendations, or feedback.
FAQs on How to Transfer Files from iPhone to USB Without Computer
When it comes to how to transfer files from iPhone to USB without computer, you may come across some problems. Don't panic. If you have any questions about this topic, check the commonly asked questions below.
1. What is the purpose of a Lightning to USB adapter?
The Lightning to USB adapter makes it simple to transfer files between iPhone and USB drive. The USB connector can significantly improve the transfer speed.
2. Can I transfer photos from iPhone directly to PC?
Yes. Connect your iPhone to your PC with a USB cable, and you will get access to photos on your iPhone. But except for photos, you are not allowed to access other files seamlessly. But for Android device, it's unrestricted for transferring files. You can transfer evertything on Android phones.
3. Can I transfer from one iPhone to another wirelessly?
Apple's Quick Start is the simplest way to wirelessly transfer iPhone to iPhone. You can also use a third-party transfer tool (such as EaseUS MobiMover) to help you do that. In addition, Move to iOS is designed to transfer everything from Android device to iOS phones, which requires you to scan QR code. Then you can access data via this QR code.
In addition, Airdrop and bluetooth is also viable to transfer pictures or send data. You can swipe down from the Home screen and tap the bluetooth icon to turn it on and start the transfer process.
4. How to transfer files from Android to USB flash drive?
The file transfers process from Android to USB is quite easy. You can just connect Android phone and USB flash drive to computer to transfer files from your Android to USB flash drive. Then you can access all the downloads folders from Android phone on your PC.
NEW
HOT

