When you go to Settings > User Name, you can see a list of all trusted devices associated with your Apple ID near the bottom of the screen. However, you may encounter an error that shows a line saying the trusted devices list is not available. Don't worry! In the following content, you will find what will cause this problem and how to solve it.
Why iPhone/iPad Says Trusted Devices List Is Not Available?
According to Apple, "A trusted device is a Mac, iPhone, iPad, iPod touch, or Apple Watch that you've already signed in to using two-factor authentication. When you sign in on a different device or browser, your device displays a code you can use to verify your identity." Therefore, a trusted device can receive the verification code for authentication, and you can manage all the trusted devices on your iPhone.
When the trusted devices list is not available on iPhone or iPad, it prevents you from accessing your accounts or adding new devices. This problem often occurs due to the following reasons:
- Network issues. You didn't connect your iPhone or iPad to a stable internet connection, or you didn't allow Settings to use Wi-Fi or cellular data.
- Bugs in iPhone settings or operating system. If your iPhone runs outdated iOS, it may lead to the list of trusted devices not being accessible.
![trusted devices list is not available]()
How to Fix Trusted Devices List Is Not Available on iPhone/iPad
Now, you know the possible reasons for the Trusted Device Is Not Available error. Then, we can go through the following fixes to solve this problem and view your trusted list again.
Fix 1. Check Network Connection
When you turn on Apple ID in Settings, it will load the trusted devices. If you see the Trusted Devices list is not available after loading, the possible reason is that the iPhone's internet is slow or there is no internet connection. Therefore, you need to check whether the internet works fine, reconnect to Wi-Fi, or change cellular data.
- Wi-Fi: Go to Settings > WLAN > Toggle off WLAN, and turn it on again. Sometimes, if the Wi-Fi is not working, you can fix it by tapping the info icon next to the Wi-Fi > Forget This Network and joining in again.
- Cellular: When there is no accessible Wi-Fi, you can use cellular data, and remember to turn off the Low Data Mode feature in Settings before you use cellular data. Then, go to the Apple ID screen to check whether you can access the list of trusted devices.
- VPN: Scroll down to the VPN feature in Settings and turn it off. Also, quit the VPN app if you are running it.
- Settings: Allow Settings to use WLAN and cellular data. Go to Settings > WLAN > Apps Using WLAN & Cellular > Settings, and allow Settings to use WLAN & Cellular Data.
- Reset Network Settings: If the above actions fail to reload the Trusted Devices List, you can go to Settings > General > Transfer or Reset > Reset > Reset Network Settings. (iOS/iPadOS 15 and later)
Fix 2. Restart Your Devices
Performing a restart on your iPhone is an often-used trick to solve a series of problems, such as the iPhone being stuck, sluggish, unresponsive, etc. Restarting your iPhone will clear up many software bugs or glitches both in the iOS system and applications.
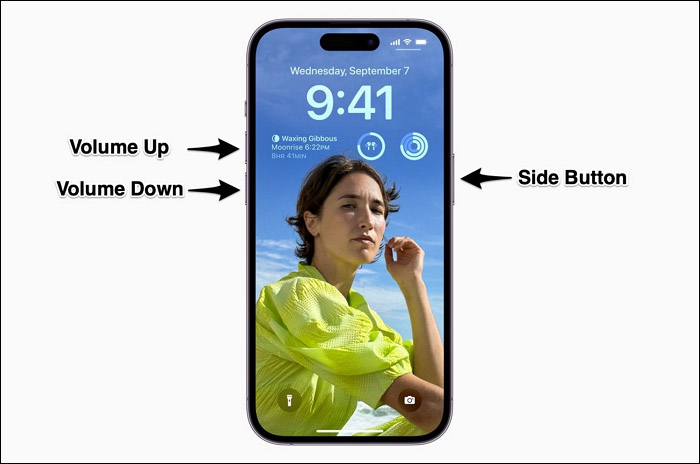
To Restart Your iPhone/iPad: Press and hold either the volume up or volume down button and the side button until you see the slider. Drag the slider to power off your iPhone or iPad. Wair it for about 30 seconds, and turn it on again.
![restart iphone]()
Also Read:
How to Force Restart iPhone 13 How to Force Restart iPad
Fix 3. Re-Sign Apple ID
If the 'Sign Out' button is workable below the 'Trusted Devices List Is Not Available' message, you can try to log out and into your Apple ID again to fix the failed sync between your devices and reload the trusted devices list.
Step 1. Go to Settings > User Name > Sign Out.
Step 2. Enter your Apple ID password to confirm.
Step 3. Then, it will ask you to back up your data. Choose the category you want to have a backup copy.
Step 4. Tap Sign Out again in the upper right corner.
![sign out apple id]()
Then, wait for a few seconds and log in to your Apple ID again to check whether the Trusted Devices List is back.
Also Read:
Fix 4. Update iOS System
There is a post from Apple Discussions stating the same problem on iOS 14.0.1 and iOS 10.3.3. Some users discover that the list of trusted devices is unviewable after updating to iOS 14, but everything is back to normal the next day. However, if it is not solved itself, there are likely some software glitches in the operating system. To get the trusted devices list back, update your iOS to the latest version, which may fix the system bug.
To Update Your iPhone/iPad: Go to Settings > General > Software Update, where you can see whether there is a new version of iOS available and tap on it to download and install the latest version.
![update ios]()
If the problem of 'Trusted Devices Not Available' appears after updating to the latest version, you can consider downgrading from iOS 17 to iOS 16 using a professional iOS System Repair tool.
Fix 5. Reset All Settings
Another resort for you to fix the issue of the list of trusted devices not available is to reset all settings, which will reset the settings that are responsible for causing trouble with your Apple ID. You don't have to worry about data loss since this action does no harm to the existing files on your iPhone and iPad; thus, you can proceed with confidence.
To Reset All Settings: Go to Settings > General > Transfer or Reset > Reset > Reset All Settings. Confirm the action by entering your screen passcode. When completed, check whether you can view the trusted devices list.
![reset iphone settings]()
If You Cannot Sign Out of Your Apple ID, Sloved Here!
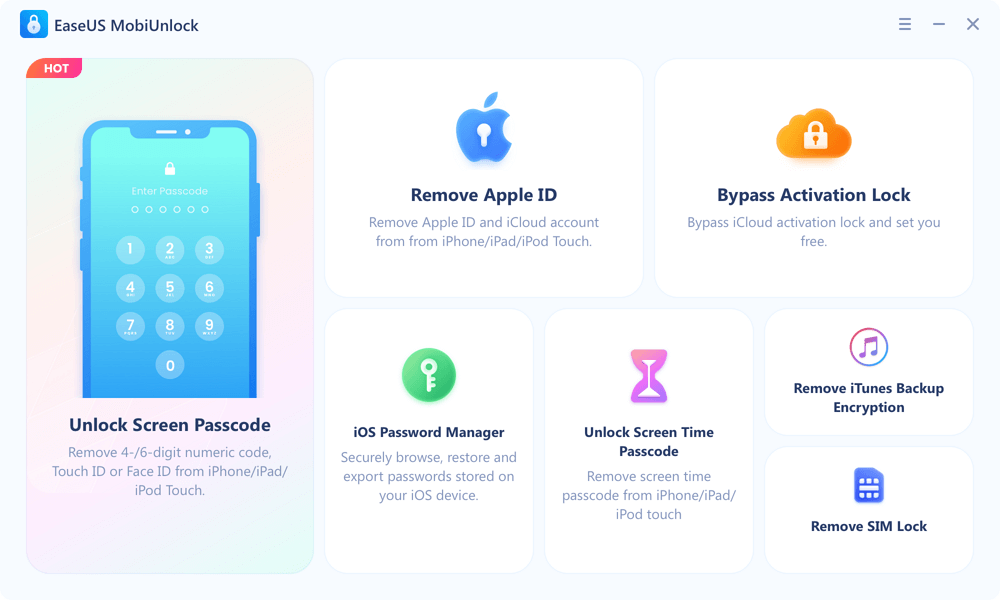
If you have a problem signing out of your Apple ID, such as your Apple ID being greyed out, EaseUS MobiUnlock is recommended. It is a professional iPhone unlocker that can remove the Apple ID or iCloud account from the iPhone, iPad, and iPod touch; thus, you can sign in with your Apple ID or a new account.
Main Features of EaseUS MobiUnlock:
- It can bypass kinds of screen lock types, such as Face ID, Touch ID, and passcode (whether it is a 6-digit or 4-digit passcode).
- It can turn off the iTunes backup encryption without password so that you can make an unencrypted backup or set a new password for it.
- It can unlock your iPhone when you forget screen time passcode, allowing you to use your iPhone/iPad freely without time limitation.
- It can remove iCloud activation lock without Apple ID. Thus, you will have no worry about being tracked or iPhone erasion remotely.
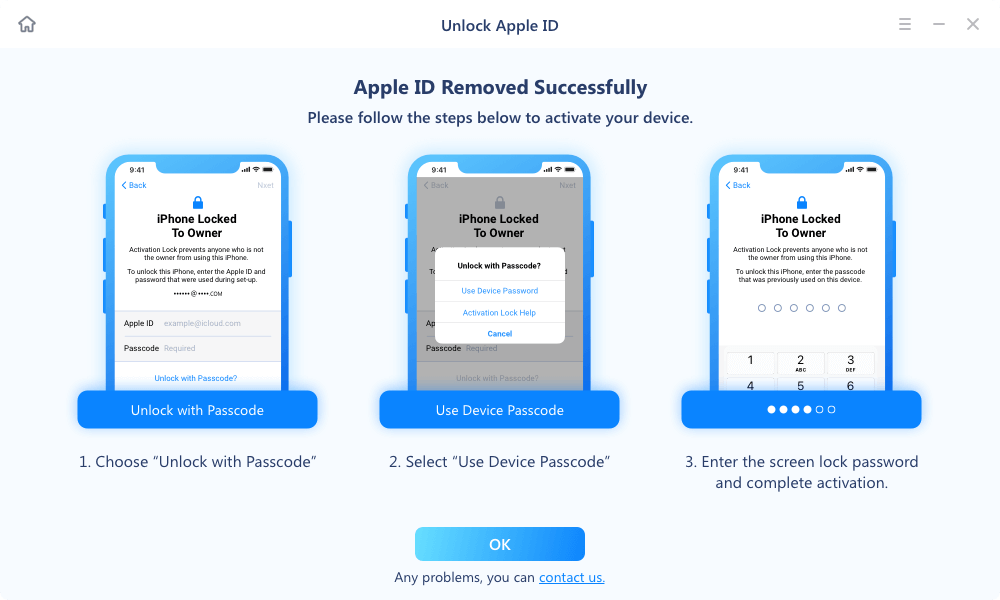
Let's see how to remove Apple ID from your iPhone or iPad without password:
Reminder: Before you start, make sure that you've enabled Two-factor authentication for your Apple ID. If you've ever set a screen lock for your device, make sure you can remember the passcode becasue we need you to trust this computer on your device.
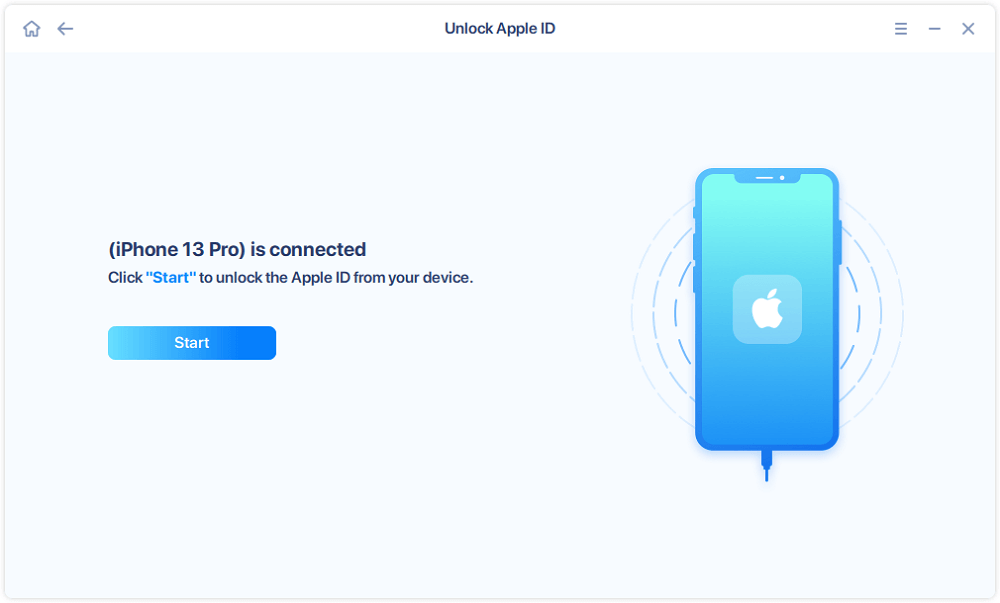
Step 1. Launch EaseUS MobiUnlock on your computer and connect your iPhone or iPad. Select "Remove Apple ID" from the home page of this program.
Step 2. Then, our program will start recognizing your device. Once your device is detected, click "Start" to proceed. Following that you'll need to download a firmware. Once the firmware is ready, click "Unlock Now."
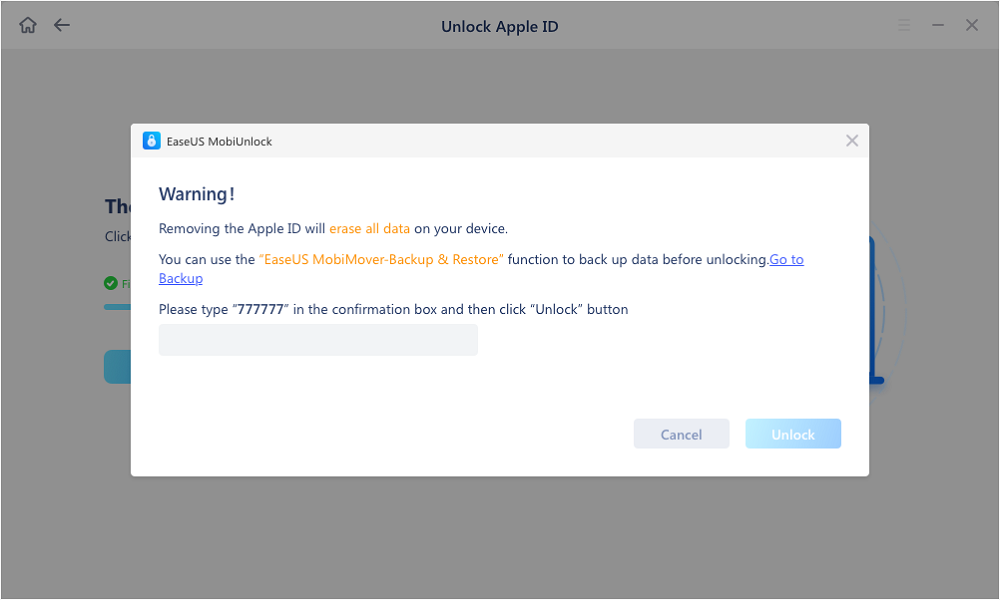
Step 3. A warning screen will pop up to ask you to enter the needed information. Proceed by enterring what it needs and then click the "Unlock" button.
Step 4. Wait for your Apple ID to be removed. Then, you can regain access to your device with a new Apple ID.
Conclusion
Now, you know how to fix 'Trusted Devices List is not available' on iPhone and a variety of reasons to cause this problem, such as network problems, iOS version, and iPhone settings. In this article, we go through five solutions and hope some of them work for you. Also, an extra tool, EaseUS MobiUnlock, is recommended if you cannot log out of your Apple ID to solve the current issue.
Is this post helpful? Share it with more friends in need and let more users know how to fix the trusted devices list problem.
FAQs About Trusted Devices List Not Available
1. How do I enable trusted devices on my iPhone?
To enable trusted devices on your iPhone, you should turn on two-factor authentication:
- Go to Settings > User Name > Sign-in & Security > Turn on Two-Factor Authentication > Continue on your iPhone.
- Enter the phone number that you use on the device to receive the verification code.
- Then, the code will be sent to the trusted phone number, and you should enter the code on your iPhone.
- Your iPhone is a trusted device now.
2. How do I add a device as a trusted device?
To add another device as a trusted device on your iPhone, you can follow the steps below:
- Sign in the same Apple ID on another device you want to add as a trusted device.
- Go to Settings > User Name > Password & Security > Trusted Device.
- Tap Add A Trusted Device > Get Verification Code. And enter the code on the new device.


 NEW
NEW HOT
HOT