Android users have the luxury of moving their files around and playing with their storage as much as they like. This allows them to store their essential files without worrying about privacy. However, sometimes, users move their images from the primary camera folder so they don't show up in the camera roll.
So, how do you move something from internal storage to camera roll on Android? What does the process look like, and is it even possible? Yes, it is possible, and there are quite a few ways to do it. Let's show you how.
Part 1. How to Move Photos from Internal Storage to Camera Roll on Android
Without further ado, let's talk about 3 methods to move something from internal storage to camera roll on Android. We'll show you three most effective ways of doing it, so let's dive right into it:
Method 1. Using a File Manager App
Every Android device that you use comes with a built-in file manager. This allows you to access the base files on your Android device quite easily. Now, each Android phone might come with a different type of file manager.
For instance, manufacturers like Xiaomi or Samsung have their separate file managers. However, the basics of their use remain the same, such as moving or copying files. So, here's how you can use the file manager app to move something from internal storage to camera roll on Android
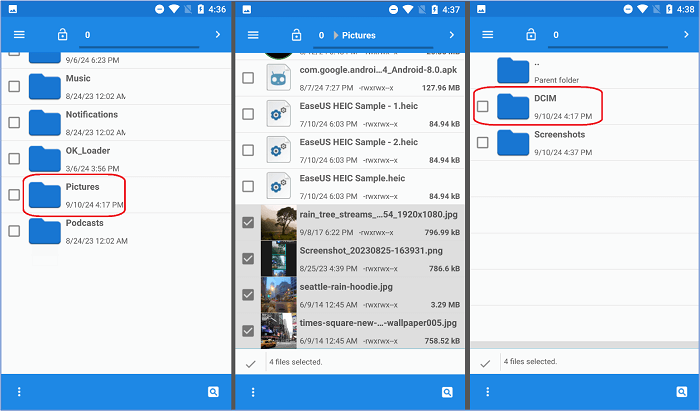
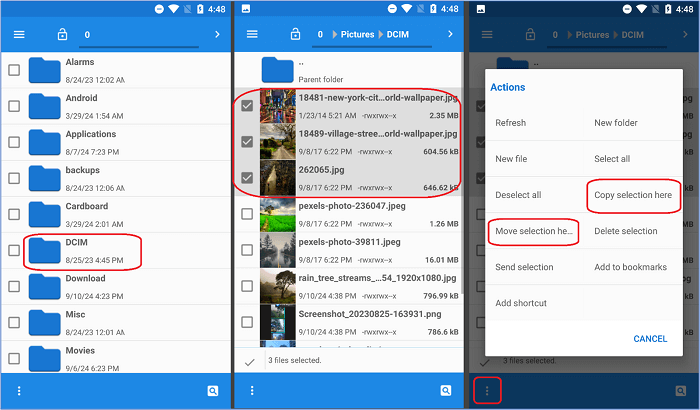
Step 1. Open the File Manager app on your Android device. Navigate to the folder which has the pictures you need to move.
Step 2. Select multiple pictures and then head into the 3-dotted menu to select the "Move" or "Copy" option.
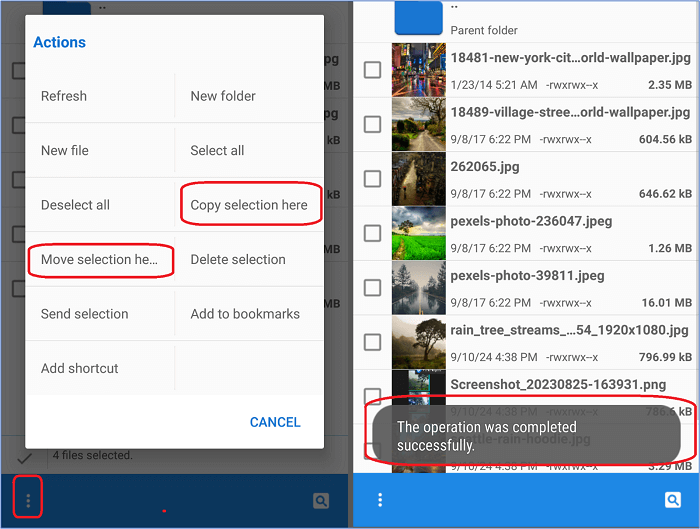
Step 3. Now, go back, find, and navigate to the "DCIM" folder in your storage.
![DCIM folder in your storage]()
Step 4. Under the "DCIM" folder, tap on the 3-dot menu once more. Select the "Move" option or "Copy" option to place files in the folder.
Step 5. Wait for the "operation was completed successfully" dialogue box.
![Operation was completed successfully]()
This will help you move the files from your internal storage to camera roll quickly. Once done, we suggest restarting the Gallery app or the phone to see the effects.
More Reading: How to Transfer Photos from Android to Android
Method 2. Using a Gallery App
Most gallery apps in modern Android phones also have the ability to move or copy files from one location to another. However, since Gallery only accesses folders with photos, it won't be accessing any other folders.
This is one of the main reasons that users are sometimes unable to find their pictures. Because the photos/images are stored in a folder that the gallery app is not allowed to access. However, here's how you can do it:
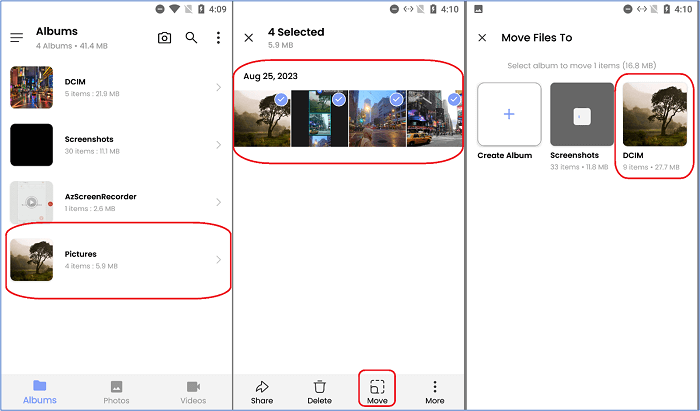
Step 1. Open the Gallery app on your Android device. Now, head into the folder that has pictures you can transfer to the camera roll.
Step 2. Select the pictures (make a few selections to ensure copying various photos at once). Now tap on the hamburger/3-dot menu to explore the option. Tap on the "Move" button to explore the following options.
Step 3. Now, select the folder to which you wish to move these photos to. Since we want them in camera roll, move them to the DCIM/Camera folder.
![DCIM/Camera folder]()
And it's as simple as moving files from one folder to another in the gallery app. You can quickly move the files without having to go through the file storage. However, if you don't find the files in the gallery app, you will have to use the file manager app.
Related Article: How to Transfer Photos from Android to External Hard Drive
Method 3. Using Cloud Storage Services
Now, let's show you another method to move your files to the camera roll. This method is ideal for those who want to move files from one phone to another. However, it's also an excellent way to get files in the camera roll for those who cannot find specific images in the file manager or gallery app.
Therefore, using Google Drive to download and move the images you want to your camera roll is a viable method. Here's how to do it:
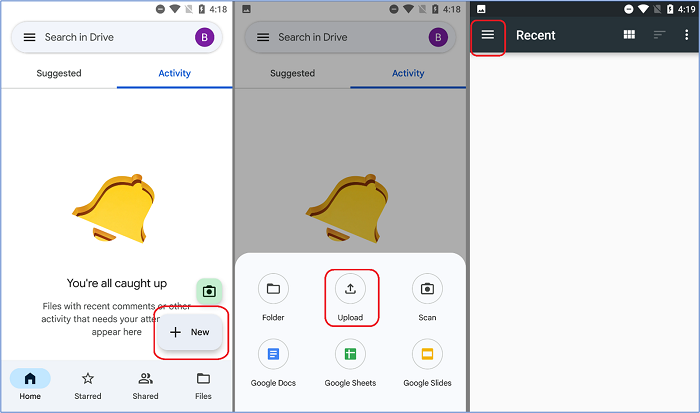
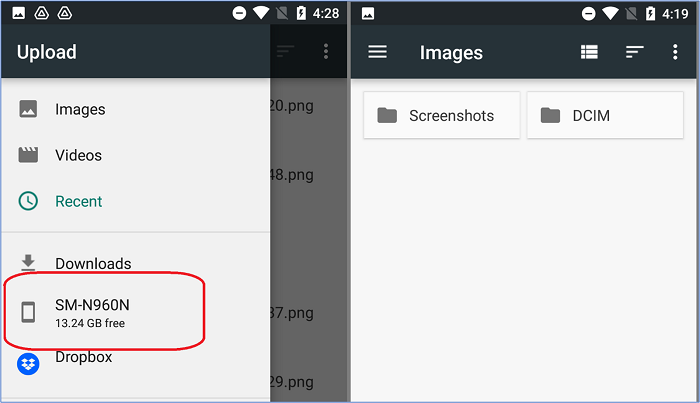
Step 1. Open Google Drive on your Android device. Make sure you're signed in, then tap on the "New" option towards the bottom-right of your screen.
Step 2. On the following pop-up menu, you'll see a few options. Tap on the "Upload" option to prompt the file manager to select files.
Step 3. In the top-left corner, click on the hamburger menu to browse your Android storage and select the images you wish to upload.
![hamburger menu]()
Step 4. Now tap on your device name to prompt the explorer/file manager option. You can also tap on your SD Card (if available) on this screen.
Step 5. Now, explore your device and upload photos. Make sure you make more than one selection.
![Upload photos]()
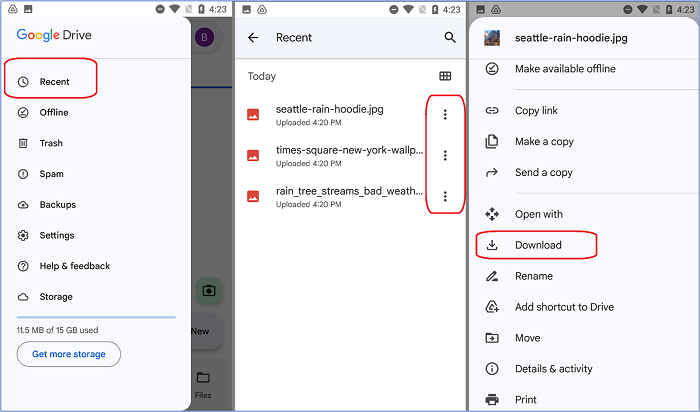
Step 6. Now head into Google Drive, tap on the hamburger menu, and then open the "Recent" sections from the sidebar.
Step 7. On the next screen, you should see the images you have uploaded recently. Next to the photos, click on the 3 dots to open the menu.
Step 8. Scroll down a bit on the menu and then select the "Downloads" option.
![Downloads option]()
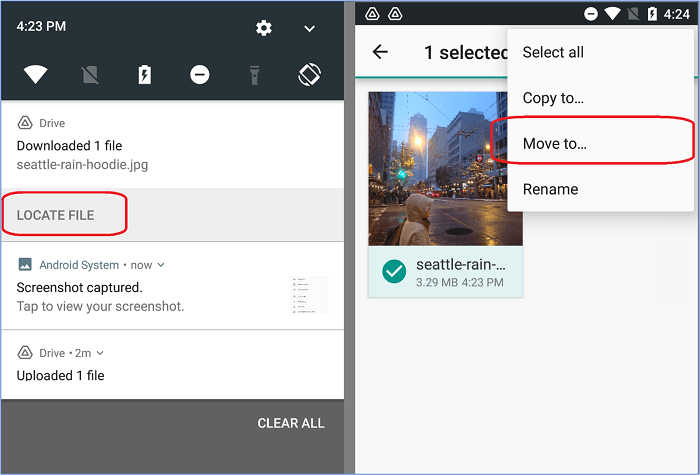
Step 9. Now swipe down on the menu bar/control center and check the Google Drive download notification. Tap on the "Locate File" option to go to the download image's location.
Step 10. Select the image(s) and tap on the 3-dot icon to move the picture to your DCIM folder.
![Select the image]()
This method is a handful, but it's 100% effective. It takes more effort and requires more time, but it gets things done quite quickly. Therefore, you can use this way of moving files from one phone to another, particularly images.
One significant benefit of doing this is the backup of your images. You don't only move something from internal storage to camera roll on Android, but also secure it on your Google Drive account.
Part 2. Differences Between Internal Storage and Camera Roll
The primary role of internal storage is to save files on your mobile device. It means it saves all sorts of files, like videos, music, documents, and images. The camera roll, on the other hand, places only the pictures that you have taken via the phone's camera on your phone's storage. This particular area on your phone is dedicated to storing pictures that you take via the phone camera.
To understand the difference between the two, here's a table to help you grasp the main idea:
| Features |
Camera Roll |
Internal Storage |
| Purpose |
Store photos and videos taken by the camera. |
Store all data on your phone, including images, videos, documents, etc. |
| Accessibility |
Accessible by various apps that store or access data on it. |
Accessible by users to view the images they have taken. |
| Data Persistence |
Users can delete the data manually. |
Clears cache and other bulk/unimportant data regularly. Also, deletes app data once the app is uninstalled. |
| Storage Type |
Depends on the phone/device. |
SD/internal storage type of the device. |
| Permissions Required |
Requires permission to be accessed by other apps, i.e., Google Drive, photo editors, etc. |
No permission to access essential files. It requires rooting of the device to access advanced/system files. |
Part 3. Tips for Organizing Photos on Android Efficiently
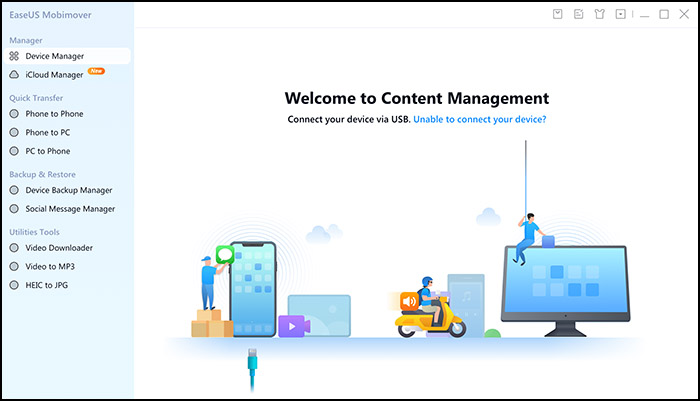
Now, if you're looking for a way to organize photos on Android efficiently, you might need more than the apps available on Android. That's why EaseUS MobiMover is the best way to bulk-delete or transfer files to Android on the computer and vice versa.
Doing so allows you to save a ton of storage on your Android device while ensuring the safety and security of your files. This remarkable tool will enable you to transfer files between PC and Android and also lets you create a backup and manage the restoration.
- The reasons it's ideal to help you organize photos on Android efficiently include:
- The option to browse and access Android files easily;
- Transfer individual files or bulk from Android to PC and vice versa;
- Copy or move files from PC to phone easily;
- Organize/delete files in bulk on your device to save a ton of time.
Step 1. Launch EaseUS MobiMover on your computer and connect the device to the computer via a USB cable. On your Android, allow debugging from the pop-up window to allow MobiMover access to files.
![connect the device to computer and allow debuging on the device]()
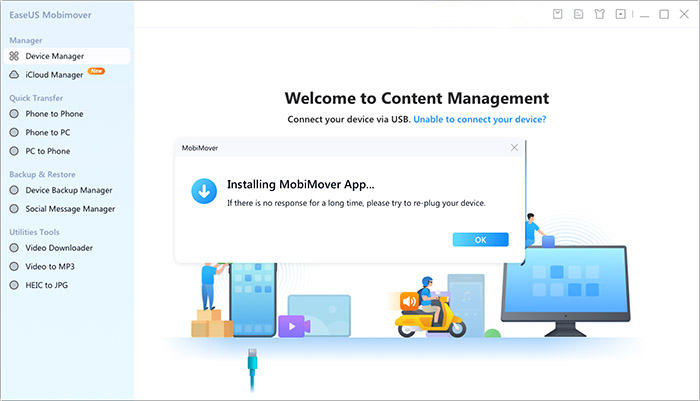
Step 2. Then, it will automatically install a mobile MobiMover app on your phone for a smooth transfer. Now tap "Allow" on your phone to allow the two required permissions shown on the screen to get file permissions. Click "OK" to dismiss.
![install MobiMover app]()
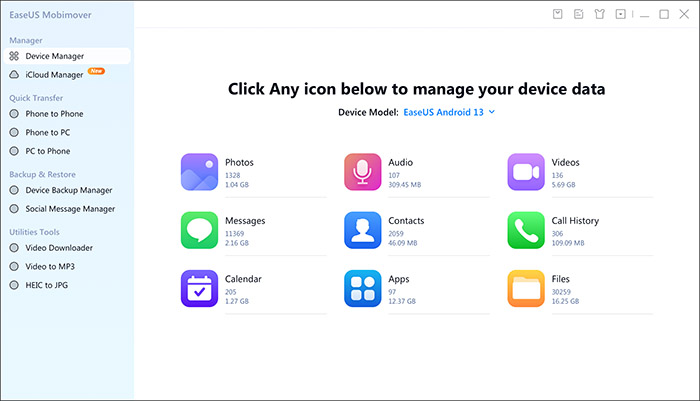
Step 3. In MobiMover, click "Device Manager." Then, select the data type that you want to view and manage. For example, here we choose "Photos."
![]()
Step 4. In the next window, you will see all the photos stored on your phone. You can view photos by album, such as screenshots, wallpaper, camera, and WhatsApp images. Here, you can delete unwanted pictures by selecting them and clicking "delete." You can also select photos and click "To Device" or "To PC/Mac" to export them to another phone device or to your computer. Also, photos from the computer can be added to your device by clicking "Import".
![manage photos from Android with MobiMover]()
Bonus Part: How to Capture Images from Camera and Save in Internal Storage on Android
Capturing images on Android devices is quite simple. However, each camera app for Android phones is different. For instance, Samsung has a unique app, while manufacturers like Xiaomi or Oppo might use various sorts of apps.
Once you take images with them, you can use the built-in file manager to save files from the camera to internal storage. Here's how to do that:
Step 1. Take any images with your Android camera. Make sure you keep the default storage selection in the camera settings.
Step 2. Now open the File Manager app on your Android phone. Find and tap on the "DCIM" folder in internal storage.
Step 3. Explore and select the images that you wish to copy/move to internal storage.
Step 4. Now head to the folder where you'd like these files in the internal storage. Tap on the 3-dotted menu, and then select the "Move" or "Copy" option.
![Move or Copy option]()
This is how you can save your camera files to your Android storage effectively. Make sure you access the correct DCIM folder, as Android phones with SD Cards tend to have two DCIM folders, one on SD card and another on internal storage.
Final Words
This is how you can move something from internal storage to camera roll on Android in a few easy methods. It's reasonably easy and doesn't require a lot of work, whether you use a file manager, gallery app, or Google Drive.
However, if you are looking for a more efficient way to manage your Android file, you can use EaseUS MobiMover. It allows you to organize files quite quickly, and the new features make it much more convenient to move or bulk delete files.
FAQ Section
While we showed you how to efficiently move something from internal storage to camera roll on Android, here are some additional queries users have:
1. How do you set the default save locations?
You can open the camera app and access the settings. In most Android phones, you can cap on "more" from the options and tap on the settings cogwheel to open configurations. From there, find the "Save to SD Card" option, then turn it on or off—depending on your preference.
2. What to do if internal storage is full?
You can try to remove file caches of files. In most Android devices, clearing data for apps like YouTube, Instagram, TikTok, Facebook, etc., can save tens of gigabytes of memory. Other than that, you can use your PC to transfer files from Android to free up some space.
3. How do I move photos from internal storage to Google Photos?
Simply sign into Google Photos and then head into the "Settings" option from the sidebar. Under those options, find and tap on the "Backup & sync" option. Here, you will find the option to turn the backup on, so toggle it on.
After that, restart your Google Photos app and go back into the same options. Under the backup & restore area, find the "Upload size" option. Make sure it's set to "high-quality" so that your pictures are saved in the best quality possible.
4. How do you transfer photos from the Gallery to an SD card?
There are quite a few ways to do this. You can go into Files by Google (install it if it's not already installed on your Android), then open the menu option. Now, find and tap on the "Storage devices" option and select "SD Card."
Now, select multiple files or choose an entire folder and then tap on the 3-dotted menu. In this section, select the "Move to" or "Copy to" option. Select your SD Card from the menu to transfer files into the external storage.


 NEW
NEW HOT
HOT