How to Transfer Photos from iPhone to iPad without iCloud
You can use AirDrop to transfer photos from iPhone to iPad wirelessly without relying on iCloud:
- Open Control Center and enable Wi-Fi, Bluetooth, and AirDrop.
- Go to the Photos app and select the pictures you want to transfer to your iPad.
- Tap Share > AirDrop. Choose your iPad as the recipient.
- Accept the incoming photos on your iPad.
AirDrop is the best method to transfer a few items to a nearby Apple device. However, if you want to transfer the entire album or photos in batches, please try other methods, such as EaseUS MobiMover, which can transfer photos and videos without losing quality or overwriting the existing data on your iPad.
Transferring photos from iPhone to iPad is required in many situations, such as wanting to free up more space on the iPhone, viewing photos on a larger screen, migrating photos from an old iPhone to a new iPad, etc. iCloud is a common choice for syncing photos across devices. However, it has storage limitations for the free version. So learning how to transfer photos from iPhone to iPad without iCloud will give you more storage solutions and facilitate the transfer process. For whatever reason, you can find five possible solutions on how to transfer photos from iPhone to iPad without iCloud.
- iOS Data Transfer - Seamlessly transfer all photos or specific items without iCloud or Wi-Fi.
- AirDrop - Manually share selected files wirelessly.
- iTunes - For full backups and restores via computer.
- Email - For quick sharing of a few files without extra setup.
- Direct Transfer - For offline, fast photo and video transfers via Lightning cable or adapter.
- Bonus: Transfer Photos from iPhone to iPad with iCloud
Transfer Photos from iPhone to iPad Without iCloud in One Click
As we all know, iCloud only offers its users 5GB of storage for free. That means you have to buy more storage space if you have more than 5GB of photos to transfer. That's why many users don't like using iCloud. In that case, EaseUS MobiMover is a practical alternative that allows you to transfer photos and videos directly between your iPhone and iPad using a computer. With MobiMover, you don't need to worry about storage limits, internet connectivity, or Apple ID restrictions. It provides a fast, secure, and user-friendly way to move your photos and other data.
- It supports various image formats, including JPG, BMP, ICON, TIFF, PNG, and GIF.
- Besides photos, it transfers videos, contacts, messages, music, notes, and more.
- It allows for selective photo transfer and the entire category of photos.
- It provides secure backup and restore options for important data.
Here is how to transfer photos from iPhone to iPad without iCloud:
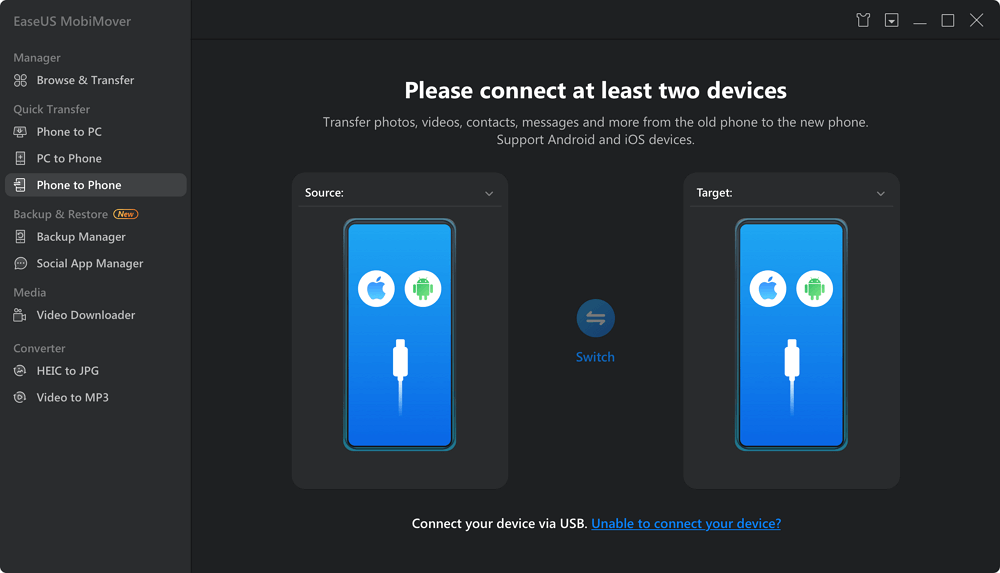
Step 1. Connect both of your iOS devices to your computer (Mac/PC). Launch EaseUS MobiMover, and choose "Phone to Phone" on the screen. Correctly set the source device and target device, and click the "Next" button to continue.
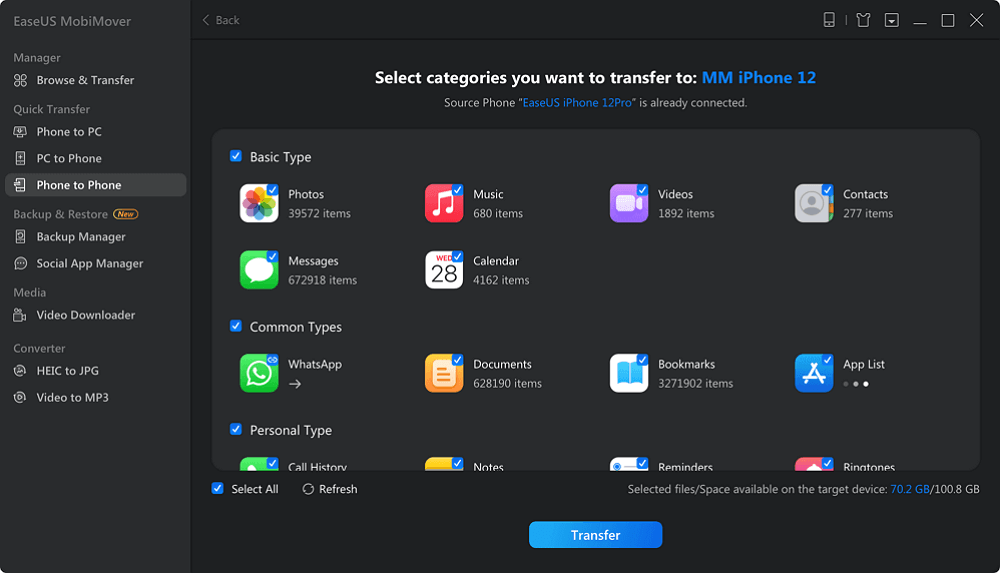
Step 2. Check the category/categories you want to transfer from your iPhone to iPad or from iPad to iPhone. As you can see, in addition to photos, you can also copy videos, audios, contacts, messages, and more between your iPhone and iPad.
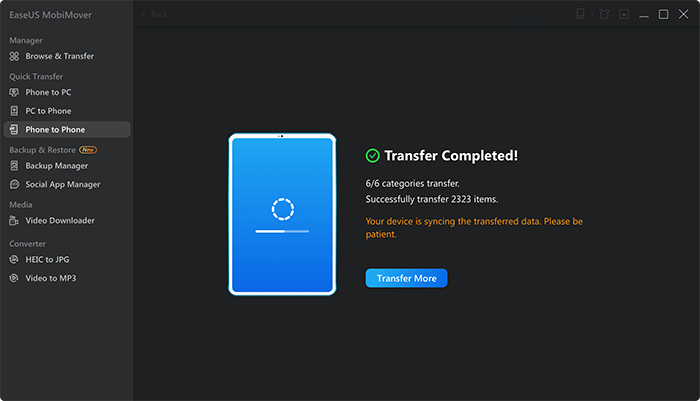
Step 3. After checking the settings, click the "Transfer" button to start transferring photos from your iPhone to iPad or iPad to iPhone. When it has completed, go to the "Photos" app on your target device to check the newly imported items.
This guide is also workable on how to transfer data from iPad to iPad. Using EaseUS MobiMover is the optimal choice for transferring iPhone to iPad. Whenever you need to transfer data from iPhone to iPad or vice versa, you can use it to share files freely and safely.
Transfer Photos from iPhone to iPad Without iCloud Wirelessly
AirDrop is a pre-installed program on iDevices and Mac to be used to share content among iPhone, iPad, and Mac wirelessly, including photos, videos, music, notes, and more.
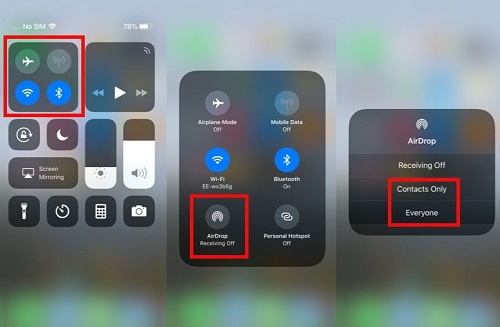
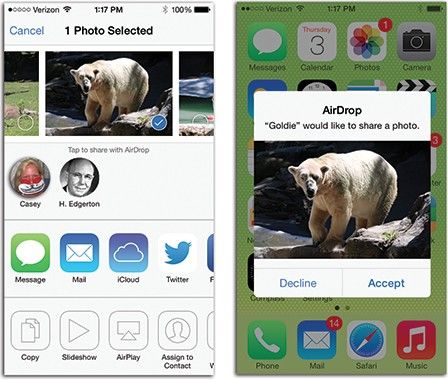
Step 1. Turn on AirDrop, Wi-Fi connection, and Bluetooth on both iPhone and iPad within the Control Center.
![Turn on AirDrop on iPhone]()
Step 2. Open the Photos app on your iPhone. And select the photos you want to sync to the iPad, tap the "Share" button, and then tap AirDrop and choose your iPad. AirDrop will start to send photos from iPhone to iPad.
Step 3. Go to your iPad and tap the "Accept" tab on the pop-up to receive photos from the iPhone. When the process is finished, run the Photos App on the iPad and check the updated files.
![AirDrop photos from iPhone to iPad]()
Related tips: How to transfer music from Mac to iPhone with AirDrop
Sync Photos from iPhone to iPad Without iCloud with iTunes
iTunes data syncing is the most complex method among the three to sync photos from iPhone to iPad without iCloud, as you need first to back up photos from iPhone and then use iTunes to sync to iPad. Or just restore the iPad with an iTunes backup of the iPhone, which will definitely wipe the existing data. Therefore, take this way with caution!
Back Up iPhone Photos With iTunes
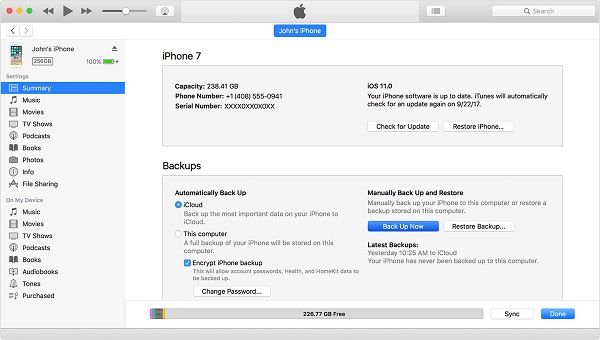
Step 1. Connect your iPhone to your computer with a USB cable and run iTunes.
Step 2. Click the Device button and choose "This Computer" on the right-side panel.
Step 3. Then click "Back Up Now" and start to sync the photos from iPhone to the computer with iTunes.
![back up iPhone photos with iTunes]()
Also read: How to Back Up Photos from iPhone Without iCloud/iTunes
Sync iPhone Photos to iPad With iTunes
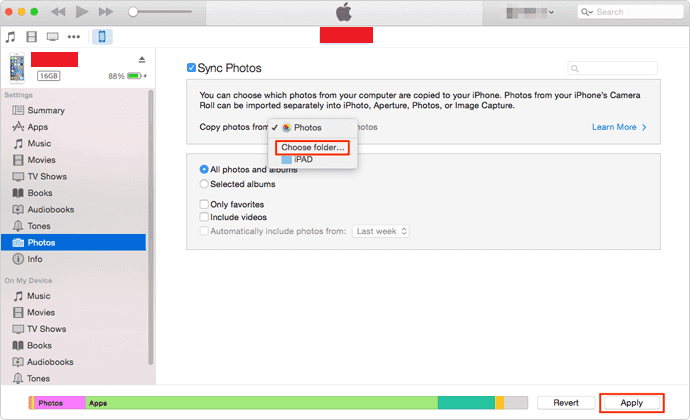
Step 1. Plug out your iPhone and plug in your iPad to your computer with a USB cable > Run iTunes.
Step 2. Click the Device button and choose Photos on the right-side panel.
Step 3. Then check "Sync Photos" and "All photos and albums." Click "Apply" to transfer photos to the iPad.
![sync iPhone photos to iPad]()
Email Photos from iPhone to iPad - Apply to Transfer One or Two Photos
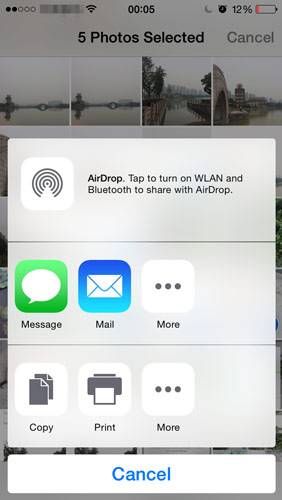
Step 1. Open the "Photos" app on your iPhone.
Step 2. Select the photos you want to transfer to iPad.
Step 3. Tap the "Share" button > Choose "Mail."
Step 4. Log in to your Mail account if you haven’t logged in > Check "Send" to send the email to your Mail account.
Step 5. Go to the "Mail" app on your iPad > Check the email from your iPhone > Save the photos on your iPad.
![Transfer Photos from iPhone to iPad via Mail]()
Direct Transfer Images from iPhone to iPad Without iCloud
You can transfer pictures from your iPhone to your iPad by connecting the devices directly via a Lightning or USB-C adapter. This method transfers photos directly and securely without relying on Wi-Fi, iCloud or Apple syncing. It supports all common iOS photo formats, including HEIC, JPEG, and Live Photos. It is ideal when you want a fast, offline transfer.
Step 1. First, get the appropriate adapter and cable:
- For iPads with a Lightning port, use a Lightning to USB Camera Adapter.
- For iPads with a USB-C port, use a USB-C to USB-C cable or a USB-C to Lightning cable, depending on your iPhone model.
Step 2. Plug the iPhone into the iPad using the adapter and cable.
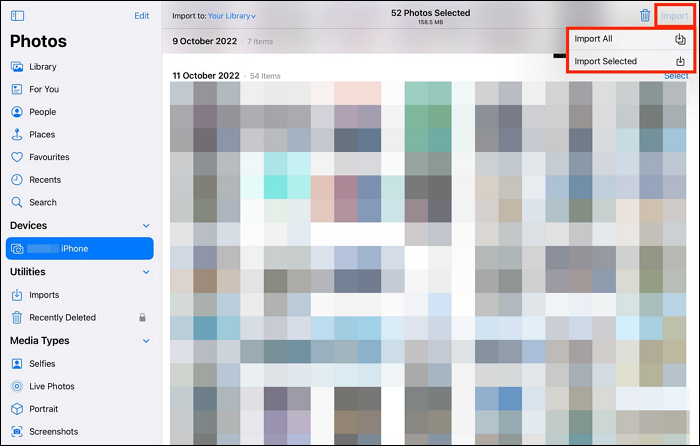
Step 3. Ensure both your iPhone and iPad are unlocked and powered on.
Step 4. The iPad will detect the connected iPhone as a camera device.
Step 5. Tap the Import tab in the Photos app on the iPad. You can now select individual photos or Import All to transfer your entire photo library.
![ipad-import-photos-from-iphone-directly.png]()
Step 6. After the import finishes, you can choose to keep or delete the photos on your iPhone.
Bonus: How to Sync Photos Between iPhone and iPad Using iCloud
iCloud is a cloud service offered by Apple. It provides two ways to sync photos across iOS devices - via My Photo Stream and via iCloud Photo Library. There are some differences between them, as shown below.
| My Photo Stream |
iCloud Photo Library |
- It doesn't count against iCloud storage
- It doesn't support videos
- Stores up to 1,000 photos
- Stores photos for 30 days
- Works only over Wi-Fi connections
- Supports JPEG, TIFF, PNG, and RAW file formats.
|
- Count against iCloud storage
- Supports videos and photos
- No limit
- The overall requirements of 3DS
- Stores photos and videos indefinitely
- Works over Wi-Fi and cellular
- Supports these photo and video formats: HEIF, JPEG, RAW, PNG, GIF, TIFF, HEVC, and MP4.
|
After learning the differences between My Photo Stream and iCloud Photo Library, you can now choose your desired way to sync photos from iPhone to iPad. This will transfer photos from iPhone to iPad automatically.
Option 1. Move Photos from iPhone to iPad via My Photo Stream
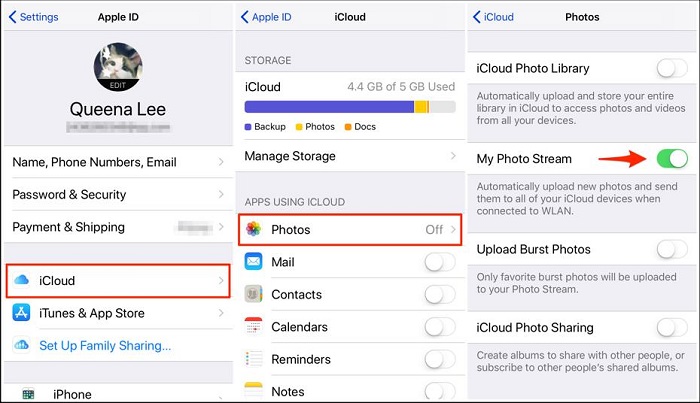
Step 1. Launch the Settings app on your iPhone > Tap on [your name] > Select the "iCloud" option > Tap on "Photos."
Step 2. Tap the "Upload to My Photo Stream" toggle to enable photos and videos over Wi-Fi.
![Enable My Photo Stream on iPhone]()
Step 3. Then, you can repeat the steps on your iPad. After that, all photos will be synced from the iPhone to the iPad.
Option 2. Transfer Photos from iPhone to iPad via iCloud Photo Library
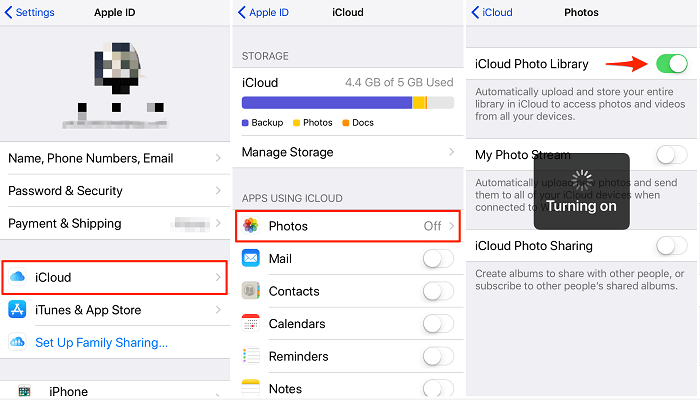
Step 1. Go to Settings on your iPhone > Tap on your Apple ID's profile > Tap on "iCloud."
Step 2. Tap on "Photos"> Toggle the "iCloud Photo Library" on.
![Transfe Photos from iPhone to iPad]()
Did You Get All the Methods for Photos Migration from iPhone to iPad to Get Rid of iCloud
After reading our post, we hope you know how to transfer photos from iPhone to iPad without iCloud. There are also methods that help you sync photos between iPhone and iPad with iCloud. We offer you the option of EaseUS MobiMover, iTunes, AirDrop, Email, and iCloud. Of these options, EaseUS MobiMover is the most recommended since it owns the fastest transfer speed and supports the widest photo formats. Anyway, don't miss it.
FAQs on How to Transfer Photos from iPhone to iPad Without iCloud
1. How do I transfer files from iPhone to iPad without iCloud?
The best way to transfer files from iPhone to iPad without iCloud is to use EaseUS MobiMover.
- Connect your iPhone and iPad to a computer and trust this computer.
- Choose Phone to Phone mode, and select the file categories you want to move.
- Click Transfer, and give a few minutes for the file-sharing process. Finally, when it completes, you can go to the corresponding apps to see whether the files are synchronized.
2. Why do photos not transfer from iPhone to iPad?
The reasons why the photos are not transferred to your iPad vary due to the different methods. If you are using My Photo Stream to sync your photos to your iPad and it fails, there should be something wrong with your internet connection. Ensure you turn on Wi-Fi and connect to a workable internet. Otherwise, go to Settings > [Your Name] > Photos > Turn on My Photo Stream (If you don't see the option, turn on iCloud Photos instead).
3. How do I AirDrop from iPhone to iPad?
- First, turn on Bluetooth and Wi-Fi on both devices.
- Open the file or picture you want to AirDrop on your iPhone.
- Tap Share, and choose AirDrop from the sharing options.
- Select the iPad you want to share the file with.
- On the target iPad, receive the file.


 NEW
NEW HOT
HOT