Transferring data between your iPhone and iPad is essential, whether you want to share files seamlessly across your Apple devices or set up a new iPad with all your important information. Whether you're moving everything or just want to selectively transfer certain files, like photos, videos, contacts, music, ringtones, and documents, this guide covers all the methods for you to transfer data from iPhone to iPad.
What's the Best Way to Transfer Data from iPhone to iPad?
- Method 1. MobiMover allows you to transfer selected or all data types without erasing devices or requiring the internet, ideal for users who want control and speed.
- Method 2. AirDrop is perfect for quick, wireless sharing of individual files, but not suitable for full device transfers.
- Method 3. Quick Start is the best wireless option for transferring everything from iPhone to iPad during the initial setup of a new iPad.
- Method 4. iTunes backup is a traditional method for full data migration from iPhone to iPa,d but requires a computer and erasing the iPad if it has been set up already.
- Method 5. iCloud is convenient for continuous syncing, but is limited by storage space and internet speed.
Method 1. Transfer Data from iPhone to iPad Without iCloud/iTunes
Supports: Photos, videos, music, ringtones, audiobooks, contacts, books, and more
If you are looking to transfer files like photos, music, contacts... between your iPhone and iPad without iCloud, you will like the free iPhone data transfer software - EaseUS MobiMover. With this tool installed on your Mac or PC, you will be able to:
- Transfer files from computer to iPhone/iPad/iPod Touch or vice versa
- Sync data from one iPhone/iPad/iPod Touch to another
- Manage iDevice content from computer
- Transfer data from iPhone to iPad after setup
Besides, EaseUS MobiMover can also serve the function of a free video & audio downloader that allows you to download videos from YouTube, Twitter, Facebook, Dailymotion, or download music from SoundCloud, MySpace, and many other sites to your computer or iPhone/iPad.
Here is how to transfer data from iPhone to iPad without iCloud or iTunes:
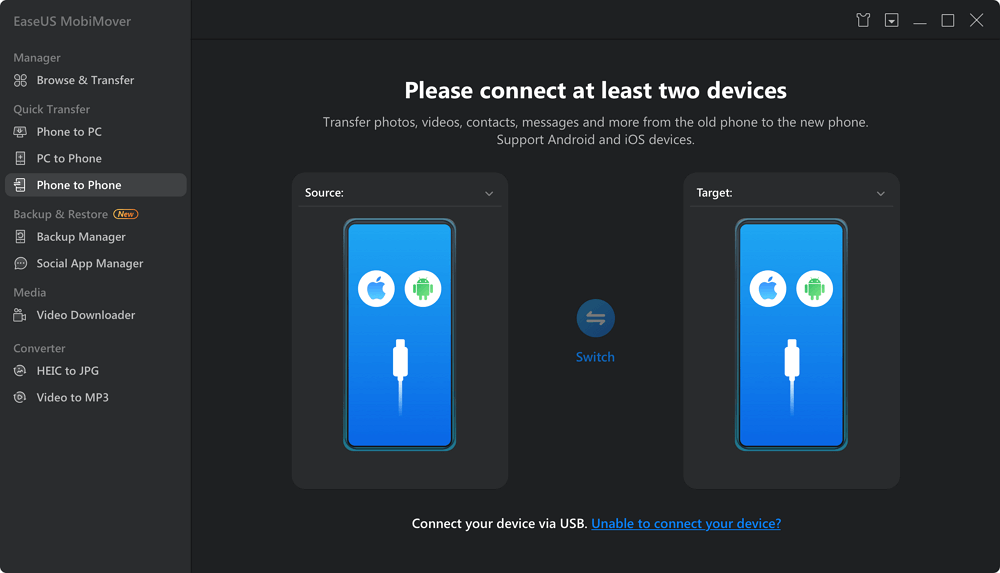
Step 1. Connect your iPhone and iPad to your computer with compatible USB cables and tap on "Trust This Computer" on both devices. Start EaseUS MobiMover and navigate to the "Phone to Phone" mode. For data syncing between iPhone and iPad, you need to switch to the correct direction (transfer data from iPhone [name] to iPad [name]). Click "Next".
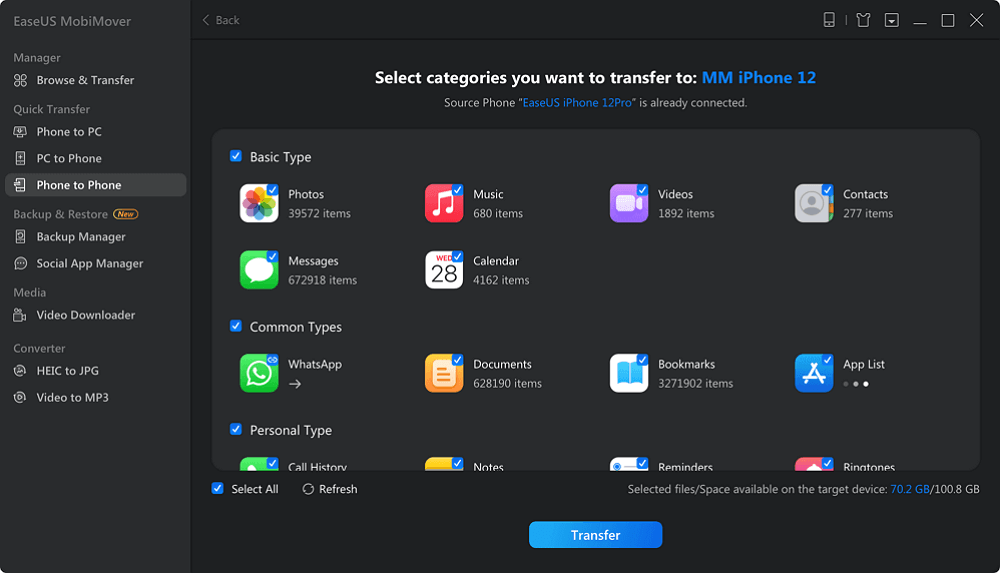
Step 2. Here, MobiMover allows you to transfer all types of data, like audio files, pictures, videos, messages, contacts, etc. You need to selectively choose the category/categories you want to transfer to your iPad, and click "Transfer" to initiate the process.
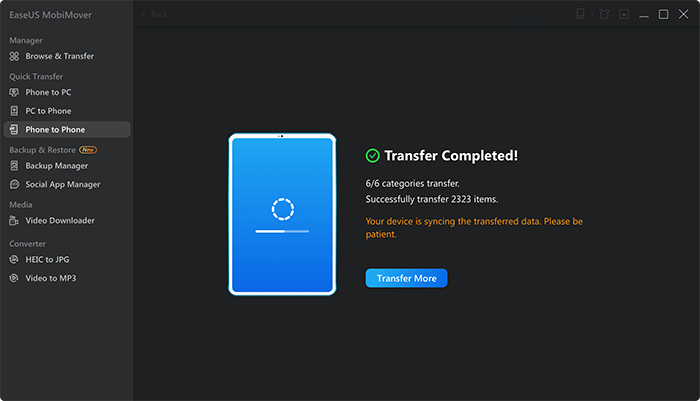
Step 3. Wait some time to let MobiMover finish transferring all the selected files. After that, go to the related apps to view the synced files on your iPad.
With EaseUS MobiMover, you can transfer files between your iPhone and iPad flexibly without erasing your device or signing in to your devices with the same Apple ID. Moreover, you can select a whole category or particular items under the category to share. Whether you want to transfer photos from iPhone to iPad without iCloud or send contacts from iPhone to iPad without AirDrop, you can use it to share files freely. Isn't it great? Don't hesitate to give it a try.
Method 2. How to Transfer Data from iPhone to iPad Wirelessly
Supports: Photos, videos, contacts, websites, locations, and more
Since both iPhone and iPad are Airdrop-supported devices, you are able to transfer data from iPhone to iPad or vice versa with the help of the built-in file-sharing service. AirDrop enables you to wirelessly transfer data between two devices over Wi-Fi and Bluetooth connections. Thus, if you prefer to perform the data transfer without a USB cable, use AirDrop instead.
How to transfer data from iPhone to iPad:
Step 1. Make sure your devices are within the Wi-Fi and Bluetooth range.
Step 2. Turn on AirDrop on your iPhone and iPad.
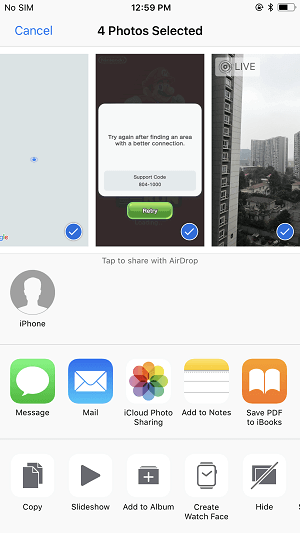
Step 3. To transfer an iPhone to an iPad, go to the App that contains the items you'd like to copy, select the items, tap on the "Share" button, choose AirDrop, and select the device name of your iPad.
Step 4. On your iPad, click "Accept" and receive the items from your iOS device to transfer data from iPhone to iPad.
![How to transfer data from iPhone to iPad without iCloud]()
That's all it takes to transfer data from iPhone to iPad after setup using AirDrop. You can use this feature to transfer photos from iPhone to iPad easily.
Method 3. How to Transfer Data to New iPad via Quick Start
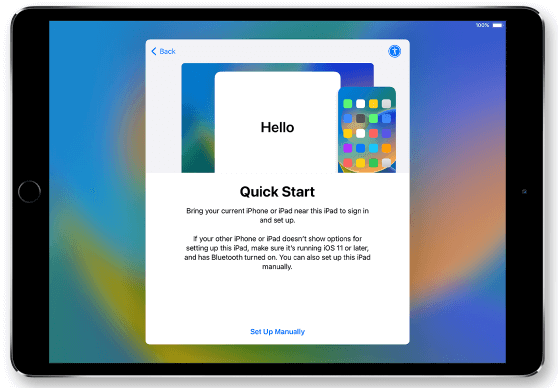
Quick Start is Apple's convenient feature that allows you to set up your new iPad automatically by transferring data wirelessly from your current iPhone or iPad. Quick Start transfers almost all data, including apps, photos, messages, settings, and more. This method is fast, secure, and doesn't require a computer or iCloud backup. However, if your iPad is already set up, you need to erase all content and settings to use Quick Start.
Step 1. Turn on your new iPad and place it near your iPhone. A Quick Start screen will appear on your iPhone. Follow the on-screen instructions on your iPhone.
![quick-start-appear.png]()
Step 2. If prompted, use your iPhone's camera to scan the animation displayed on the iPad's screen. If the camera doesn't work, tap "Authenticate Manually" and enter your iPhone's passcode.
Step 3. Follow the prompts on your iPad to set up your Face ID or Touch ID.
Step 4. Choose whether to download from iCloud or transfer directly from your iPhone. If you select to transfer data from iPhone to iPad directly, ensure both devices remain close and connected to power until the transfer is complete.
![transfer-directly-form-iphone.png]()
Step 5. After the data migration from iPhone to iPad, follow the instructions and finish the setup.
Note: Quick Start requires iOS 12.4 or later for full device-to-device migration, including apps and app data. Additionally, your new iPad should run iPadOS 13 and later.
Method 4. How to Sync iPhone to iPad via iTunes Backup
Syncing your iPhone data to your iPad using iTunes involves creating a full backup of your iPhone on your computer and then restoring that backup onto your iPad. This method transfers your apps, photos, messages, settings, and more, but some content like Apple Pay info or Face ID settings won't transfer due to security.
Note: Disable iCloud backup on your iPhone before backing up to iTunes to avoid conflicts. Ensure your computer has enough space to store the backup file.
Step 1. On your Windows PC or Mac, launch the latest version of iTunes. On macOS Catalina and later, use Finder instead of iTunes.
Step 2. Connect your iPhone to your computer and select your iPhone icon when it appears.
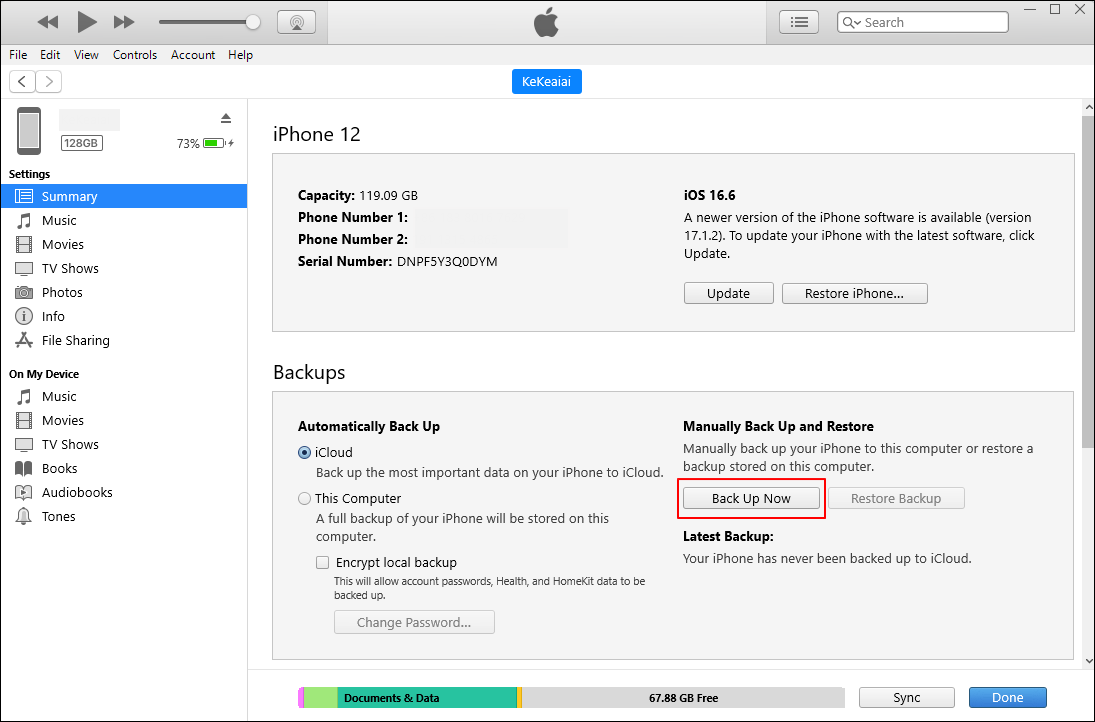
Step 3. In the Summary tab, locate the Backup section, and choose This Computer as the backup location to create a local backup.
Step 4. Click Back Up Now to start the backup process. Wait until the backup completes before disconnecting your iPhone.
![itunes-back-up-iphone-new.png]()
Step 5. Follow the on-screen instructions to set up your iPad until you reach the App & Data screen.
Step 6. Choose "Restore from Mac or PC." Connect your iPad to the same computer.
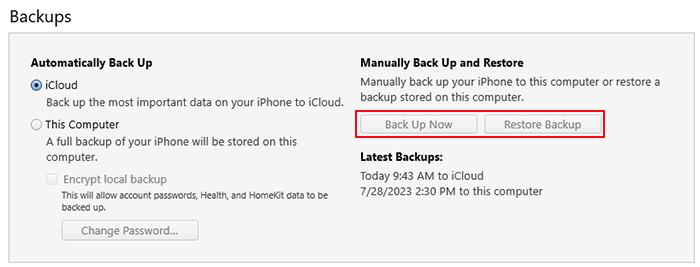
Step 7. Launch iTunes or Finder, select your iPad, and click Restore Backup.
![itunes-backup.png]()
Method 5. How to Transfer Data from iPhone to iPad Using iCloud
iCloud is the cloud-based storage service provided by Apple. It allows you to sync data across your devices that use the same Apple ID over Wi-Fi automatically. When it comes to transferring data between iPhone and iPad, iCloud could help in three ways:
- Transfer photos, videos, contacts... via iCloud Photos/Contacts
- Sync documents via iCloud Drive
- Transfer all data and settings via iCloud backup
Before you start, you should know that you need to make sure you are using the same Apple ID account on your iOS devices and there is enough iCloud storage for you to save the files you'd like to copy.
Get ready and follow the steps on how to transfer data from iPhone to iPad wirelessly.
Option 1. Transfer Files Between iPhone and iPad via Apps Using iCloud
Supports: Photos, videos, contacts, notes, etc.
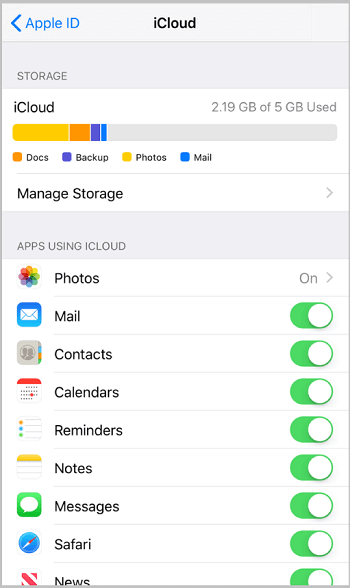
It's quite easy to sync data from iPhone to iPad via apps that use the service. For example, you can transfer photos and videos from your iOS device to your iPad by turning on iCloud Photos, or sync contacts between your devices by enabling iCloud Contacts.
To transfer data from iPhone to iPad with iCloud, all you need to do is to sign in to the devices with the same Apple ID and turn on the corresponding option via the Settings app.
![How to transfer files from iPhone to iPad via iCloud settings]()
Option 2. Transfer Files from iPhone to iPad via iCloud Drive
Supports: Word, Excel, PPT, and other types of content
iCloud Drive stores any type of content as long as the file is less than 50GB and doesn't exceed your iCloud storage. With iCloud Drive on, you can sync files across your devices, including iPhone, iPad, iPod Touch, Mac, and PC.
How to transfer files from iPhone to iPad via iCloud Drive:
Step 1. On your source iOS device, go to the "Settings" app and select [your name] > "iCloud".
Step 2. Scroll down to enable "iCloud Drive".
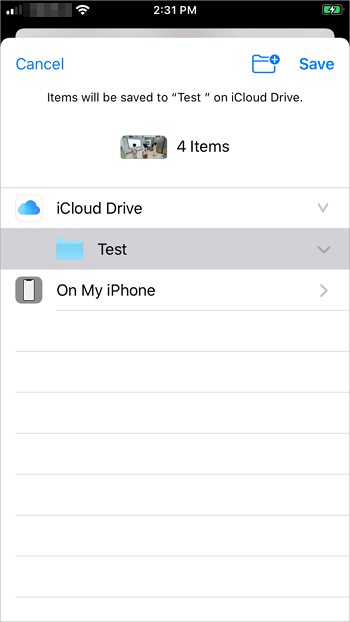
Step 3. Open the "Files" app and select "Browse" > "iCloud Drive." Search for the files you want to copy to your iPad and upload them to iCloud Drive. (Or you can go to select the files you want to transfer, click the "Share" icon and save them to iCloud Drive.)
Step 4. On your iPad, go to the Files app and click "Browse" > "iCloud Drive" to check the items. If you need to do so, hold and press the file to move it to your iPhone storage.
![How to transfer data from iPhone to iPad with iCloud Drive]()
Option 3. Transfer All Data and Settings from iPhone to iPad via iCloud Backup
Supports: Almost all data and settings on the iOS device
An iCloud backup includes almost all data and settings on your iOS device except data that has been stored in iCloud already. Thus, using iCloud backup (or iTunes backup) is a good choice when you want to switch to a new iPhone, iPad, or iPod from an old one.
However, if you restore the iPhone backup to an iPad that has been set up, you will need to erase the device and then set it up again. That's because the "Restore from iCloud Backup" option is only available during the setup process. For more details on how to transfer data from iPhone to iPad, refer to the guide on how to transfer data from one iPhone to another for the detailed steps.
Other than iCloud, other cloud-based storage services will also help to transfer data between iPhone and iPad.
The Bottom Line
Whether you are going to switch from your previous iOS device to a new device or just share files between two iOS devices, you now know how to do it from the paragraphs above. Choose the way that fits your needs best and follow the steps to transfer data from your iPhone to iPad with a few simple clicks.
FAQs on How to Transfer Data from iPhone to iPad
If you have any questions about today's topic, you may want to check the commonly asked questions below.
1. How Do I Transfer Photos bwtween iPhone and iPad for Free?
You can achieve that using a third-party tool called EaseUS MobiMover. You'll just need to download, install, and launch a free version of the tool on your computer. Next, connect both iOS devices via USB and follow the on-screen instructions.
2. What is the purpose of a Lightning to USB adapter?
The Lightning to USB adapter makes it simple to transfer files between an iOS device and USB drive.
3. How to transfer photos from Mac to iPhone?
There are numerous methods for transferring photos from a Mac computer to an iPhone. If you have iTunes, you can easily figure out how to transfer files from iTunes to iPhone. You may access your data on your iPhone by uploading it to iTunes.


 NEW
NEW HOT
HOT