When Do You Need to Transfer Photos from iPhone to Flash Drive
Transferring photos from iPhone to flash drive is an excellent choice to make your photos more portable without occupying your iPhone storage. Besides, it is also one of the ways to back up iPhone photos so that you can avoid accidental data loss.
But how to transfer photos from iPhone to flash drive? If you have no idea about how to do it, here I'd like to show you how to get things done. Since the ways on how to transfer photos from iPhone to flash drive on Mac has been detailed already, here, I'd like to show you how to transfer photos from iPhone to flash drive on Windows only. (While if you want to transfer photos from USB to iPhone, check the related guide for details.)
How to Transfer Photos from iPhone to Flash Drive on Windows All at Once
When you want to transfer photos and videos from iPhone to PC or an external storage device connected to PC, you can't miss the iPhone data transfer tool - EaseUS MobiMover Pro. Whenever you need to transfer photos, videos, music, contacts, and more to or from an iPhone, iPad, or iPod touch, EaseUS MobiMover, the software to transfer photos from iPhone to PC/Mac/External hard drive, will come to help.
In addition, it plays the roles of an iPhone backup tool, WhatsApp manager, and file converter. These powerful functions make it easy for you to back up iPhone to external hard drive, transfer WhatsApp messages from one iPhone to another, and convert iPhone photos to JPEG so that you can open HEIC on Windows easily.
This tool is advisable to help you better manage your iPhone, iPad, or iPod touch content.
To transfer photos from iPhone to flash drive on Windows:
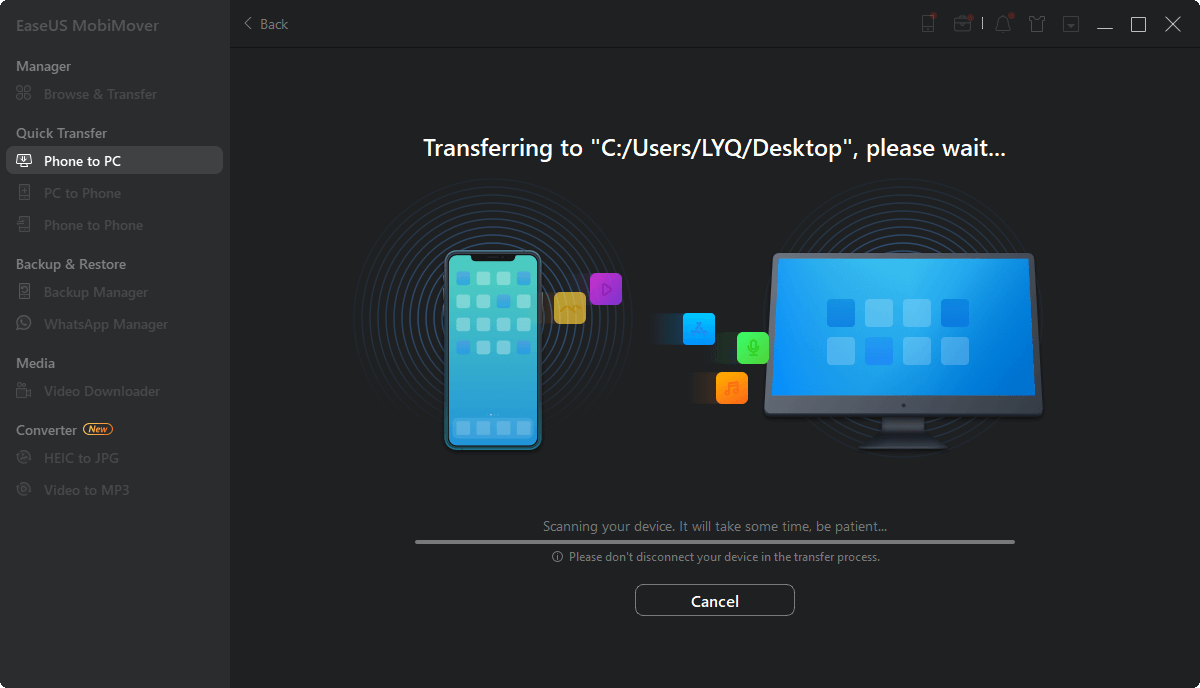
Step 1. Connect your flash drive and iPhone to your computer at the beginning. Start EaseUS MobiMover and choose "Phone to PC" at the left side panel. Then, click the "Next" button to the following step.
Step 2. Keep the genres you'd like to transfer. Except for photos, you can also copy videos, audio, books, podcasts, and more from iPhone to the flash drive as a backup. And, click "Custom Path" to set your flash drive as the destination.
Step 3. Click the "Transfer" button to start transferring photos from your iPhone to your flash drive. When it has completed, you can go to your flash drive to check the items.
If you need to transfer photos from iPhone to external hard drive or transfer photos from iPhone to SanDisk someday in the future, you can also follow the same steps above.
How to Transfer Photos from iPhone to Flash Drive on Windows 8/10/11 with Photos
The Photos app is available on Windows 8 (including Windows 8.1), Windows 10, and the latest Windows 11. Photos on Windows works to manage photos and videos on your PC and import photos and videos from an external device to your computer.
When you need to transfer photos from iPhone to flash drive, all you need is to change the destination path to a folder on your flash drive. Afterward, you can import photos from iPhone to flash drive via Photos directly. (It is no doubt that Photos also works to transfer photos from iPhone to PC without iTunes. )
Notes: As you may know, there is also a Photos app on Mac, which also helps to transfer photos from iPhone to Mac.
To put iPhone photos on flash drive on Windows:
Step 1. Connect the iPhone and the USB flash drive to your computer. Make sure your computer recognizes them.
Step 2. Launch Photos and click "Import" > "From a connected device."
Step 3. Wait for Photos to load the pictures on your iPhone.
Step 4. Set to save the imported photos to a folder on your USB drive.
Step 5. Select the pictures you need to transfer and click "Import Photos" to start transferring photos from iPhone to the USB flash drive.
![Import Photos via the Photos app]()
How to Transfer iPhone Photos to Flash Drive on Windows via File Explorer
Transferring photos from iPhone to a flash drive on Windows is also practical with File Explorer. As you may have noticed, the only folder a PC can read from an iPhone, iPad, or iPod touch is the DCIM folder. And this folder stores all your iPhone photos and videos. Thus, you can transfer iPhone photos to the flash drive on Windows via a USB cable. If you encounter the issue "iPhone photos not showing up on PC," follow the troubleshooting guide to fix the issue first.
To transfer pictures from iPhone to flash drive on Windows:
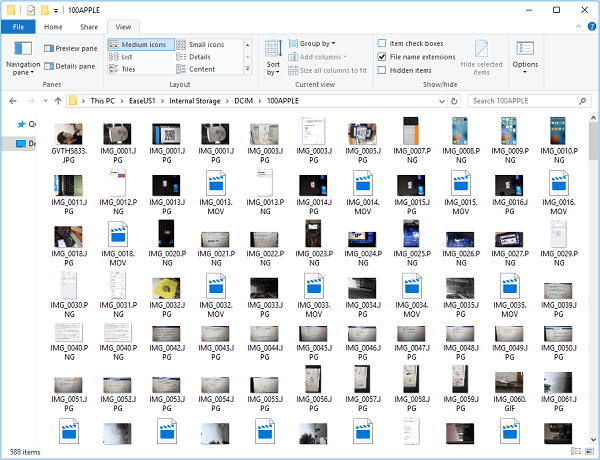
Step 1. Connect your iPhone and USB to Windows via USB.
Step 2. Go to "This PC" > "Internal Storage" > "DCIM" > "100APPLE."
Step 3. Manually copy the photos you want to transfer from your iPhone's internal storage to your USB flash drive.
![Import iPhone photos via File Explorer]()
How to Transfer iPhone Photos to USB with iCloud
If you don't have a USB cable to connect your iPhone to a PC, is there any way for you to download pictures from your iPhone to the flash drive? The answer is "Yes."
With Apple's cloud-based service - iCloud, you can transfer photos from your iPhone to iCloud and then download pictures from iCloud to your flash drive. By doing so, you can also achieve your goal of transferring photos from iPhone to flash drive on Windows.
To transfer iPhone photos to USB with iCloud:
Step 1. Turn on iCloud Photos on your iPhone.
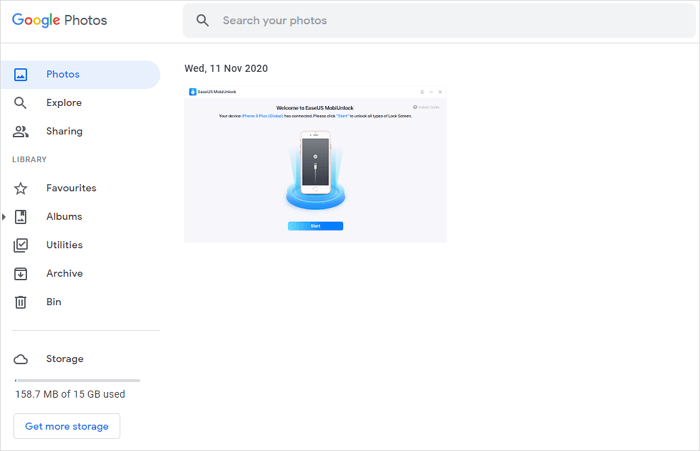
Step 2. Go to iCloud.com on your PC and sign in with the Apple ID account on your iOS device.
Step 3. Choose Photos among the options.
Step 4. Select the pictures you want to transfer and click the download icon to save them to your computer.
Step 5. Go to the Downloads folder on your PC and then move the downloaded photos to your flash drive.
![Visit photos in iCloud]()
How to Transfer Pictures from iPhone to Flash Drive on Windows with Google Photos
Using Google Photos is similar to using iCloud since both are cloud-based services. To transfer iPhone pictures to flash drive on Windows using Google Photos, you need to download the Google Photos app to your iPhone first. Then follow the steps below.
To transfer photos from iPhone to flash drive on Windows:
Step 1. Open the Google Photos app and sign in.
Step 2. Go to Settings and back up your photos and videos to Google.
Step 3. Visit Google Photos via a browser and sign in with the same Google account used on your iPhone.
Step 4. Select the pictures you want to transfer and download them to your computer.
Step 5. Go to the Downloads folder to copy these images to your USB flash drive.
![Upload photos to Google Photos]()
FAQs About Transferring Photos from iPhone to Flash Drive
When you are looking to transfer photos from iPhone to flash drive, you may have questions below:
1. How do I transfer photos from iPhone to flash drive with computer?
It's easy to transfer photos from iPhone to flash drive with computer. Whether you are using a PC running Windows 11, Windows 10, Windows 8, or Windows 7, you can follow the steps below to get things done:
- Connect the iPhone and the flash drive to the computer.
- Open This PC and visit your iPhone's DCIM folder.
- Manually copy photos from the internal storage of your iPhone to the flash drive.
2. Can you transfer photos directly from iPhone to flash drive?
If your flash drive is for iPhone, which means it is compatible with USB Type-C devices, you can transfer photos from iPhone to flash drive directly by connecting the flash drive to your iOS device via the charging port.
3. Can I transfer photos from iPhone to Windows computer?
All the ways above to transfer photos from iPhone to flash drive on Windows are also applicable to transferring photos from iPhone to Windows computer. For example, you can use Photos and File Explorer to transfer photos from iPhone to PC all at once or use an iPhone data transfer tool like EaseUS MobiMover to transfer photos and many other files from iPhone to PC quickly.
The Bottom Line
If you decide to choose a cloud service, make sure you have enough cloud storage to save the pictures you are going to transfer, and there is a stable network connection on your device. Besides, you need to use the same account on your iPhone and Windows computer to access the synced items.
Specify your need and carry out the way to like best to transfer photos from iPhone to flash drive on Windows quickly.


 NEW
NEW HOT
HOT