Are you planning to upgrade to the new iPhone 17? Then, transferring data from your current iPhone is a crucial step to ensure all your contacts, photos, apps, and settings move seamlessly to your new device. There are several user-friendly methods available, from quick wireless transfers using Quick Start to restoring from an iCloud backup. This guide helps you choose the best approach tailored to your situation, making your switch to the iPhone 17 smooth and hassle-free.
Transfer Data from iPhone to iPhone 17 with MobiMover
EaseUS MobiMover is a versatile iPhone data transfer tool that supports transferring a wide range of data types between devices. With MobiMover, it is easy to move all data from one phone to another in one go. It allows users to transfer contacts, messages, photos, videos, notes, calendars, voice memos, and more directly from one iPhone to another. This tool also enables simple backup, file management, and selective data transfer, making it ideal for users looking to move data efficiently when upgrading to a new iPhone.
EaseUS MobiMover is especially suitable for:
- 👉Those who try to transfer all data from iPhone to iPhone 17 safely and quickly.
- 👉Anyone looking to transfer large volumes of data or specific file types selectively between devices.
- 👉Users seeking an alternative to iCloud/iTunes backup and preferring direct device-to-device transfer.
- 👉Those with limited or slow internet connections (data transfers via USB, no Wi-Fi required).
How to Transfer Whole Data from iPhone to iPhone 17:
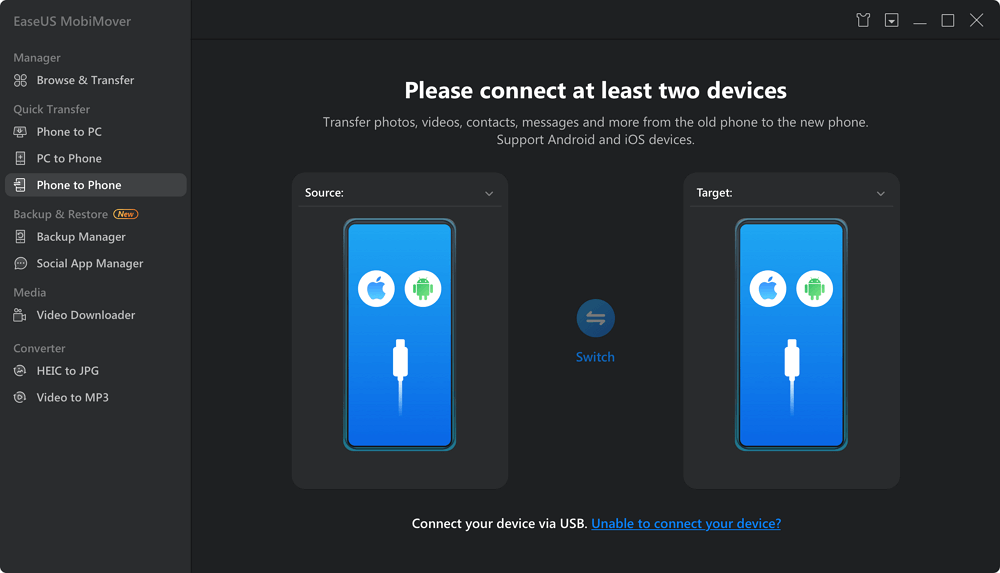
Step 1. Install EaseUS MobiMover on your computer and launch it. Navigate to Phone to Phone transfer mode.
![phone to phone transfer]()
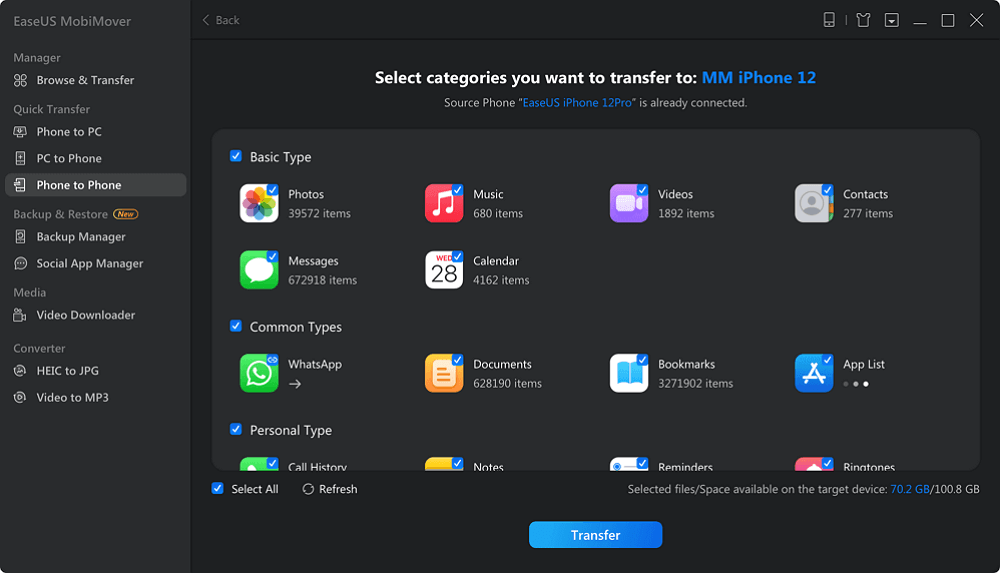
Step 2. Connect both your old iPhone and new iPhone to the computer. Click Next to select the data you want to move.
![select data types]()
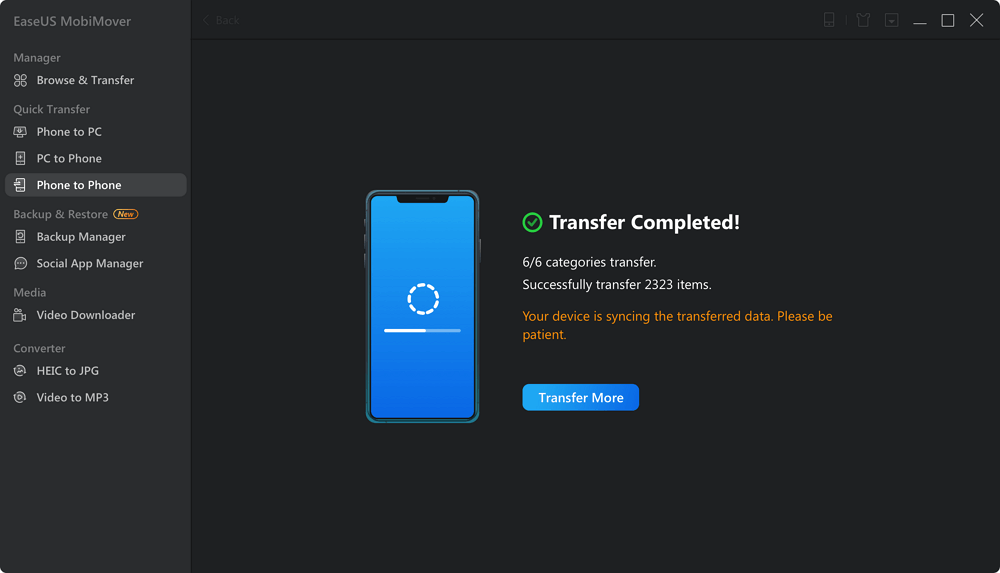
Step 3. Click Transfer and wait for the data migration process to finish. Then, you can go to the related application to check the content.
![transfer completed]()
Transfer All Data from iPhone to New iPhone with Quick Start
Apple's built-in Quick Start feature allows you to wirelessly transfer data directly from your old iPhone to the new iPhone. It works by establishing a secure connection between the two devices, enabling you to transfer contacts, photos, apps, and settings without the need for cables or manual setup. As long as both devices run iOS 12.4 or later, Quick Start can transfer most of your data quickly, usually within half an hour to a couple of hours, depending on the amount of content.
Quick Start is especially suitable for:
- 👉Users upgrading to iPhone 17 that has not been set up yet.
- 👉Those who prefer moving data and settings entirely in one process, with no specific data selection.
- 👉People are seeking a method that automatically transfers settings like Apple ID, Wi-Fi password, apps, and preferences.
Steps for Full Data Transfer with Quick Start:
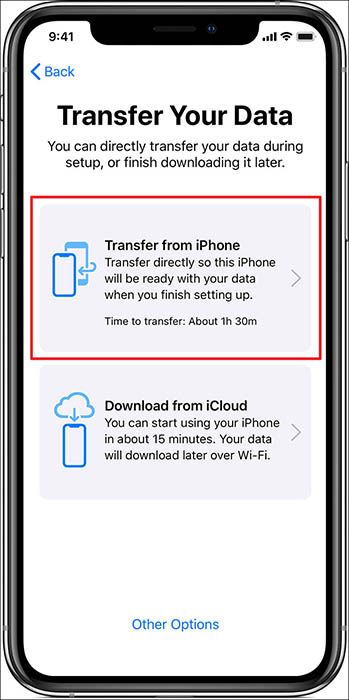
Step 1. Power on your iPhone 17 and place it next to your old iPhone. The Quick Start screen will appear on your old iPhone, asking you to use your Apple ID to set up the new device.
Step 2. An animation will appear on the new iPhone 17. Use the camera on the old iPhone to scan it, and it will establish a secure connection.
Step 3. Follow the on-screen instructions to configure biometric security. When prompted, select Transfer from iPhone to start wireless data transfer. It will transfer most content, including photos, accounts, device settings, and app data.
![transfer-iphone-data-quick-start.png]()
Step 4. Keep both iPhones near each other during the transfer. Once it finishes, your iPhone 17 will restart, and you can finish setting up additional features. Your apps will then download from the App Store in the background.
Note: If you have already set up your iPhone, you need to perform a factory reset before using Quick Start.
Transfer Selected Data from iPhone to iPhone 17 with AirDrop
If you want to share a few items, such as specific photos, videos, contacts, or documents, try AirDrop. While it doesn't transfer everything from one iPhone to another in one go, AirDrop is ideal for selectively sharing important files without using cables or an internet connection. It utilizes Bluetooth and Wi-Fi, and it is ideal for instant file sharing on the spot.
AirDrop is especially suitable for:
- 👉Users who want to selectively transfer files rather than complete device data.
- 👉People who have already set up their iPhone 17 and want to add files without resetting the device.
- 👉Quick file sharing between iPhones in close proximity.
- 👉Those who want to transfer individual or small groups of files instantly.
How to Transfer A Few Files from iPhone to iPhone 17:
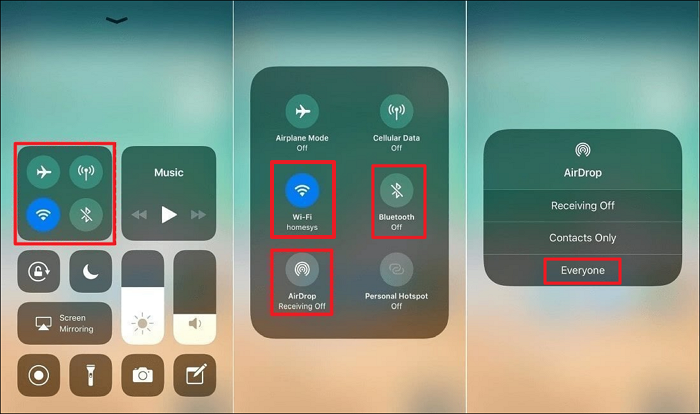
Step 1. Enable Bluetooth and Wi-Fi on both devices.
Step 2. In Control Center, press and hold the network settings card, tap AirDrop, and set it to receive from Contacts Only or Everyone.
![enable-airdrop-on-iphone.png]()
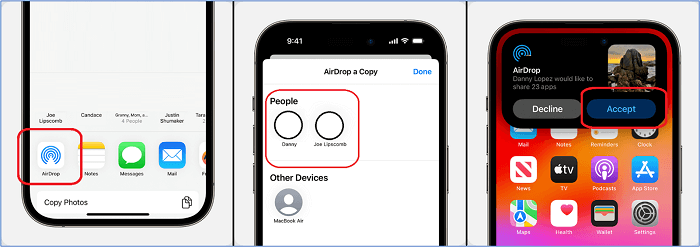
Step 3. Open the app, such as Photos or Contacts. Select the items you want to send.
Step 4. Tap the share icon and choose AirDrop from the sharing options. From the list of nearby devices, tap your new iPhone 17.
Step 5. On the target iPhone, tap Accept to receive the incoming files.
![airdrop-apps.png]()
Back Up iPhone and Restore Backup to iPhone 17 with iCloud (Wireless)
iCloud offers a convenient cloud-based method to transfer your data from an old iPhone to your new iPhone. By backing up your current device to iCloud, you create a copy of your photos, messages, app data, and settings. When setting up your iPhone 17, you can restore this backup to bring all your data to the new device. Apple provides 5GB of free iCloud storage, but you can upgrade your plan if you need more space for your backup.
iCloud Backup is especially suitable for:
- 👉Users who want a wireless, cloud-based way to move data without needing both phones at once.
- 👉People with limited access to cables or computers during their upgrade process.
- 👉Individuals willing to wait for backups and downloads depending on internet speed (Ensure your phones are connected to a stable and fast Wi-Fi during the whole process.).
Transfer Data from iPhone to iPhone 17 Wirelessly with iCloud:
Step 1. On your old iPhone, go to Settings > [Your Name] > iCloud > iCloud Backup, then tap Back Up Now.
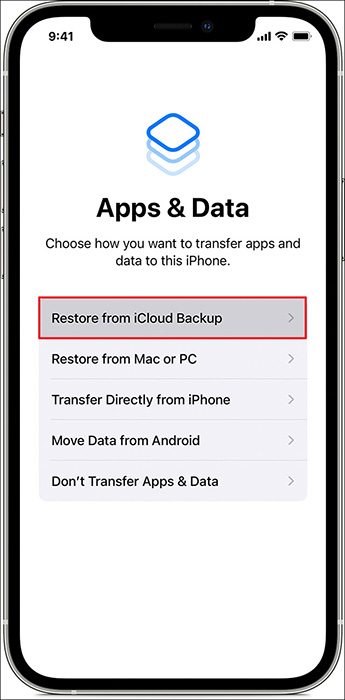
Step 2. Power on your new iPhone and follow the on-screen setup instructions until you reach the Apps & Data screen.
Step 3. Choose Restore from iCloud Backup and sign in with your Apple ID. Select the most recent backup.
![choose-icloud-backup-apps-and-data.jpg]()
Step 4. Keep your new iPhone connected to Wi-Fi and plugged into power while your apps, data, and settings download and install. This may take some time, depending on your backup size and internet speed.
Restore iTunes Backup to New iPhone 17, iPhone 17 Pro (Wired)
You can also use iTunes (or Finder for macOS Catalina and later) to transfer data from your old iPhone to the new iPhone. This method involves creating a full backup of your old iPhone on your computer and then restoring that backup onto your iPhone 17. As data is transferred via USB, the process can be more stable and sometimes faster compared to wireless methods.
iTunes Backup is especially suitable for:
- 👉Users who want a full, local backup and restore without needing iCloud storage.
- 👉People switching to a new iPhone 17 with a large amount of data, including apps and passwords.
- 👉Those with limited or slow internet connections who prefer wired transfer.
- 👉Anyone comfortable connecting devices to a computer for managing backups and transfers.
How to Transfer Data from iPhone to iPhone 17 with iTunes:
Step 1. Launch iTunes or Finder, and connect your old iPhone to the computer. If prompted, trust the computer on your iPhone and enter your device passcode.
Step 2. Select your device icon, then click Back Up Now to create a full backup on your computer.
![itunes-backup-vs.png]()
Step 3. Safely disconnect your old iPhone and connect your new iPhone 17 to the computer.
Step 4. In iTunes/Finder, select the new iPhone 17 when it appears. Choose Restore Backup, then select the backup you just created.
Step 5. iTunes/Finder will sync apps, music, and other media to your new device, which may take some time depending on the size of your data. Once the restore is done, your iPhone 17 will restart.
Conclusion
In conclusion, transferring data from your old iPhone to the iPhone 17 is straightforward with several effective methods available, each catering to different user needs. Whether using Quick Start for a quick wireless direct transfer, iCloud for a convenient cloud-based restore, iTunes/Finder for a reliable local backup and restore, AirDrop for selective file sharing, or third-party tools like EaseUS MobiMover for added flexibility, the key is choosing the method that best fits your situation.
Ensuring both devices are updated, charged, and properly prepared will make the transition smooth and help retain all your valuable data. With these options, upgrading to the iPhone 17 can be as seamless and worry-free as possible.
FAQ
1. What should I do if my new iPhone 17 won't detect the old iPhone during the Quick Start?
Make sure Bluetooth and Wi-Fi are enabled on both devices. Place them close physically. Restart both iPhones and update their iOS versions. If the issue persists, try resetting network settings on both devices or using iCloud or iTunes for data transfer instead.
2. What if I don't have enough iCloud storage to back up my old iPhone for transfer?
You can upgrade your iCloud storage plan to accommodate your backup or use alternative transfer methods, such as iTunes backup and restore or Quick Start for direct transfer without cloud storage.
3. How long does it take to transfer data to an iPhone 17?
The transfer time depends on the data size and method used. Wireless Quick Start transfers typically take from 30 minutes to 2 hours. Wired transfers via iTunes/Finder may be faster. iCloud restore depends heavily on internet speed. Patience and leaving both devices plugged in are recommended.
4. What if my iPhone 17 gets stuck during data transfer?
If your iPhone 17 freezes or the transfer halts, try restarting both devices and retry the transfer. Make sure you have the latest iOS updates. If problems persist, restore from an iCloud or iTunes backup instead.
5. Can I transfer my Apple Watch data when switching to iPhone 17?
Yes, your Apple Watch data is included in your iPhone backup if you use iCloud or encrypted iTunes backups. After pairing with the new iPhone 17, you can restore the watch from the backup.


 NEW
NEW HOT
HOT