Nowadays, smartphones have become the primary repository for precious photos. As you document your adventures, milestones, and everyday moments, the storage capacity of your iPhones often reaches its limits. That's when external storage solutions like LaCie Hard Drives come to the rescue, providing a secure and reliable space to safeguard our treasured memories.
This article provides a simple and effective method to transfer photos from iPhone to LaCie hard drive. It will ensure that your memories remain intact and easily accessible for years. You'll be guided effortlessly through the steps, ensuring seamless iPhone photos transfer to external hard drive.
| 💡Suitable for |
🙂Effectiveness |
🔍Difficulty |
| Mac&Windows |
🥇Very effective in transferring photos swiftly and reliably. |
👍Easy to use: innovative and user-friendly interface suitable for all users. |
| Windows Only |
Effective for transferring photos in bulk using native Windows functionality. |
Moderately Difficult: Requires enabling AutoPlay and selecting import settings. |
| Mac Only |
🥇Highly effective, especially for Mac users, providing direct backup to LaCie hard drive. |
👍Moderately Easy: Requires launching Image Capture and selecting backup settings. |
| iPhone Only |
Effective for direct transfer of photos without a computer. |
Moderately Difficult: Involves connecting and configuring the external storage device and app. |
🏃The Fastest Way to Transfer Photos to LaCie Fuel
When it comes to transferring photos from your iPhone to the LaCie Fuel, you want a solution that's not only fast and efficient but also user-friendly and reliable. That's where EaseUS MobiMover Pro comes into play. It is a powerful and versatile software designed to simplify your photo transfer process while ensuring that none of your precious memories are left behind.
This software is built to deliver lightning-fast data transfer between your iPhone and LaCie Fuel without compromising the quality of your photos. What's more, it can help you to import photos in a reverse way: transfer photos from external hard drive to iPhone. Whether you're dealing with a small collection of snapshots or a vast library of memories, this software gets the job done swiftly.
💎Key Features of EaseUS MobiMover
- With this tool, you can easily manage, organize and optimize your photos and videos on your iPhone. For example, you can import videos from iPhone to PC to free up iPhone storage.
- This software provides you access to back up your iPhone to Windows 10, ensuring that you are able to manage everything efficiently.
- It allows you to download videos from YouTube, Facebook, and over a thousand websites.
- You can use this tool to batch-convert HEIC images to JPG and video files to MP3.
Follow this YouTube short to see the video tutorial for transferring your photos from your iPhone to external hardware like LaCie Fuel, or follow the step-by-step instructions in the text.
Ready to experience the convenience and speed of EaseUS MobiMover for yourself? Follow these simple step-by-step instructions to transfer photos from iPhone to LaCie hard drive:
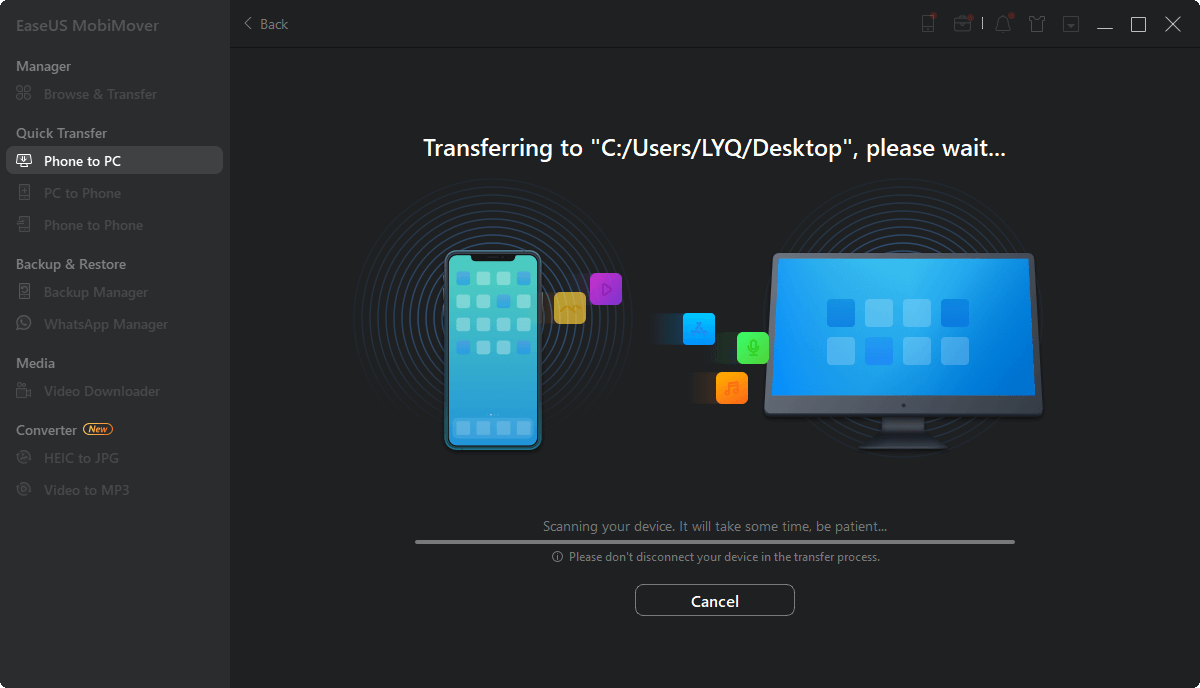
Step 1. Connect devices and launch EaseUS MobiMover.
Connect both the iPhone and the external hard drive to the PC and make sure these devices are recognized by the computer. Afterward, launch the photo transfer tool and click "Phone to PC" > "Next."
Step 2. Select the category.
Check "Pictures" among all the supported categories. If you need to, you can also transfer other files from your iPhone to the external hard drive, together with photos. Besides, since the default destination is the desktop, you need to click the storage path to change it to your external hard drive.
Step 3. Start transferring photos from iPhone to hard drive.
Click the "Transfer" button to start importing photos from the iPhone to the external hard drive. When it has done, go to the selected folder on the hard drive to check these items.
📷Move Pictures from iPhone to LaCie on Windows
Having explored the convenience of EaseUS MobiMover for transferring photos, let's delve into another method. It is to transfer photos from iPhone to LaCie hard drive on Windows using AutoPlay.
For Windows users, the AutoPlay feature offers a straightforward and native approach to handle this task seamlessly. Following are the steps to guide you through the process of using AutoPlay options to transfer your photos:
Step 1. Using a compatible USB cable, connect your iPhone to your Windows computer. Ensure the LaCie Fuel external hard drive is also connected to the computer through a USB port. Upon connecting your iPhone, Windows should automatically detect it and display a pop-up window with various options.
Step 2. You'll see a list of options for how Windows should handle the connected iPhone. Then, proceed with the "Import photos and videos " option from the list. Once you've chosen the import settings, a new window will appear, displaying all the photos and videos available on your iPhone.
![choose import photos and videos option]()
Step 3. You can either select individual photos or click the "Select All" option to transfer your entire photo library. After choosing the images, you want to transfer, change the destination location to LaCie Fuel external hard drive and click the "Import X of X Items" button to initiate the transfer process.
![import photos to lacie hard drive]()
Is this method effective and workable? If you think this method actually solves your problem, please share it with more friends on social media platforms.
💻Back Up iPhone Photos to LaCie Hard Drive on Mac
For Mac users, backing up your iPhone to the external hard drive is a breeze with the help of the built-in "Image Capture" application. In this section, we will walk you through the step-by-step process of using Image Capture to seamlessly back up your photos. It will ensure they are safely stored on your reliable LaCie hard drive.
Step 1. Connect your iPhone and LaCie hard drive to your Mac. Once your devices are connected, navigate to the "Applications" folder on your Mac and launch the "Image Capture" application. It should automatically recognize your connected iPhone and display it in the sidebar.
![choose the image capture feature]()
Step 2. In the Image Capture window, you'll see a list of all the photos available on your iPhone. To select specific images for backup, simply click and drag to highlight the desired photos. Alternatively, you can take help from the "Command + A" shortcut key combination to select all images.
![choose all the iphone pictures]()
Step 3. Once you've selected the photos you want to back up, look for the "Import To" drop-down menu at the bottom of the Image Capture window. Click on it to reveal a list of available destinations, and select your LaCie Fuel external hard drive as the backup location.
![change location to lacie hard drive]()
📱Import Photos from iPhone to LaCie Without Computer
It is also possible to import your treasured photos from your iPhone to the LaCie Fuel external hard drive without the need for a computer. To do this, you will need to use the LaCie media app. It is an alternative method that allows you to accomplish photo transfer from iPhone to external hard drive without a computer. By using the power of the LaCie hard drive and its app, you can transfer photos from your iPhone to Lacie hard drive:
Step 1. Begin by downloading the LaCie Media app from the iOS App Store. It's available for free. Power on the wireless storage device. You'll notice the Wi-Fi LED blinking for about a minute. Wait for it to become solid before proceeding to the next step.
Step 2. On your mobile device, open the Settings app. Tap on the "Wi-Fi" option, and from the list of available Wi-Fi networks, select the storage device. Finally, launch the LaCie Media app to initiate the photo transfer process.
Step 3. Tap on the filter drop-down icon (three lines) and choose your LaCie Hard Drive from the available devices. Navigate to the photos you wish to upload from your device. Tap the Checkmark button to select the desired photos. After selecting the images, tap on the Actions button and then choose the Upload option to start the upload process.
![view external hard drive photos on iphone]()
Conclusion
In this comprehensive guide, we explored various methods to transfer photos from iPhone to LaCie hard drive. From user-friendly software like EaseUS MobiMover to native functionalities such as AutoPlay on Windows and Image Capture on Mac, we've covered a range of options to suit diverse user preferences and operating systems. Each solution presented in this article offers its own set of advantages, making photo transfer efficient, secure, and convenient.
EaseUS MobiMover stands out for its high-speed data transfer and user-friendly interface, making it an excellent choice for users seeking simplicity and reliability. Windows AutoPlay and Mac's Image Capture provide effective ways to back up photos to the LaCie hard drive directly from your computer, catering to respective operating system preferences.
Transfer Photos from iPhone to LaCie Hard Drive FAQs
Now, let's address some common questions related to transferring photos from iPhone to LaCie hard drive. Below are answers to FAQs that will help you better understand the process and troubleshoot any potential issues:
1. Can I transfer photos from my iPhone directly to an external hard drive?
Yes, you can transfer photos directly from your iPhone to an external hard drive without the need for a computer. Certain external storage devices, like iOS-compatible wireless drives or flash drives, allow you to use dedicated apps or built-in functionality to facilitate the direct transfer of photos from your iPhone to the external hard drive. These solutions offer a convenient method for on-the-go photo backups and management.
2. How do I connect my iPhone to LaCie?
To connect your LaCie Hard Drive to your iPhone, follow these simple steps:
Step 1. Find and install the free LaCie Media app from the App Store. Power on the wireless storage device and wait for the Wi-Fi LED to blink for approximately one minute. Once it becomes solid, you're ready for the next step.
Step 2. Open the Settings app on your mobile device and tap the "Wi-Fi" option. Then, select the LaCie Hard Drive from the list of available Wi-Fi networks.
3. Why won't my Mac recognize my LaCie external hard drive?
If your Mac is not recognizing your LaCie external hard drive, it can be frustrating. However, there are various steps you can perform to troubleshoot and resolve this issue. Firstly, ensure that the LaCie Hard Drive is powered on and connected correctly to your Mac using a compatible USB cable.
Next, examine the USB ports on your Mac for any physical damage or debris. To further diagnose the issue, try testing the LaCie external hard drive on another computer. If it works seamlessly on another device, it suggests that the problem might be specific to your Mac.