Sometimes you download the music you like on your iPad for offline listening. What if the iPad reminds you the storage is full after downloading lots of songs?
Of course, you don't want to delete them. You can transfer music from iPad to computer to free up your iPad. If you want to know how to move music from iPad to computer, this guide can help you. There are three ways for you to choose from.
How to Transfer Music from iPad to Computer Without iTunes
iTunes, indeed, could help to transfer purchased music from an iPhone or iPad to a computer. If you prefer to copy songs downloaded from other sources, iTunes will fail you.
At this time, you can seek help from third-party software. I would recommend EaseUS MobiMover, free iPhone transfer software to transfer files from iPad to PC. It is professional on how to put music on iPod without iTunes and how to transfer songs from iPad to computer whether the song is purchased in iTunes or downloaded elsewhere. With this tool installed on your computer, you will be able to:
- Transfer files between an iPhone/iPad/iPod touch and a computer
- Transfer files between two iDevices
- Back up and restore iPhone/iPad
- Download online videos to a computer or iDevice
Therefore, in addition to transferring music from iPad to computer, EaseUS MobiMover could also help when you need to transfer photos from PC to iPhone or download YouTube videos to iPad.
To copy music from iPad to PC:
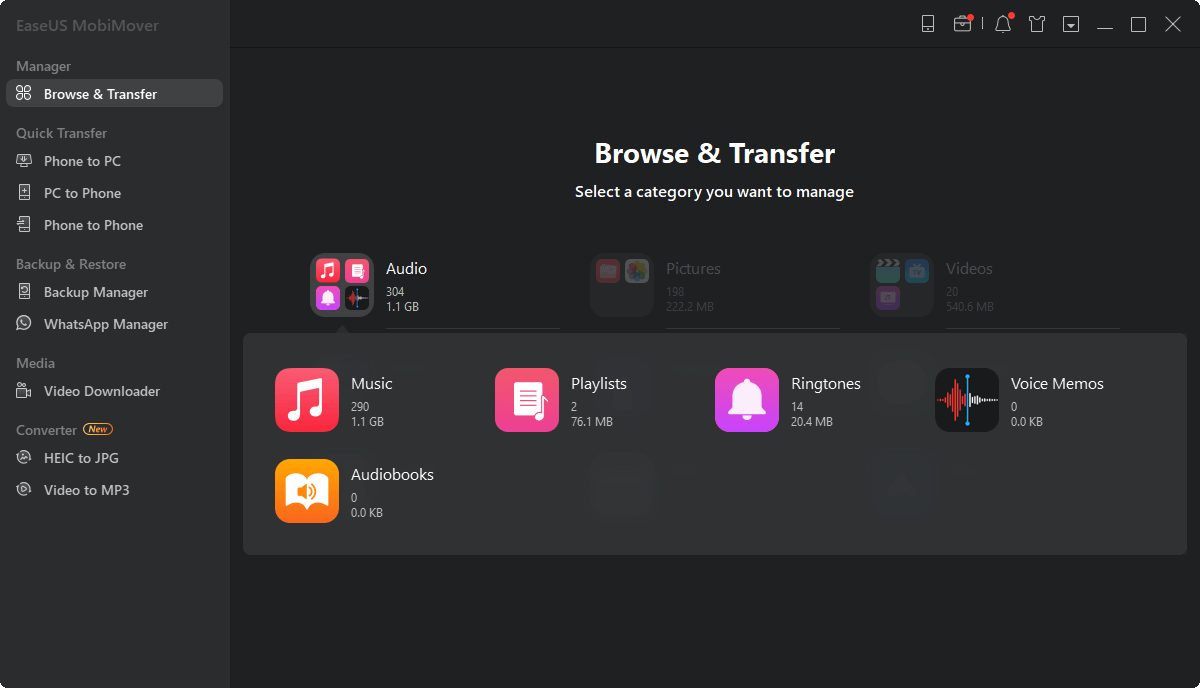
Step 1. Connect your iPad to the computer and run EaseUS MobiMover. Allow EaseUS MobiMover to access your iPad by clicking "Allow" on the program and tap "Trust" on iPad. Click "Browse & Transfer" at the Manager section, then click "Audio" and "Music" to start the process.
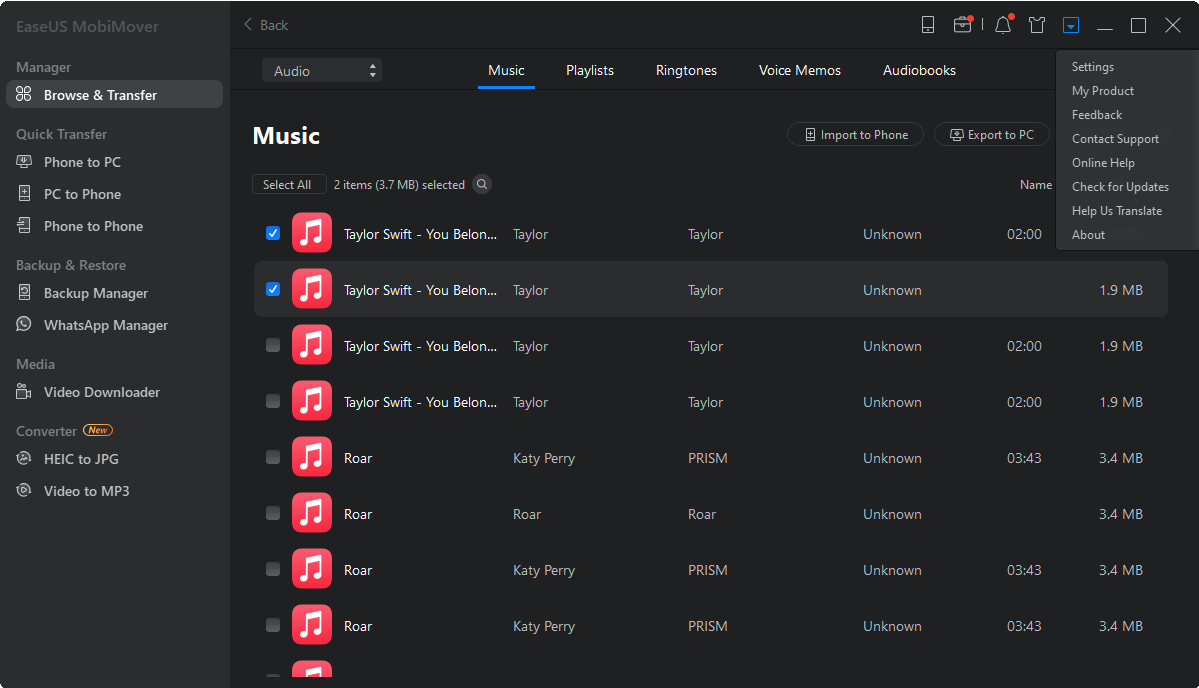
Step 2: Choose Music on iPad and click "Settings" to set a safe location on your PC for transferring. You can select specific music files by clicking "Music" on the program and select a secure location on your PC by clicking "Settings" to transfer and save the selected files.
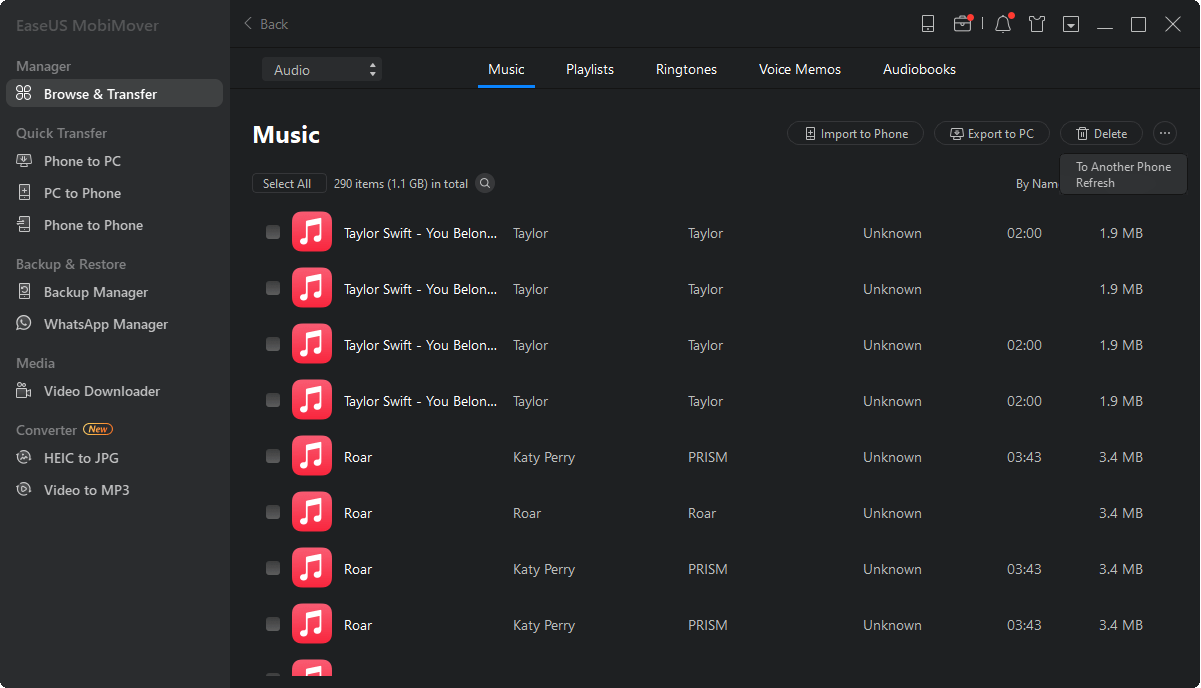
Step 3. Start the transferring by clicking "Transfer to PC" and wait for the process to finish. When the process finishes, you can open and check the transferred music files on your PC.
After transferring, you can edit music on your computer as you want or burn these songs onto a CD to listen to them in a car. Anyway, you can do whatever you want with the transferred music once you transfer them to a computer.
How to Transfer Music from iPad to Computer with iTunes
If you only want to copy purchased music from iPad to computer, using iTunes is enough. iTunes allows you to purchase and manage music on your computer, sync content from iPad to computer, and backup and restore your iOS devices. Let’s see how to transfer music from iPad to computer using iTunes.
Step 1. Download and install iTunes on your PC.
Step 2. Launch iTunes and click "Account" > "Authorizations" > "Authorize This Computer."
Step 3. Enter the Apple ID and password you use on your iPad and click “Authorize.”
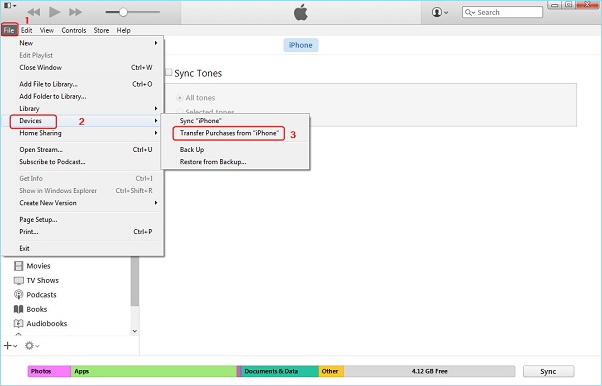
Step 4. Connect your iPad to the computer and go to "Files" > "Devices" > "Transfer Purchases from [your iPad's name]" to transfer music from your iPad to the computer.
![transfer photos from iPad to computer with iTunes]()
How to Transfer Music from iPad to Computer with iCloud
If you have subscribed to Apple Music or iTunes Match, you can use iCloud to transfer music from iPad to Computer.
iCloud is an online synchronous storage service and cloud computing service provided by Apple. It provides an initial storage space of 5 GB for free, and you can purchase more. You can store music, photos, files, etc. in iCloud. Moreover, you can log in on different devices to view the stored content. Here are the steps of using iCloud to copy music from iPad to computer.
Step 1. Update your iPad to the latest version of iPadOS.
Step 2. Ensure to use the same Apple ID as Apple Music or iTunes Match to log in to your iPad.
Step 3. Connect your iPad and computer to the Internet.
Step 4. Go to "Setting" > "Music," tap "Sync Library."
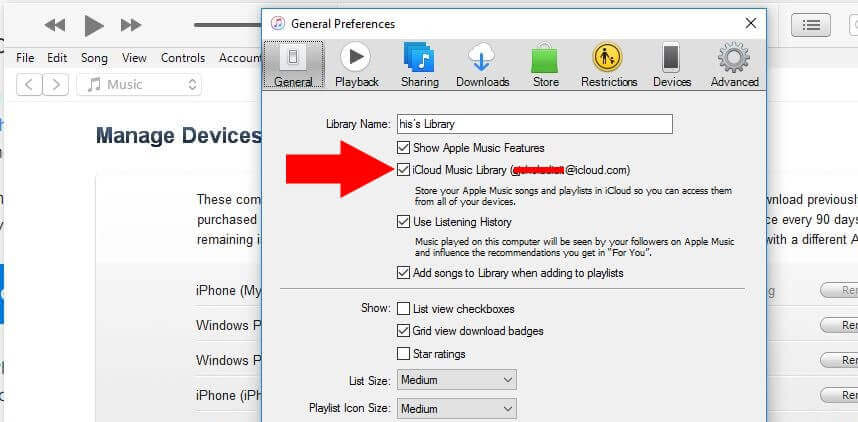
Step 5. Launch your iTunes, head to "Edit" > "Preference."
Step 6. Click “General” on the prompt dialogue, and select "iCloud Music Library" to turn it on.
Step 7. Click "OK."
![transfer music from iPad to computer with iCloud]()
How to Pass Music from iPad to Mac via AirDrop Wirelessly
If you're using a Mac computer and an iPad or iPhone running iOS 8.4, then you can use AirDrop to transfer music from your iPhone or iPad to your Mac. To do this, you'll need to enable the AirDrop feature on both your Mac and iPad and then put them together. Next, you can follow these steps to transfer and add music to your Mac from your iPad.
Step 1. Enable AirDrop on your Mac and iPad.
- On your Mac: Go to the Finder, find "AirDrop" from the left sidebar, enable it, and set its visibility to everyone.
- On your iPad: Go to the Settings, tap "General," and then enable "AirDrop."
Step 2. Launch the Music app on your iPhone and find the music you wish to share.
Step 3. Tap the More icon (...) at the right-bottom side of your screen, then choose "Share Song..."
Step 4. From several supported sharing icons, choose "AirDrop."
Step 5. Open your Mac and tap "Accept" to receive the music file.
![Share music with AirDrop]()
Bonus Tip. How to send videos from a PC to an iPhone
If you think the music file is not enough to express the creator's emotion or creativity, then you can download music videos to your iPhone from the computer. The downloaded music video will bring some visual vision of the song to your life. Asides from this purpose, there are many other benefits of learning how to send a video to your iPhone from the computer.
And here we will briefly instroduce five different ways to transfer videos from a PC to an iPhone. To get the job done, you'll need some data transfer apps like an iOS data transfer tool and iTunes or cloud services like iCloud and Dropbox to help.
If you want to know how each tool or service works to help you, you can check our previous guide "how to transfer videos from PC to iPhone with/Without iTunes."
The Bottom Line
iTunes only supports transferring music you purchased. And iCloud allows you to sync music from iPad to computer if you have subscribed to Apple Music or iTunes Match. EaseUS MobiMover can transfer music from iPad to computer without limitation. What's more, it can work to share other types of files. If your device is running iOS 8.4, you can also utilize AirDrop to complete the transfer task easily. After reading this guide, you can choose the method you like to copy music from iPad to computer.

