Although Microsoft has released the latest Windows 11, there are still some of you who use computers that carry the older Windows 7. But no matter which operating system you use, there is no difference when it comes to transferring photos from an iPhone to a PC. To help you make a backup of your precious iPhone photos to a PC in Windows 7 smoothly, there is a collection of proven ways for you:
How to Transfer Photos from iPhone to PC in Windows 7 with iPhone Transfer Software
Also supports videos, music, ringtones, contacts, messages, books, etc.
Whether you are using Windows 7 or the newest Windows 11, you can apply the iPhone transfer software - EaseUS MobiMover. As the software to transfer photos from iPhone to PC, it allows you to transfer all your iPhone photos to a PC and vice versa. Other than photos, you are able to transfer videos, music, ringtones, books, contacts, and many other types of files between an iPhone/iPad/iPod and a computer or between two iDevices with it.
What's more, it is also an iPhone backup tool and WhatsApp manager which enables you to:
- Back up and restore an iPhone/iPad/iPod touch without iTunes
- Transfer WhatsApp messages from one iPhone to another
- Back up and restore WhatsApp chats
Although there are built-in utilities on Windows that allow you to transfer photos from an iPhone to Windows 7, they won't work when it comes to importing photos from a PC or laptop to an iPhone. Besides, other types of files are not available for data transfer with them. Therefore, you are highly recommended to transfer photos from your iPhone to a Windows 7 PC using EaseUS MobiMover.
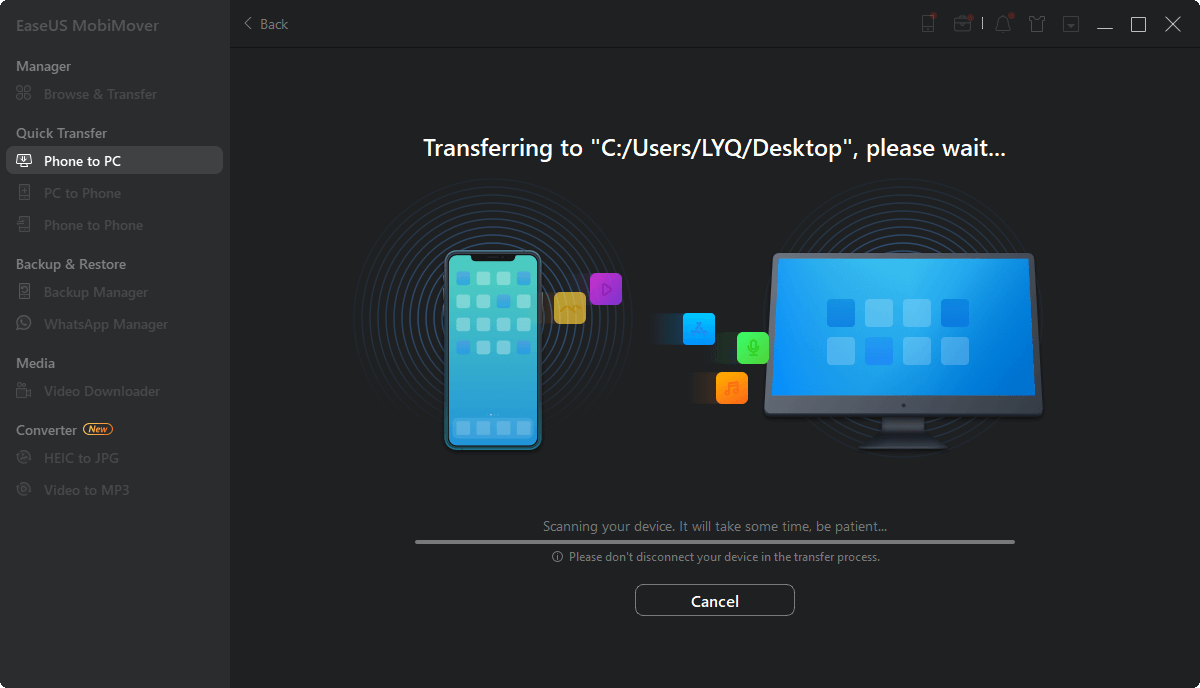
To transfer photos from an iPhone to Windows 7:
Step 1. Connect your iPhone to PC running Windows 7 or later. Run EaseUS MobiMover, choose "Phone to PC" and click the "Next" button on the screen. This mode allows you to transfer data from iPhone to PC in one click.
Step 2. MobiMover supports transferring audio, videos, pictures, books, contacts, messages, etc. from iPhone to PC. Here, choose "Pictures" only. MobiMover will save the files on your desktop by default. You can customize the path as you need.
Step 3. Now, click the "Transfer" button to start transferring photos from your iPhone to PC. The transfer time depends on the file size. Wait patiently
How to Import Photos from iPhone to Windows 7 via AutoPlay
On Windows 8 and later, the Photos app is pre-installed on PC for the purpose of helping you manage photos on your computer and import photos from an external device to Windows. In spite of the fact that Windows 7 doesn't have such an app, there is AutoPlay on Windows 7 that performs equally effectively to copy photos from an iPhone to Windows 7. Before you start, make these preparations:
- Download and install iTunes on your computer so that AutoPlay can read your iPhone data.
- Prepare a USB cable.
- Unlock your iPhone using your password.
How to access iPhone photos on PC and import iPhone photos to Windows 7 PC or laptop:
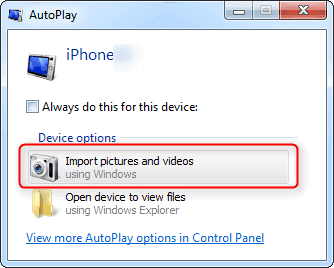
Step 1. Plug your iPhone into your PC using a USB cable.
Step 2. When a prompt appears on your iPhone asking you to "Trust This Computer," tap "Trust."
Step 3. When your iPhone is detected by this PC, the AutoPlay window will appear. Click "Import pictures and videos." Then the import process will begin.
Step 4. Then, all of your pictures will be imported to your computer. You can find them in a folder called "My Pictures." If you want to change the default location to store the transferred pictures, you can click "Import Setting" in the left corner bottom and then follow its on-screen instructions to do it.
![Transfer photos from iPhone to PC Windows 7 via AutoPlay]()
Note: AutoPlay disallows you to export certain pictures. If you want to export some specific photos, try one of the other ways available.
How to Transfer Photos from iPhone to Windows 7 via Windows Explorer
Windows Explorer is another free option to download pictures from your iPhone to your PC. As with the AutoPlay method shown above, you'll need to download and install iTunes (the latest version) so that your Windows 7 computer can read your iPhone's content. Then, follow these steps.
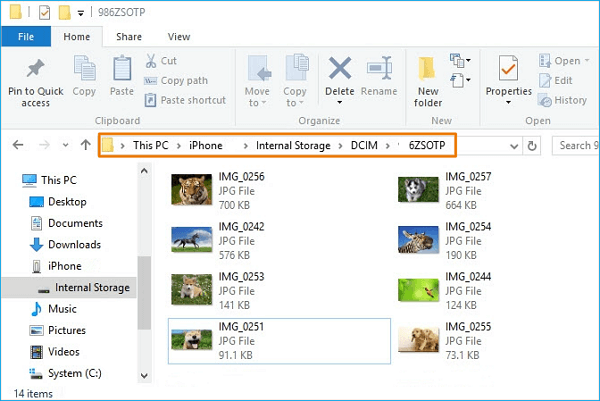
Step 1. Open Files Explorer by going to "This PC" > "Apple iPhone" > "Internal Storage" > "DICM."
Step 2. Open the "DICM" folder, and then you'll see all of your pictures and videos.
Step 3. Choose the pictures you want and copy them to another folder on your computer.
![how to transfer photos from iPhone to Windows 7 PC]()
How to Copy Photos from iPhone to PC in Windows 7 with iCloud
iCloud is a wireless option to export iPhone photos to a PC running Windows 7. Here are a few things you should know about using this method.
- This method requires you to enable iCloud Photos on your iPhone. If you don't, go to Settings > [your name] > iCloud > Photos > iCloud Photos. From here, you can enable and disable iCloud Photos.
- Once you've enabled iCloud Photos on your iPhone, every new picture you take will be automatically synced to your iCloud photos when your iPhone connects to a WiFi network.
- Every iCloud account comes with 5GB of storage, which can exceed easily if you transfer photos and videos that are in large size. If you have many photos to transfer, don't forget to upgrade your iCloud storage plan. (Prices start at $0.99 a month for 50GB)
iCloud is a great feature to use if you want to access your iPhone photos on other devices. If you prefer a wireless solution, here are the steps.
Step 1. Download and install iCloud for Windows on your computer.
Step 2. Sign in to your iCloud account.
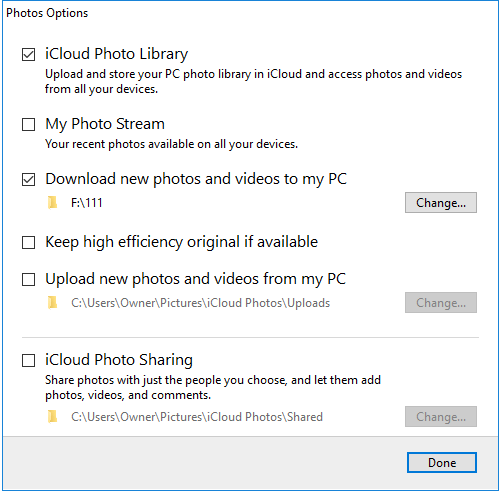
Step 3. Make sure the "Photos" option is enabled, then click "Option."
Step 4. Check the box next to "iCloud Photo Library" and "Download new photos and videos from my PC."
Step 5. Click "Done."
![Transfer photos from iPhone to PC using iCloud]()
iCloud is not the only cloud-based service applicable. Similar services like Dropbox, OneDrive, and Google Photos are also workable to transfer photos from your iPhone to a Windows 7 PC or laptop.
How to Send Photos from iPhone to PC in Windows 7 via Email
Apart from the methods listed above, you can also transfer photos from an iPhone to a computer in an old-fashioned way by using email. But this method only works when you have several photos to transfer since your email has a size limit for attachments.
Step 1. Open the Photos app on your iPhone.
Step 2. Go to your Camera Roll.
Step 3. Select the photos (not more than five) you wish you transfer.
Step 4. Click the export icon in the bottom left corner.
Step 5. From the suggested options, choose "Mail."
Step 6. Enter the detailed information by following its on-screen instructions.
Step 7. Then, you can sign in to your email account on the computer and download pictures to your PC.
![Transfer photos from iPhone to PC via Email]()
The Bottom Line
Except for AutoPlay, all of the ways above are also solutions to transfer photos from an iPhone, iPad, or iPod touch to a PC in other versions,including Windows 8, Windows 10, and Windows 11. While if you are looking to transfer photos from Windows to an iPhone someday, AutoPlay and Windows Explorer are not the suitable solutions. Instead, you should use a tool like EaseUS MobiMover or iCloud to get things done.
 NEW
NEW HOT
HOT