Want to make a copy of your iPhone music to the iPad? Purchase a new iPad and want to move loved songs to the new device for listening? Want to share songs between iPhone and iPad for convenience? Whatever the reasons, it's not difficult to transfer music from iPhone 12/11/XR/XS/8(P)/7(P)/6(P) to iPad/iPad mini/pro, whether you have iTunes or not.
In this post, we'll introduce 5 useful methods to transfer music from iPhone to iPad. All of these methods also apply to transfer music from iPad to iPhone. Let's have a quick view:
- iTunes: Use iTunes on your computer to sync music from iPhone to iPad with your iTunes library, then sync your iPad with the same library.
- EaseUS MobiMover: This third-party app allows you to transfer music directly from your iPhone to your iPad wirelessly.
- iTunes Store: You can access and download your purchased music in iTunes Store across multiple devices linked to the same Apple ID.
- Email: You'd better upload one or two songs due to file size limitations on email attachments.
- AirDrop: Use AirDrop to transfer individual songs or albums from your iPhone to your iPad.
Here we recommend EaseUS MobiMover most. You can use it to transfer music or other files from iPhone or iPad for free. Click below to free download it:
Part 1. How to Transfer Songs from iPhone to iPad With iTunes
According to Apple, iTunes is a media player, media library, and a mobile device management utility. With it, you can sync all purchased songs from an iDevice to iTunes library or vice versa. That makes it possible to transfer music from iPhone to iPad. Before you proceed, two things should be noted:
- iTunes only allows syncing purchased music.
- Make sure your computer runs the latest version of iTunes.
Step 1. Connect your iPhone to the computer via a USB cable.
Step 2. Launch the latest version of iTunes on your computer.
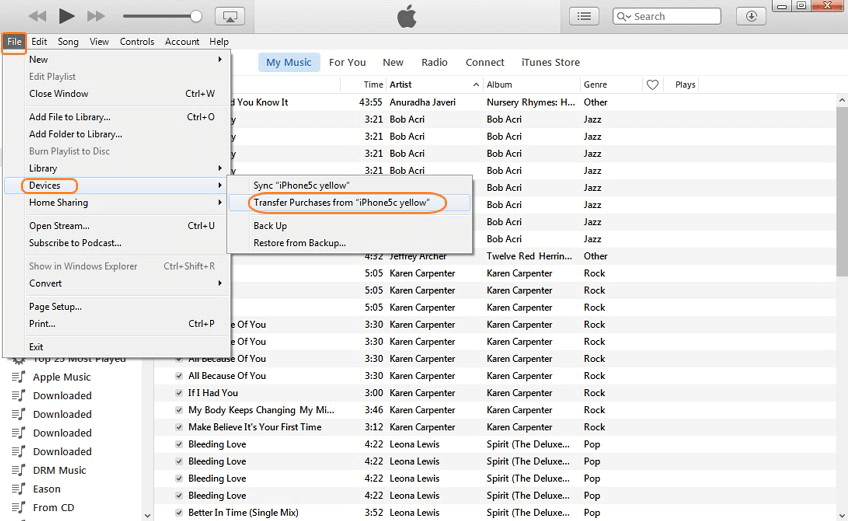
Step 3. Choose the "File" option at the top of your screen.
Step 4. From the drop-down list, choose "Devices," then choose "Transfer Purchases from [your iPhone name].
![Transfer music from iPhone to iPad]()
Step 5. Connect the iPad to your computer and open iTunes.
Step 6. Choose the song you'd like to move to your iPad.
Step 7. Right-click and select "Add to Device."
Step 8. Click on your iPad name to move the items to your iPad.
Part 2. 4 Ways to Transfer Music from iPhone to iPad Without iTunes
In this section, you'll get 4 methods to transfer music from iPhone to iPad. Each of the methods has its benefits and limits. You can read them to choose the one that best suits your needs.
Option 1. Using EaseUS MobiMover
To transfer music from iPhone to iPad more efficiently, an easy-to-use data transfer tool is necessary. But how to choose the best tool?
In short, the fewer limits it has in speed, data type, and functions, the better it works. To help you find that kind of tool, we have invited a couple of bloggers who are experts in fixing various iOS problems to test several tools. Finally, EaseUS MobiMover emerges as the most cost-effective tool. Here are some reasons why they recommend EaseUS MobiMover.
- It is a perfect iTunes alternative and even works better than iTunes since it is much smoother, faster, and easier.
- It can transfer all music, whether they're purchased or non-purchased. For example, it works well on how to put music on iPod without iTunes.
- It comes with a video downloader that allows you to download videos from YouTube or other popular websites.
- You can also convert a video to MP3.
- It works perfectly with iPhone/iPad/iPod and compatible with the latest iOS 17.
- In addition to audio, you can also transfer other files from iPhone to iPad, such as photos, videos, voice memos, and other data.
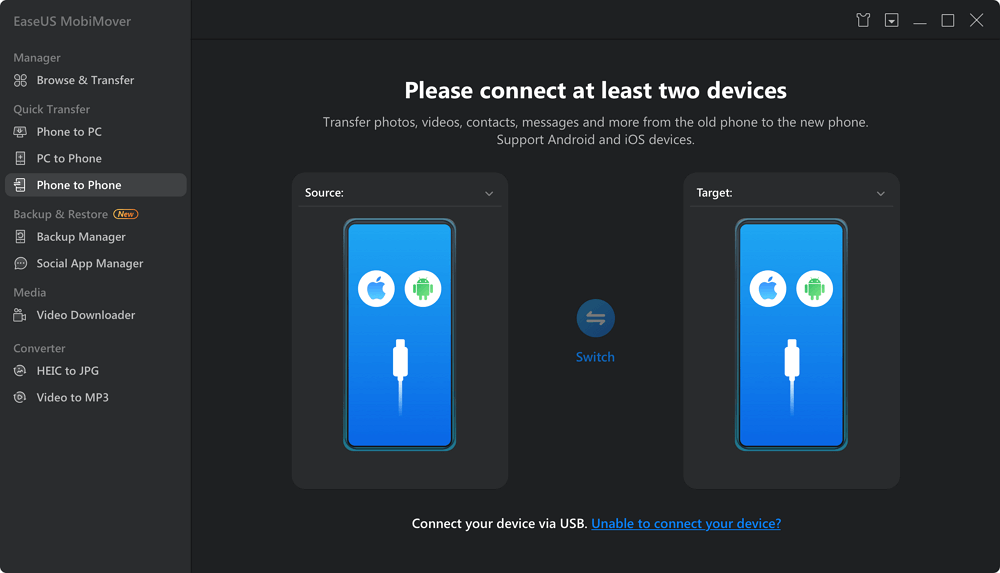
Step 1. Connect your iPhone and iPad to your computer and launch EaseUS MobiMover.
Tap "Trust" on both iDevices and click "Allow" on EaseUS MobiMover to enable this software to access your iPhone and iPad.
Click on "Phone to Phone" and set the transfer direction between iPhone and iPad, such as Transfer from "iPhone" to "EaseUS". Then click "Next" to continue.
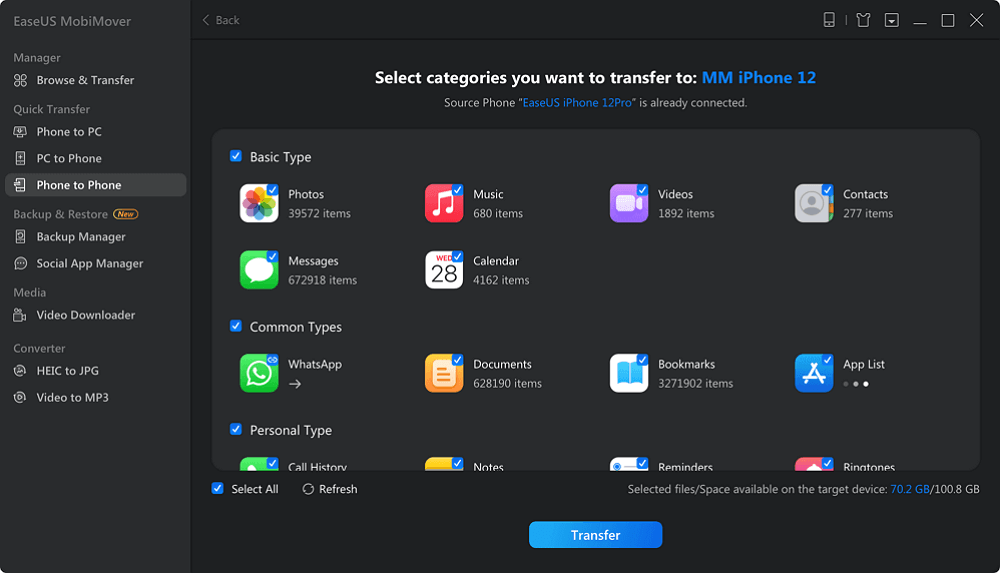
Step 2. Select "Music" on your source iPhone or iPad.
EaseUS MobiMover will automatically load and select all the supported files on your iPhone or iPad.
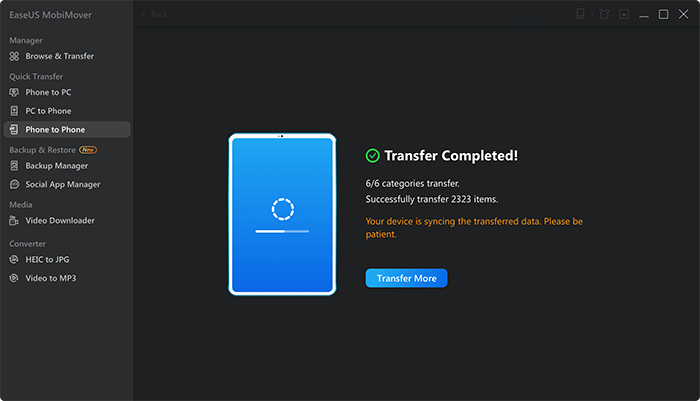
Step 3. Click "Transfer" to start the transferring process, moving music from iPad to iPhone or vice versa.
When the process finishes, go to open the Music app on the target device and you'll be able to play the transferred music.
As said before, MobiMover enables you to transfer music from iPad to iPhone in vice versa. And to be frank, the way to move songs, on the contrary, is the same as that from iPhone to iPad. Thus, whenever you want to transfer data from iPhone to iPad, using EaseUS MobiMover will fulfill your need.
Option 2. Using the iTunes Store
iTunes Store is another choice that can help you transfer music from iPhone to iPad without iTunes. First of all, make sure both devices are singing with the same Apple ID. Note that the iTunes store only allows you to transfer purchased items.
Step 1. Sign-in both devices with your Apple ID you use to purchase songs.
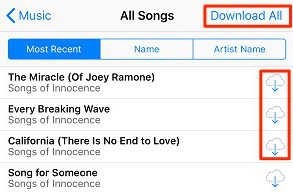
Step 2. Open the iTunes Store on your iPad > "More" > "Purchased."
Step 3. Select "Music" and then tap "Not on This iPad's tab."
Step 4. Choose "All Songs" and then tap the download icon next to each song to download your wanted songs or you can also tap "Download All" to save all songs to your iPad.
![Download music from music app]()
Option 3. Using Email
If you have a few songs to transfer, then Email is a good choice. It doesn't require a computer or iTunes. All you need to do is to log your email account on both devices.
Step 1. Open the Mail app on your iPhone.
Step 2. Tap the "Compose" button to open a new email creation window.
Step 3. Enter the email address that you log on to your iPad.
Step 4. Click the "Add Attachment" button and tap the "Send" button.
Step 5. Then, you can go to your iPad to download the song to your iPad.
Option 4. Using AirDrop
AirDrop allows you to move music between two iOS devices wirelessly. It not only allows you to transfer music but also lets you transfer photos from iPhone to iPad. But it only allows transferring music one by one. If you have a lot of music to transfer, you'd better choose EaseUS MobiMover.
Step 1. Turn on AirDrop, Wi-Fi connections Bluetooth on both iOS devices.
Step 2. Open the Music App on the iPhone and tap the song you want to transfer.
Step 3. Tap the "More" button in the right lower corner, then tap on the "Share" icon. Next, choose "AirDrop" and choose the IPad to send music.
Step 4. Choose "Accept" on the prompt window on your iPad to receive the song. Repeat Step 2 - Step 4 again and again if you have multiple songs to be move.
![Transfer music from iPhone to iPad]()
The Bottom Line
As you can see, there are many tools for data transfer between iPhone and iPad. Whichever the way you choose to use, we hope you can successfully get your wanted music to the iPad. If you have any questions related to this issue, don't hesitate to ask us for help!