Getting a new iPhone is awesome, but transferring all stuff from your old iPhone to the new one isn't. Luckily, Apple offers you the option to restore all of this data from iTunes or iCloud. But before using iTunes or iCloud, make sure you've backed up your source iPhone to iTunes or iCloud. Otherwise, your current data will be erased. If you want to keep data on your iPhone forever, there is also a way to transfer data without erasing. For more options, you can read the table we made below. Then, choose the way you prefer to use.
|
Options
|
Benefits
|
Drawbacks
|
Ease of Use |
|
iTunes
|
- No need to install any third-party tool.
- No limit on the storage.
|
- It crashes very often.
- It takes a long time to complete.
- It requires to back up your iPhone 6 at first.
|
Difficult
|
|
iCloud
|
- No computer is needed.
- Wirelessly.
|
- Only 5GB storage for free
- It requires to back up your iPhone 6 at first.
|
Medium
|
|
EaseUS MobiMover
|
- Ease to use.
- Quick to transfer.
- Support a wide range of data types.
|
- It requires you to install third-party software on your computer.
- It doesn't support Android devices.
|
Easy |
Part 1. How to transfer data from iPhone 6 to iPhone with iTunes
iTunes offers you the feature of backing up the iPhone and restore the new iPhone from iTunes backup. In order to transfer files from iPhone 6 to iPhone 8 via iTunes, you are supposed to back up your old iPhone to the iTunes library first, then sync the backup file to the new iPhone 8. Check the following detailed guides.
Back up iPhone 6 with iTunes
Step 1. Install the latest iTunes on your computer.
Step 2. Connect your iPhone 6 to your computer with a compatible USB cable.
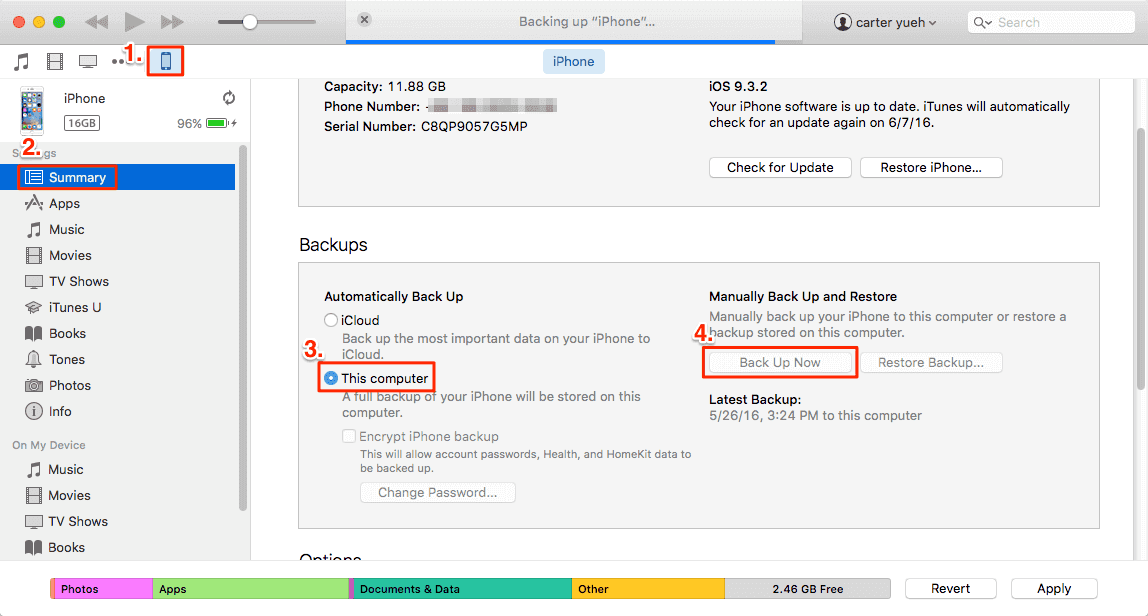
Step 3. Open iTunes, click the device icon in the upper-left corner of the iTunes.
Step 4. Choose "Summary" below the device button.
Step 5. Click "This computer," then click on "Back Up Now."
Step 6. Click "Apply" to begin to back up all the files on iPhone 6 to the computer with iTunes.
Step 7. Wait patiently until the process finished.
![itunes-back-up-iphone]()
Sync iPhone 6 backup to new iPhone 8 with iTunes
Step 1. Connect your new iPhone 8 to the computer via a compatible USB cable. Learn how to fix if iPhone 8 not showing up on Windows 10.
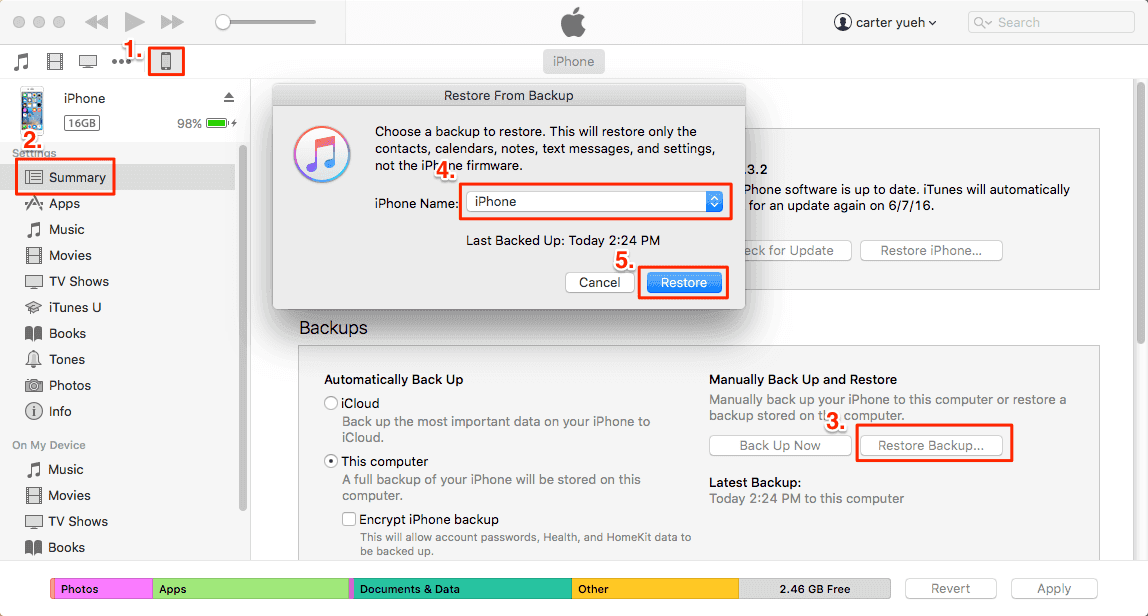
Step 2. Run iTunes, and click on the device button.
Step 3. Click "Summary."
Step 4. Select "This computer."
Step 5. Click on "Restore Backup."
Step 6. Click "Apply" to get started to sync the backup files of iPhone 6 created just now to your iPhone 8.
![itunes-restore-iphone-from-backup]()
Part 2. How to transfer data from iPhone 6 to iPhone with iCloud
This is the most straightforward way to transfer data between iOS devices. With iCloud, you can complete the transfer process without using a computer or downloading any third-party software. But iCloud only offers you 5GB storage for free. You have to buy more storage space if you have a large number of files to transfer.
Back up iPhone 6 with iCloud
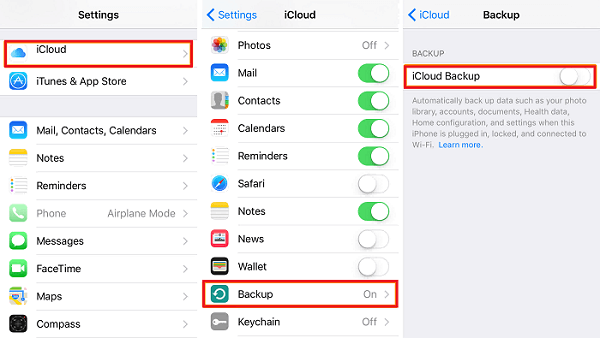
Step 1. Go to Settings on your iPhone 6 > Go to the iCloud.
Step 2. Scroll download to find the "Backup" option, and then turn it on.
Or you can also select the specific data you want to backup (such as contacts, calendars, reminders, etc) and then tap on the "Backup Now" to back up these specific data to the iCloud.
![Backup iPhone with iCloud]()
Restore iCloud backup to new iPhone 8
Step 1. If you have set up your iPhone 8, then you need to erase all content and settings on it.
Step 2. Go to your Settings on the iPhone 8 > General > Reset.
Step 3. Erase All Content and Settings > Erase iPhone.
Step 4. Now, you can follow the prompts to set up your iPhone 8/X/XS/XR.
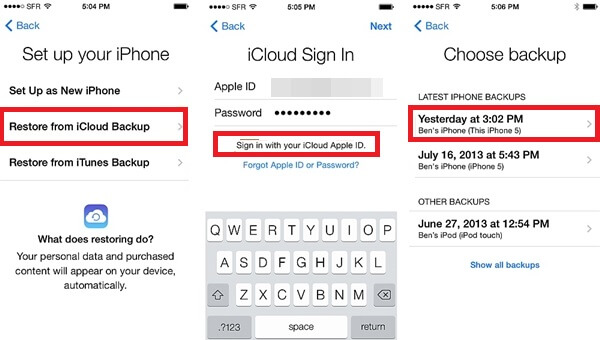
Step 5. Select the "Restore from iCloud Backup" option and sign-in to your iCloud account.
Step 6. Select the backup you want to restore.
![Restore iPhone from iCloud]()
Part 3. The quickest way to transfer data from iPhone 6 to iPhone
Although iTunes allows you to back up all kinds of iPhone data to the computer, it won't permit you to view the exported data. Besides, iTunes syncing always takes much of your time. What's worse, you can not use your iPhone while syncing.
If you want to avoid these problems, you are highly recommended to use EaseUS MobiMover Pro, one of the best and reliable iTunes alternative you can use to transfer contacts, notes, books, Safari bookmarks, photos, videos, movies, music, playlists, ringtones, and audiobooks from one iPhone to another with just one click.
Now you can download and install EaseUS MobiMover on your computer with Windows 10/8/7 and start to transfer data from iPhone 6 to iPhone 8.
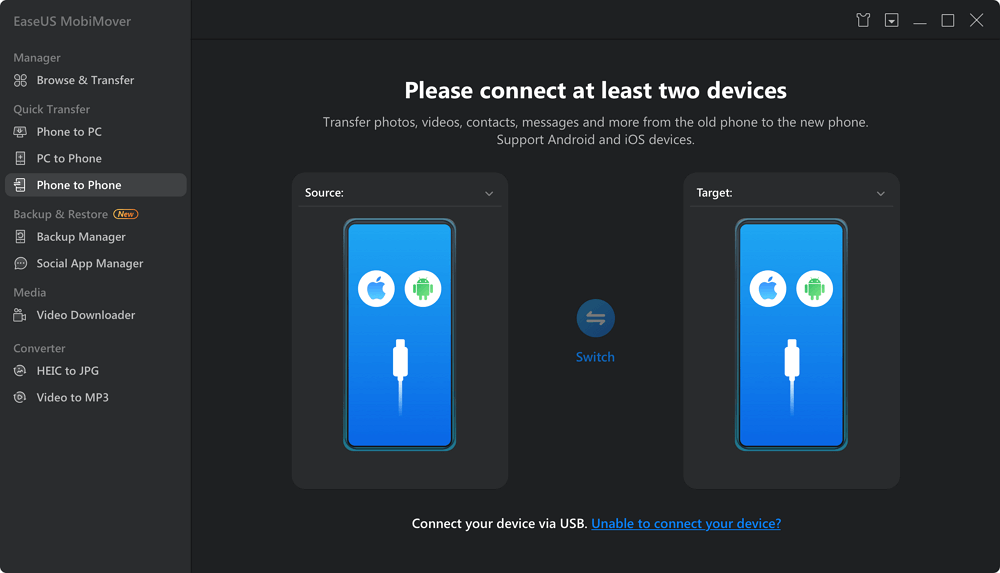
Step 1. Connect your two iPhones to your Mac with compatible USB cables and tap on "Trust This Computer" if you are asked > Run EaseUS MobiMover for Mac > Choose the "Phone to Phone" mode on the main screen > Click "Next."
![connect your device to computer]()
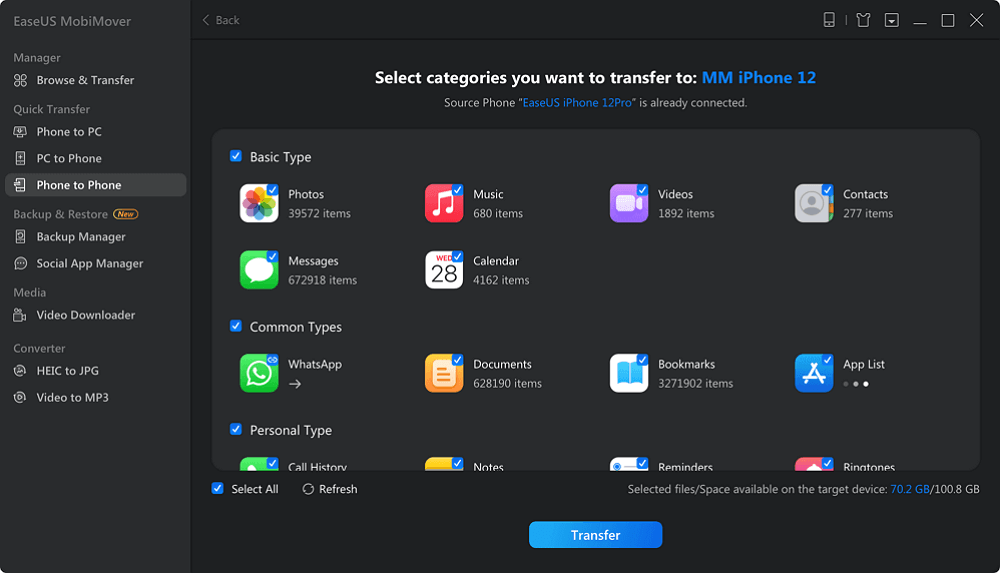
Step 2. Here you can choose all types of data to start the transfer, such as photos, audios, videos, contacts, messages, books, podcasts, voice memos, and more. After choosing the desired data, click "Transfer" to transfer data from iPhone to iPhone X/8 on Mac at a fast speed.
![select files]()
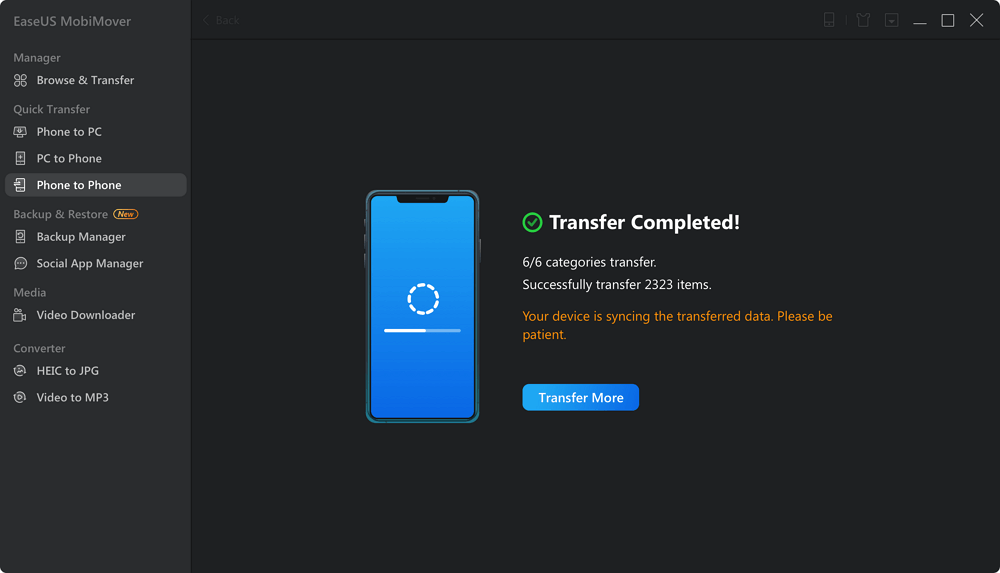
Step 3. Wait for MobiMover to finish the transfer process. After that, you can view and edit the transferred contents as you like.
![transfer completed]()
The Bottom Line
That's all about our guide on how to transfer data from iPhone 6 to iPhone 8. We hope you have found your desire way to do it. If you haven't found your way, don't be upset, you can try to use another 3 methods offered in this guide to transfer data from one iPhone to another with ease.
NEW
HOT
