Whenever you get a new iPhone, you need to set up your iPhone first to make it ready for use. Given that, this article is written to provide you the step-by-step guide to set up and activate your iPhone X. Besides, getting a new iPhone doesn't mean you are willing to lose the contents on your previous iPhone. If you need, you can back up your old iPhone to computer to make a backup of the important files on your device or you can transfer all data from old iPhone to new iPhone X to keep the data on your new device. Ready for settings up your new iPhone X? Read on.
How to set up iPhone X
Step 1: Turn on your iPhone X.
- Press and hold the Side button (Sleep/Wake button) on your iPhone X to turn it on and then you will see "Hello" in many languages.
- Unlock your iPhone X by pressing the Home button.
- Choose your language and select your country/region.
Step 2: Set up your iPhone manually.
Click Set Up Manually on your iPhone screen. (If you have another iOS 11 device, you can set up your iPhone X using Quick Start following the onscreen instructions. Otherwise, use Set up Manually introduced here.)
Step 3: Activate your iPhone X.
Connect your iPhone X to a WiFi or cellular network to activate your device. If there is no WiFi network available, you can connect our iPhone X to the cellular network, which requires you to insert your SIM card to your iPhone first. (WiFi not working on your iPhone in iOS 11? Learn how to fix the issue from the solutions provided.)
Step 4: Set up Touch ID.
The next step is to set up your Touch ID, which enables you to use your fingerprint to unlock your iPhone X. Tap on Continue and follow the onscreen instructions to set up your Touch ID right now or click Set Up Touch ID Later if you don't need it. (Touch ID not working on your iPhone in iOS 11? Learn what to do from the article.)
Step 5: Set a passcode for your iPhone X.
Setting a passcode is necessary to protect your iPhone data and use features like Touch ID and Apply Pay. If you prefer, you can tap on Passcode Options to set a four-digit password, custom password or no password. You can choose to create a passcode for your device after you set up your iPhone X.
Step 6: Restore your iPhone with the previous iOS contents.
If you have backed up your previous iPhone using iCloud or iTunes, you can choose Restore from iCloud Backup or Restore from iTunes Backup to sync data from your old iPhone to your new iPhone X. If you have no data to transfer to your iPhone X, choose Set Up as New iPhone instead.
Step 7: Enter your Apple ID to sign in.
If you have an Apple ID ready, enter your Apple ID and password for you can use iCloud, iTunes, App Store, iTunes Store and more on your iPhone X later. If you forget your Apple ID or don't have Apple ID, click Don't have an Apple ID or forget it. While if you have more than one Apple ID, choose Use different Apple IDs for iCloud & iTunes on the screen.
Then you need to agree with the iOS Terms and Conditions and switch on Location Services, which is necessary for you to use some Apps like Maps and Find My iPhone. You can also turn off Location Services on iPhone in iOS 11 after setting up your iPhone X if you want.
After signing in with your Apple ID, you need to set up Apple Pay and iCloud Keychain follow the instructions.
Step 8: Set up Siri.
You can choose whether to use Siri or not when you set up your iPhone X.
Step 9: Set up App Analytics, True Tone, and Home button.
You can choose whether to share data or information with App Developers here. If you are willing to do so, choose Share with App Developers, if not, choose Don't Share.
If you want images appearing more natural on your iPhone X, turn on True Tone display.
Then comes an important step, which is to set up your Home button. Adjust your Home button's click to what you prefer and tap on Next to continue.
Step 10: Select a display style.
Congratulations. This is the last step you need to set up your iPhone X, which is to choose a display resolution, STANDARD or ZOOMED, for your iPhone X. After that, tap on Next to continue. Till now, all the important steps you need to set up your iPhone X have been done.
Notes:
As an iPhone user, you can miss the world's first completely free iOS data transfer software, EaseUS MobiMover Free. With MobiMover installed on your PC running Windows 7 or later, you can sync files from computer to iPhone/iPad (in iOS 8 or later), back up iPhone/iPad contents to computer, transfer data from one iPhone/iPad to another and manage your iPhone/iPad files from computer. With MobiMover, you can transfer or manage photos, videos, audios, contacts, notes, messages and more according to your needs. Things like adding ringtones to your iPhone X, back up messages on iPhone 7 and transferring contacts from previous iPhone to new iPhone X can be easily done using MobiMover. Don't hesitate to try to transfer photos from computer to your iPhone or iPad with the all-in-one MobiMover.
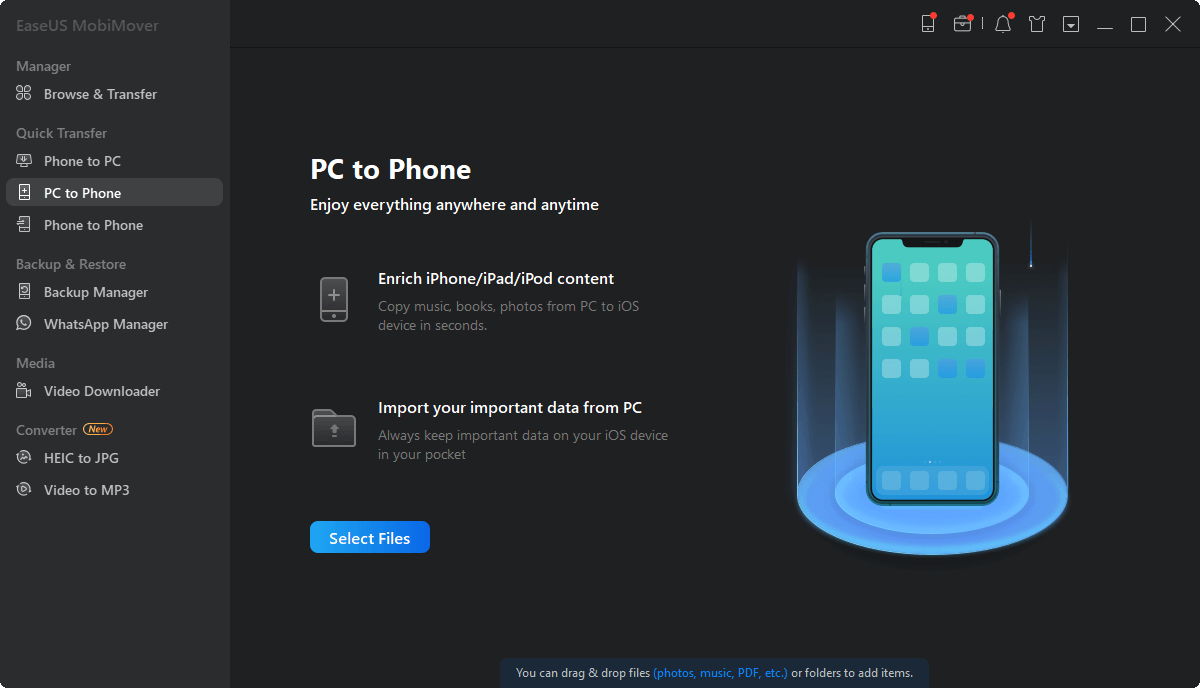
Step 1. Use a USB cable to connect your iPhone/iPad to your computer (Mac/PC). Run EaseUS MobiMover, choose "PC to Phone" and click "Select Files" to go on.
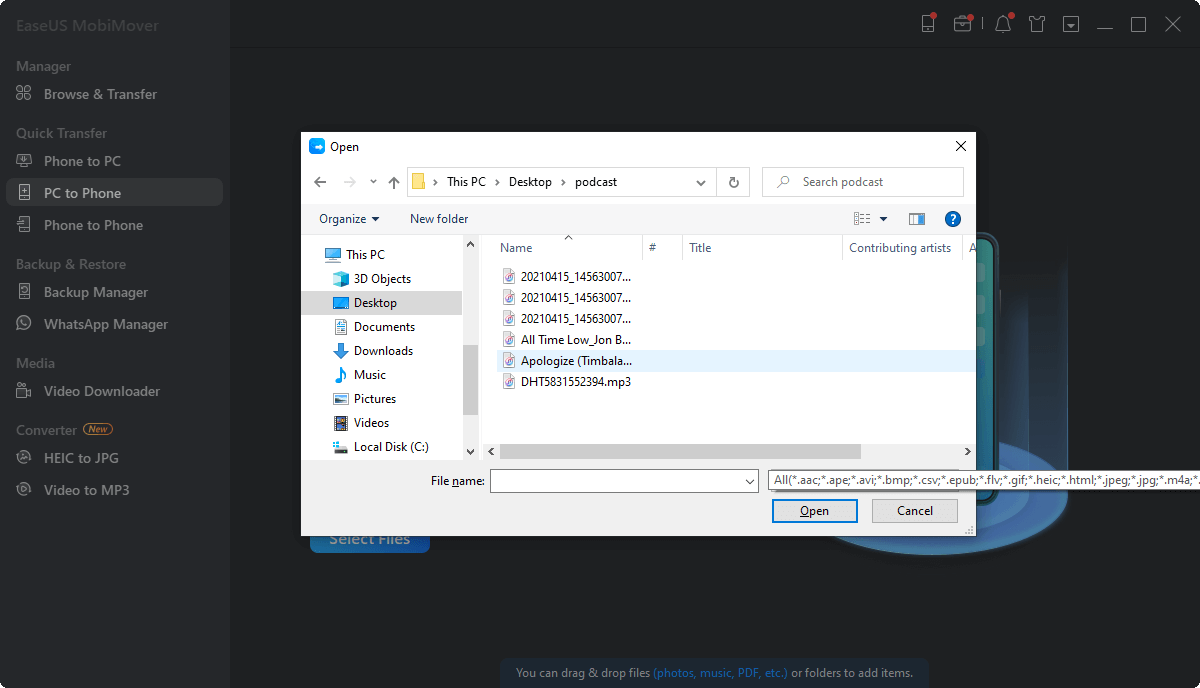
Step 2. Now, go to your computer to select pictures you want to import. After that, click the "Open" button to load files.
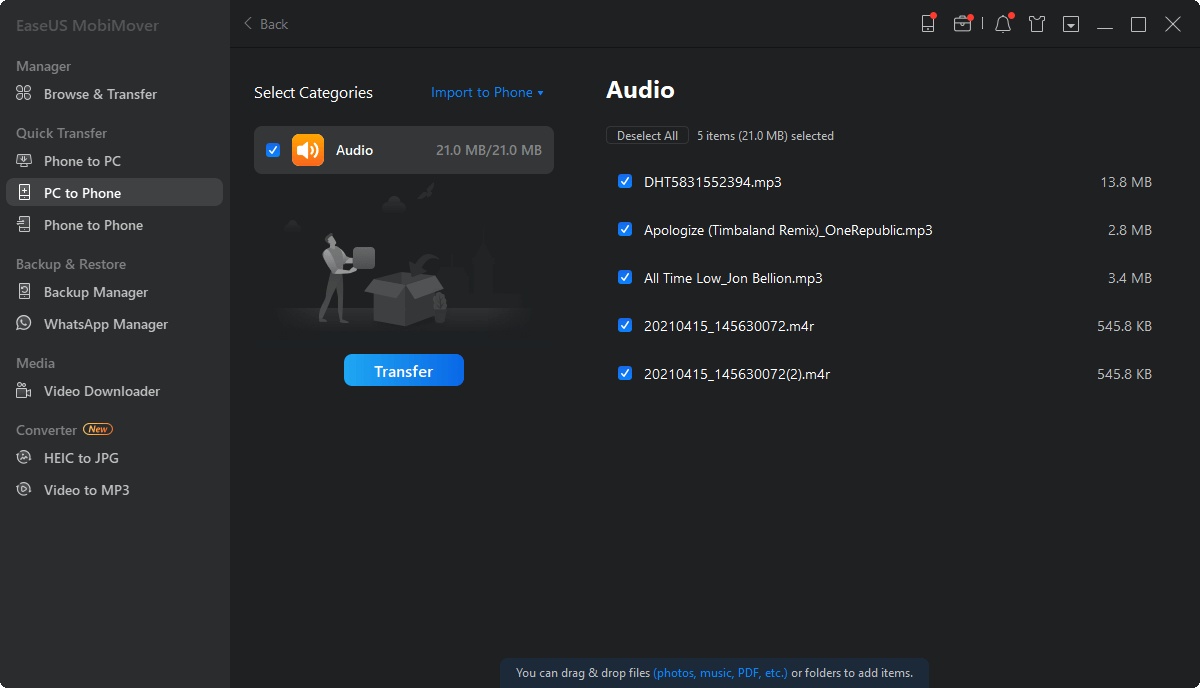
Step 3. If the folders you have chosen include not only pictures but also other content, MobiMover will load them all as the image shows below. Here, unselect other data types and keep "Pictures" checked. Then, click the "Tranfer" button to begin to transfer photos from computer to your iPhone or iPad.
 NEW
NEW HOT
HOT