What's the Easiest Way to Sync Notes from iPhone to Mac?
There are many ways to transfer notes from iPhone to Mac. The easiest way to sync notes from iPhone to Mac is by using the iCloud Sync feature. First, enable Notes for iCloud on your iPhone. Then, turn on iCloud sync for Notes on your Mac. Another easy way to sync notes from iPhone to Mac is by using a professional transfer tool. This kind of tool can help sync all notes from iPhone to Mac in one click. It also helps address any problem in the syncing process.
Apple's Notes app lets you access your Notes across different Apple devices. As long as you enable the Notes option in iCloud, you can keep Notes in sync on any iPhone, iPad, and Mac that signs in with the same Apple ID. Whether it's an easy-to-forget daily schedule or a long to-do list, you can easily check them without switching devices via iCloud syncing. This page will show you the detailed steps to sync notes from iPhone to Mac.
Plus, we also listed the proven solutions to address issues like "Cloud Notes not syncing" issue or "how to sync notes between iPhone and Mac with different Apple ID."
Part 1. How to Sync Notes from iPhone to Mac with EaseUS MobiMover
It is quite convenient to sync Notes from iPhone to Mac or from Mac to iPhone. However, the Notes you created on your iPhone before enabling iCloud won't sync to your Mac, or your Notes sometimes fail to sync to iCloud. Under such circumstances, you can get iPhone data transfer software like EaseUS MobiMover to sync Notes from iPhone to Mac. With the help of EaseUS MobiMover, you can get Notes on your iPhone to Mac quickly with a lighting cable.
What's more, you may need to transfer photos and videos between your iPhone and Mac. EaseUS MobiMover is a professional iPhone data transfer tool that enables you to transfer files between iPhone and PC/Mac or two iOS devices. Besides, you can also apply it to back up your iOS content, back up WhatsApp to PC, and batch convert HEIC to JPG or videos to MP3.
Now see how to transfer Notes from iPhone to Mac with Ease US MobiMover. You can use similar steps to transfer files between iPhone and Mac.
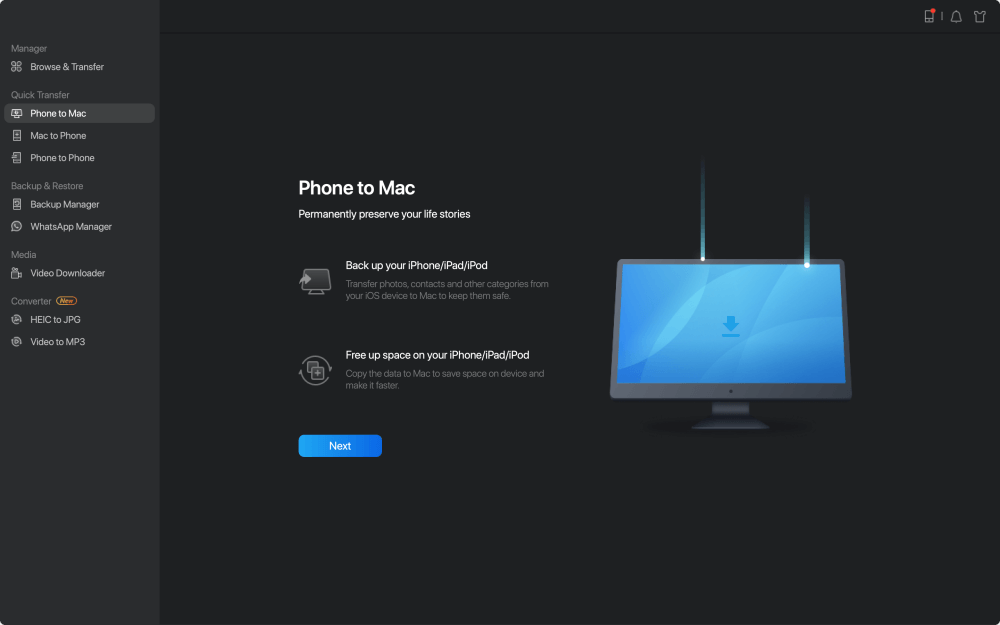
Step 1. Connect iPad to your Mac with a USB cable. Once connected, tap "Trust This Computer" on your device's screen. Open EaseUS MobiMover and select "Phone to Mac" on the main screen. Click "Next" to start transferring data from iPad to your computer.
![how to transfer files from iDevice to Mac - step 1]()
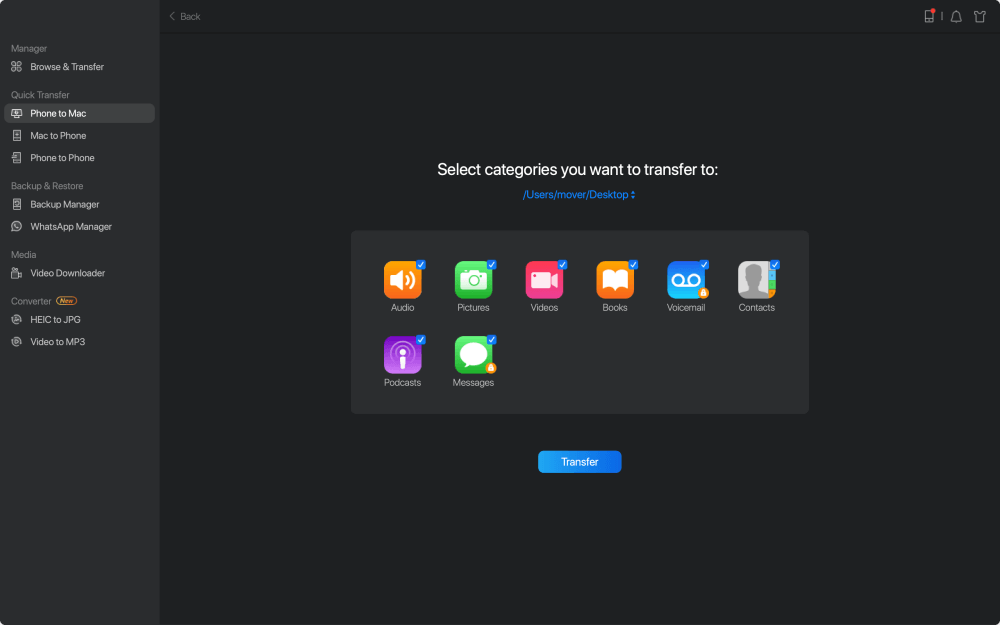
Step 2. MobiMover will read and load all the compatible files on your iPhone/iPad automatically. Choose Contacts/Messages/Pictures/Audio/Video or other specific types of apps to transfer. The transferred content is kept on Desktop by default, so you need to change the default location before clicking "Transfer".
![how to transfer files from iDevice to Mac - step 2]()
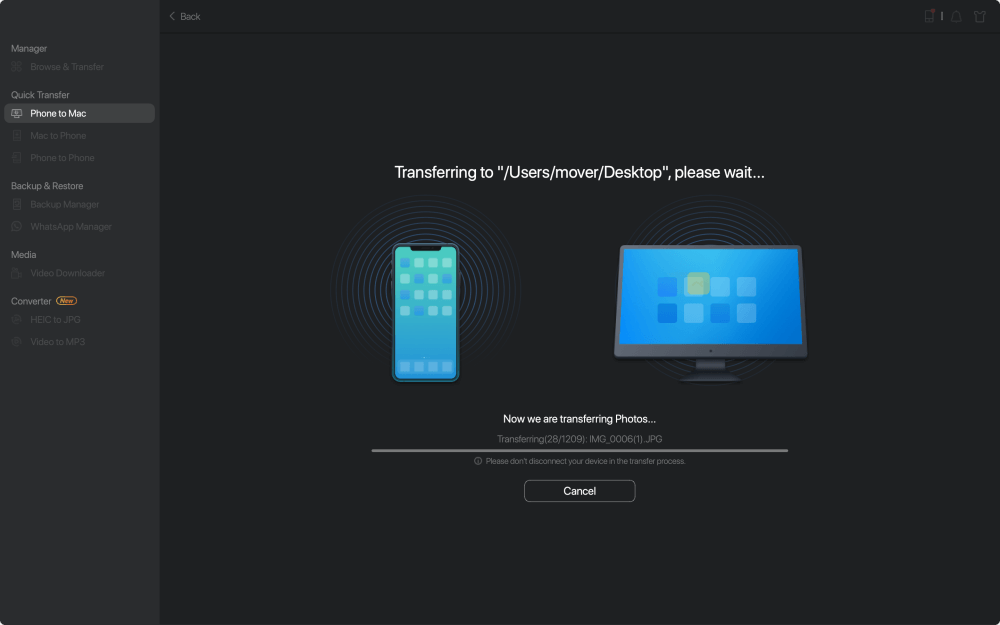
Step 3. MobiMover will immediately begin to transfer data from iPad to Mac without iTunes. Don't interrupt the USB connection during the course. When it completes, you can open and check the transferred content. Some files, like contacts and messages, are kept as .html files, so you need to use a web browser to open such a type of file.
![how to transfer files from iDevice to Mac - step 3]()
Part 2. How to Sync Notes from iPhone to Mac with iCloud
As long as you have set up the iCloud service on your iPhone and Mac, you can sync Notes, photos, Mail, Contacts, Calendars, Reminders, Safari bookmarks & history, and other documents & data between your iPhone and Mac. Here are the steps to turn on Notes Sync for iCloud on both your iPhone and Mac.
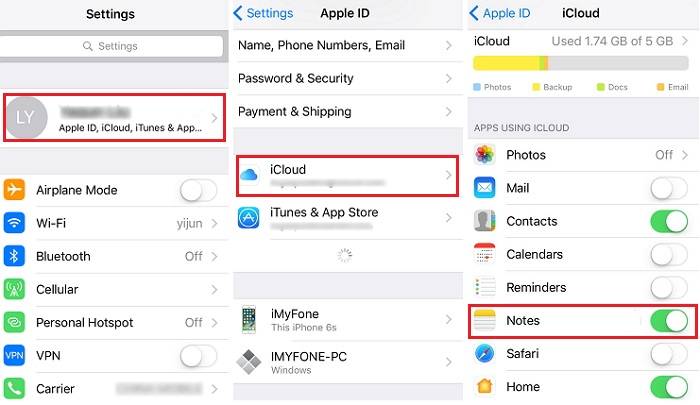
Follow the steps below to enable iCloud sync for Notes on your iPhone or iPad.
Step 1. On your iPhone or iPad, open the Settings app.
Step 2. Tap [Apple ID], then choose "iCloud."
Step 3. Toggle on iCloud service for "Notes."
Step 4. Then, all your new Notes and changes to Notes will be uploaded to iCloud and synced to your Mac using the same Apple ID.
![turn on icloud notes]()
Steps to turn on iCloud sync for Notes on your Mac.
Step 1. Launch System Preference on your Mac, which looks like your Settings app on the iPhone. Ensure you sign in with the Apple ID you used on iPhone.
Step 2. From its screen, choose "iCloud."
Step 3. Sign in with your iCloud account.
Step 4. Check the box next to the "Notes" from the list of options. Then your can sync Notes from iPhone to Mac. On the other hand, Notes you add on Mac will also be synced to your iPhone or iPad.
![turn on iCloud sync for Notes on Mac]()
Part 3. How to Sync Notes Between iPhone and Mac with Gmail Account
If you wish to sync Notes tied to Google's Gmail, you can enable the sync option on both your Mac and iPhone by following these steps. To begin with this method, you need to have a Gmail account tied with your iPhone/iPad and Mac.
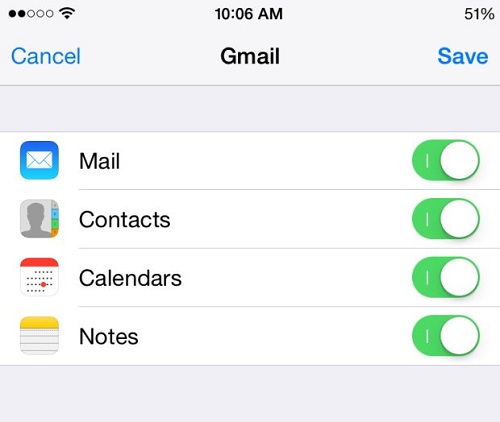
Enable Notes sync for Gmail on your iPhone:
Step 1. On your iPhone, go to the Settings app.
Step 2. Scroll down to find the "Mail" option, and tap it.
Step 3. Tap "Accounts," then "Gmail." (If you haven't added a Gmail account, add one by tapping on "Add Accounts" > "Google" to sign in to your Google account.)
Step 4. Toggle the "Notes" option on.
![Enable Notes sync for gmail]()
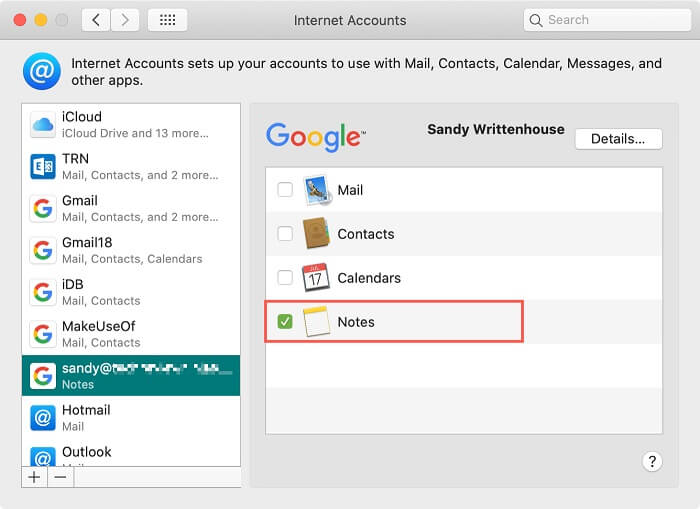
Enable Notes Sync for Gmail on your Mac
Step 1. On your Mac, launch the Notes app.
Step 2. Click the "Notes" in the menu bar in the upper left corner.
Step 3. Select "Account" from the drop-down list.
Step 4. Select the "Google" option.
Step 5. Enter your username and password by following the prompts.
Step 6. Select "Notes" from the listed options.
![Enable Notes Sync for Gmail on Mac]()
Part 4. How to Import Notes from iPhone to Mac via AirDrop
Apart from syncing all notes from iPhone to Mac at once, you can import one or two specific notes from iPhone to Mac via AirDrop. To use this method, your very first step is to turn on AirDrop on iPhone and Mac, and then you need to make sure there is a Bluetooth and Wi-Fi connection on iPhone and Mac. Finally, place your iPhone and Mac within about 30 feet and follow these steps to Airdrop Notes.
Here is how to sync notes from iPhone to Mac with AirDrop.
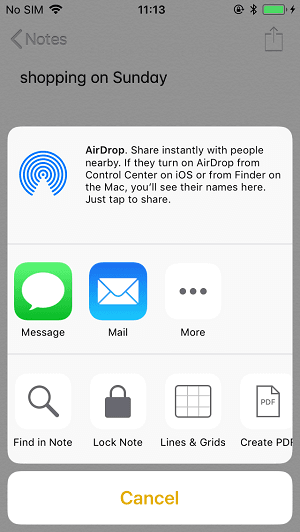
Step 1. On your iPhone, open the Notes app.
Step 2. Open the note you want to sync from iPhone to Mac.
Step 3. Tap the Options icon on the top right, which is a circle with three dots inside.
Step 4. Choose "Send a Copy," then choose "AirDrop."
Step 5. Choose your Mac from the available list. If you don't see your Mac in the list, check your Airdrop settings to make sure your Mac can be found.
Step 6. Next, go to your Mac and tap "Accept" on the pop-up window to save the Note on your Mac.
Step 7. When the process is finished, open the "Notes" app on your Mac to check the synced files.
Note: You can Airdrop one Note at one time. If you want to Airdrop multiple Notes, repeat the steps.
![airdrop-notes-iphone-to-mac]()
Bonus Tips: Fixes to Notes Not Syncing Between iPhone and Mac
As you can see, it is easy to sync Notes from iPhone to Mac with iCloud. But sometimes, some unexpected problems like system problems, update issues, or iCloud server errors might stop you from syncing between Mac and iPhone. When these problems knock on your door, don't fret, and just hit them back with solutions offered in this guide on how to fix Notes not syncing between iPhone and Mac.
Did You Get All the Methods for Note Syncing from iPhone to Mac?
All possible methods for syncing Notes from iPhone to Mac have been listed in this guide. If you want to transfer Notes from one iPhone to another, you can refer to this guide on syncing Notes from iPhone to iPad. By these methods, you can sync your notes seamlessly between your iPhone and your Mac, making your notes accessible and up-to-date on both devices. If you want to transfer more files than Notes from iPhone to Mac, we recommend you try EaseUS MobiMover.
Share this post with your friends if you find it helpful!
NEW
HOT
