Apple's iTunes has always been the main tool that people use to transfer data or files to their iPhones for a long time. But sometimes, it can be hard to use, especially when people want to transfer files from Mac to iPhone or iPad. For people who want to transfer music from Mac to iPhone, luckily, there are other ways to complete the transfer process without using iTunes. In addition, PC users can also transfer music from PC to iPhone without iTunes.
In this guide, we'll show you some easy and effective methods to get your favorite music onto your iPhone without any hassle. Whether you love Apple products and want a simpler way to transfer music, or you just want to avoid using iTunes, we've got you covered. Let's dive into the detailed steps!
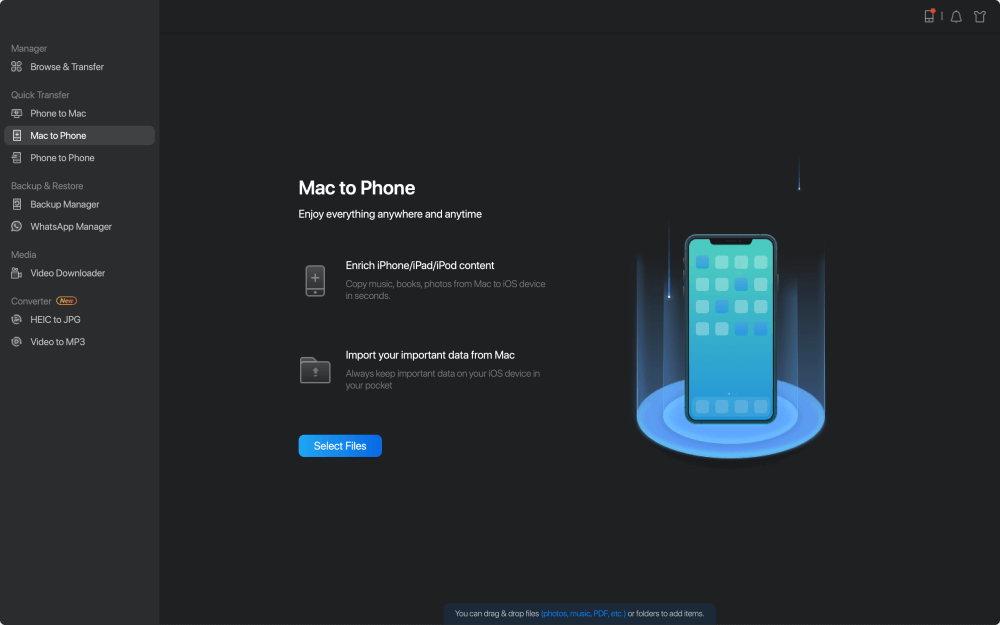
How to Transfer Music from Mac to iPhone Without iTunes via EaseUS MobiMover
EaseUS MobiMover Pro is a great tool if you are wondering how to transfer music from Mac to iPhone without using iTunes. It is designed specially to assist users in the transfer with one-click task completion. You do not have to go through much hassle in order to make the transfer of music. Additionally, this tool also allows you to transfer other types of data, including music, videos and contacts.
To transfer music from Mac to iPhone using EaseUS MobiMover, follow the below steps:
Step 1. Connect your iPhone to the Mac with a USB cable and tap "Trust This Computer" on your device if you are asked > Run EaseUS MobiMover for Mac > Choose "Mac to Phone" on the main screen > Click "Select Files" to continue.
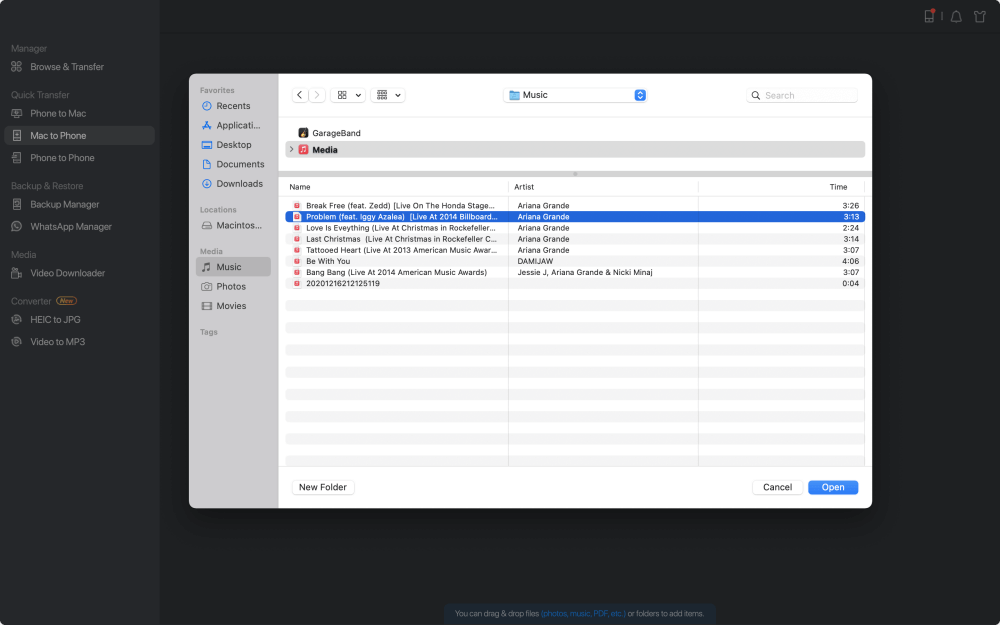
Step 2. Select the music files saved on your Mac, like MP3, and click "Open" to continue.
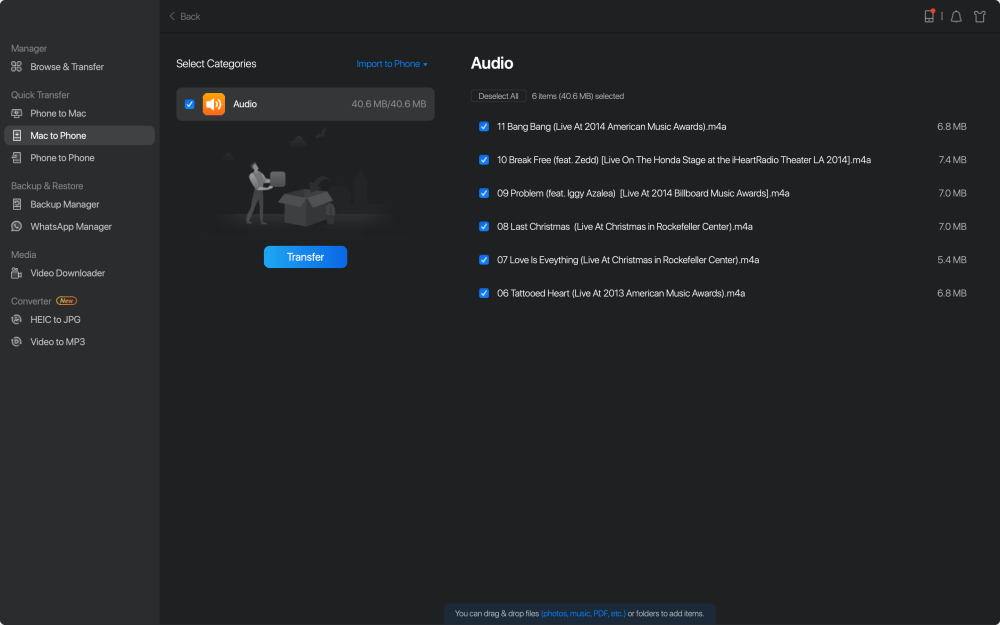
Step 3. Check the selected items and click "Transfer" to start moving MP3 files from your Mac to your iPhone or iPad. When the process is done, open the Music app on your iPhone or iPad to check the transferred items.
Once the transfer process is completed, go to the Music app on your iPhone to check if the songs have been successfully transferred. With EaseUS MobiMover, you can also transfer music from iPhone to Mac when needed.
One thing to note is that EaseUS MobiMover is a free video & audio downloader, with which you can download music from websites like SoundCloud, MySpace, and more to your iPhone or iPad using URL. If you want to know more details, read the guide on how to download music from SoundCloud. In addition, you can use it to download MP3 to iPhone directly.
You can also watch the video guide here:
How to Transfer Music from Mac to iPhone Without iTunes via Finder
Another tool that lets you transfer music from Mac to iPhone without iTunes is Finder. This tool is specially designed to find files and manage them on your Mac and connected devices and iCloud. You can utilize this feature of the app and transfer files and music to your iPhone.
To transfer music from Mac to iPhone with Finder, follow the steps below:
Step 1. Connect your iPhone to your Mac using a USB cable.
Step 2. Open Finder on your Mac.
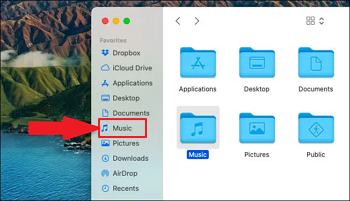
Step 3. In the sidebar under "Locations," select your iPhone.
Step 4. In the menu bar at the top of the screen, click on "Music."
Step 5. Now, drag and drop the music files or folder from your Mac that you want to transfer onto the iPhone icon in Finder's sidebar.
Step 6. The music files will start copying to your iPhone.
Step 7. The copying process may take some time, depending on the size of the files you're transferring. So, be patient and let the transfer finish.
Step 8. Once the transfer is complete, go to the Music app on your iPhone to check if the songs have been successfully transferred.
![open Finder on Mac and click on Music]()
That's it! With Finder, you can easily transfer your favorite music from your Mac to your iPhone without using iTunes.
How to Import Music from Mac to iPhone Without iTunes via Google Play/Amazon Music
Streaming music apps like Google Play and Amazon Music also let you transfer music files from your Mac to your iPhone. Although the process is a bit lengthy, it does work flawlessly.
Follow the below steps to transfer music files from your Mac to your iPhone using Google Play Music or Amazon Music.
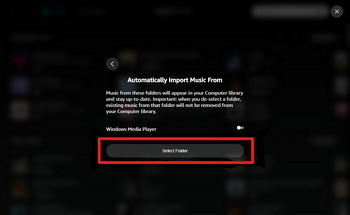
Step 1. Download and install Google Play Music Manager/Amazon Music on your Mac.
Step 2. Launch the Music Manager and sign into your Google/Amazon account.
Step 3. Select "Upload songs to Google Play/Amazon Music" and choose the folder on your Mac containing the music you want to transfer.
Step 4. Wait for the upload process to complete. This may take some time, depending on the size of the files you're transferring.
Step 5. On your iPhone, download the Google Play Music/Amazon Music app from the App Store and sign into your Google/Amazon account.
![select the folder containing the music that needs to transfer]()
The songs you uploaded should now be available to stream on the Google Play Music/Amazon Music app on your iPhone. And also remember to check the storage space on your iPhone, if it's nearly full, you need to first free up storage on iPhone first.
How to Copy Music from Mac to iPhone Without iTunes via Dropbox
Online file storage and sharing tools like Dropbox also let you transfer music from your Mac to your iPhone. This solution includes the use of Dropbox to store the music and sync it to your iPhone. (You can also check other software that could transfer files from PC to iPhone free)
Follow the below steps for clear instructions on the transfer process.
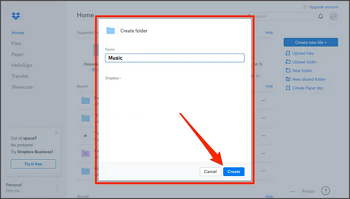
Step 1. Download and install Dropbox on your Mac, and sign into your Dropbox account.
Step 2. Create a new folder in Dropbox and name it "Music."
Step 3. Drag and drop the music files or folder from your Mac that you want to transfer into the Music folder in your Dropbox account.
Step 4. Wait for the files to upload to your Dropbox account.
Step 5. On your iPhone, download and install the Dropbox app from the App Store, and sign into your Dropbox account.
Step 6. Open the "Music" folder in Dropbox and select the music files you want to copy to your iPhone.
Step 7. Tap the "..." icon and select "Export."
Step 8. Choose "Save to Files" and select "On My iPhone."
Step 9. Choose the folder on your iPhone where you want to save the music files. Wait for the music files to finish copying to your iPhone.
![create a new folder named Music]()
Once the transfer is complete, go to the Music app on your iPhone to check if the songs have been successfully transferred.
How to Sync Music from Mac to iPhone Without iTunes via Airdrop
Airdrop is a new way of transfer. This tool released by Apple for its ecosystem has been a game changer. It uses a WiFi connection to transfer files from one Apple device to another. You can use this tool on your Mac and iPhone to transfer music.
Follow the below steps:
Step 1. Turn on Airdrop on your Mac and make sure that your Mac is discoverable to everyone.
Step 2. Open the Finder on your Mac and select the music files or folder you want to transfer.
Step 3. Click on the "Share" button and select "Airdrop."
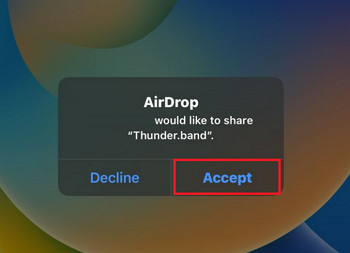
Step 4. Choose your iPhone from the list of nearby Airdrop-enabled devices.
Step 5. Tap "Accept" on your iPhone when prompted.
Step 6. Wait for the music files to transfer to your iPhone via Airdrop.
Step 7. Once the transfer is complete, go to the Music app on your iPhone to check if the songs have been successfully transferred.
![tap Accept option on your iPhone if prompted]()
With Airdrop, you can easily sync your favorite music from your Mac to your iPhone without using iTunes.
Conclusion
Therefore, transferring music from your Mac to your iPhone without using iTunes is a very easy process. However, there could be many hurdles you may face in the process. This is why we recommend the EaseUS MobiMover tool for fast and one-click transfer.
FAQs on How to Transfer Music from Mac to iPhone Without iTunes
Some frequently asked questions are taken from the internet.
1. How do I transfer music from Mac to iPhone wirelessly?
If you're looking to transfer music wirelessly from your Mac to your iPhone, there are several methods available that don't require iTunes. These include using EaseUS MobiMover, Airdrop, Dropbox, Google Play Music, and Amazon Music.
Among these tools, EaseUS MobiMover allows you to easily transfer your music without the need for any cables or cords and with one click, giving you the flexibility to enjoy your favorite tunes on your iPhone wherever you go.
2. Can I airdrop all my music from Mac to iPhone?
Yes, Airdrop is an effective method for transferring all your music files from your Mac to your iPhone. This method allows you to quickly transfer large files, including your entire music library, without the need for cables or cords.
However, it's important to note that the transfer speed may vary depending on the size of the files and the strength of your Wi-Fi connection. This is why we recommend the EaseUS MobiMover tool for faster and hassle-free transfer.
3. How do I transfer music from Mac to iPhone 13?
There are several methods available for transferring music from your Mac to your iPhone 13. You can use EaseUS MobiMover, Airdrop, Dropbox, Google Play Music, or Amazon Music, or connect your iPhone to your Mac using a USB cable and using the Finder app to transfer the music files.


 NEW
NEW HOT
HOT