"How to fix the screenshot not working issue?" is a common question frequently asked by iOS users. If you are also experiencing the same problem, don't rush to find solutions to fix it. First of all, you'll need to export important files to a computer for safekeeping so that you won't lose any important files while solving this problem. After that, you can follow the tips involved in Part 2 to solve the "screen not working" issue.
Part 1. Export Important Files from iPhone to a Computer
First of all, you'll need to back up your device with iCloud or iTunes or export your important data to a computer. Since iTunes and iCloud will erase your device while restoring, we don't recommend using either of them. Thus, you can export some specific iPhone data with this iPhone data transfer tool - EaseUS MobiMover.
With this program, you can transfer files between iPhone and Mac or PC, or move data between two iOS devices. The data supported by EaseUS MobiMover include contacts, messages, videos, photos, and other files.
If you want to download videos from YouTube, Twitter, Facebook, Instagram, and other websites, it's also possible with this program.
To export iPhone data to a computer, you can:
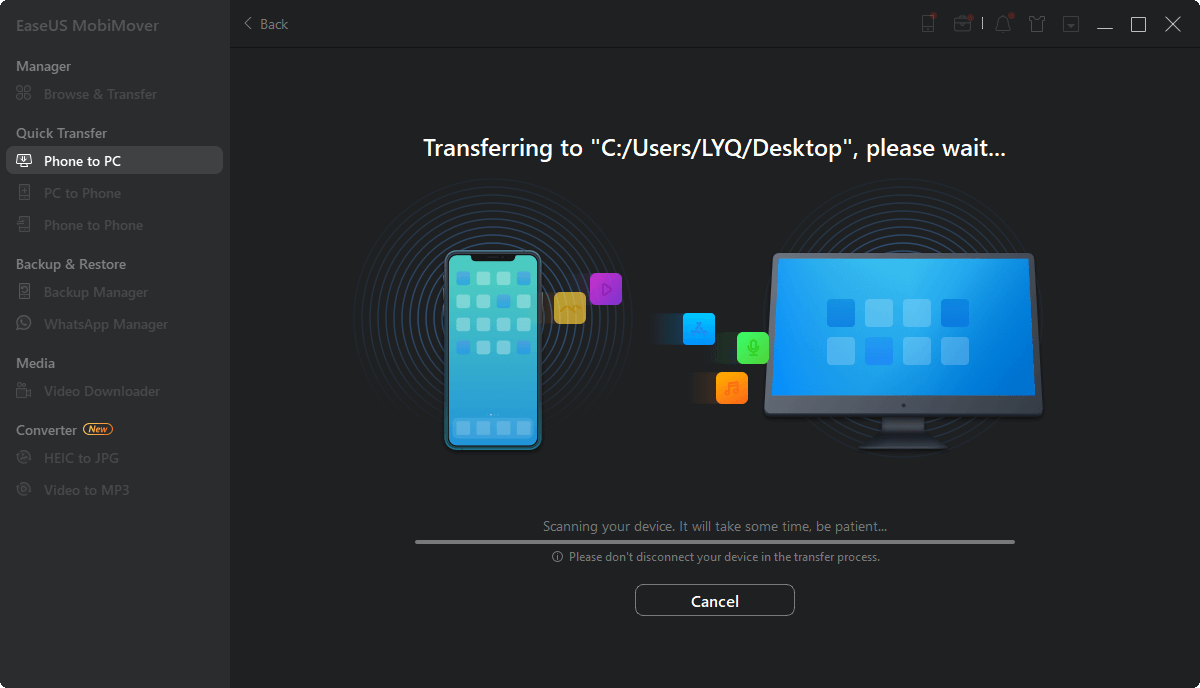
Step 1. Connect your iPhone to PC running Windows 7 or later. Run EaseUS MobiMover and click "Phone to PC" on the screen. Then, click the "Next" button to continue.
Step 2. Check the category/categories you want to transfer from your iPhone to PC running Windows 10/8/7. As you can see, you can copy other supported files together with photos from your iPhone to PC at once.
Step 3. Now, click the "Transfer" button to transfer the photos from iPhone to your PC in one-click. If you've customized the storage path, find the files there. If not, you can check them on your desktop.
Part 2. Tips to Fix Screenshot not Working on iPhone or iPad
After backing up your device, now you can follow these steps to fix the "screenshot not working" issue.
Tip 1. Press and hold the Home and Power buttons simultaneously
It can be frustrating when you want to take a screenshot but your iPhone is frozen and unresponsive for unknown errors. In that case, you can press and hold the Power and Home buttons at the same time, but make sure to press the Power button a second before the Home button, which is the small change in iOS 10.
Tip 2. Force reboot your iPhone or iPad
Press and hold the Home and Power buttons together for at least 10 seconds, and your device should proceed to force a reboot. After this, your device should work well, and you can successfully take a screenshot on the iPhone.
Tip 3. Use AssistiveTouch to take a screenshot
If you don't want to press buttons, you can use AssistiveTouch to fix this issue as well.
Step 1. Go to "Settings" > "General" > "Accessibility".
Step 2. Tap on AssistiveTouch and slide it on.
Step 3. Tap on the white virtual button on your screen > Device > More > Screenshot.
Tip 4. Use 3D Touch
If you are using an iPhone 6s or a later device, you can add the screenshot to 3D Touch Actions.
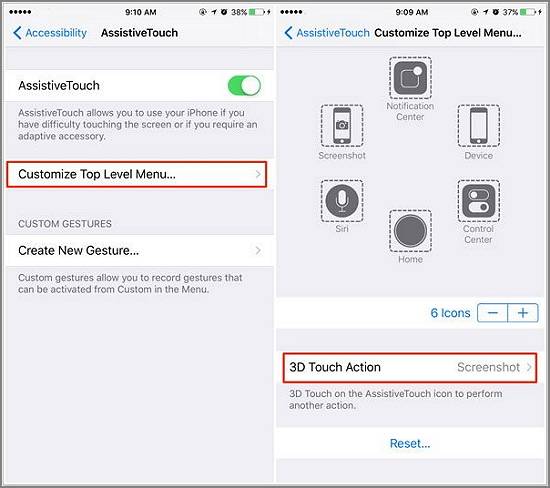
Step 1. Enable "AssistiveTouch" as shown in Tip 3.
Step 2. Tap "Customize the Top Level Menu" and then "3D Touch Actions" to check Screenshots.
Step 3. Now just capture a screenshot by pressing the Assistive Touch icon bly.
![use 3D touch to take a screenshot]()
Conclusion
That's all about our guide on how to fix the "screenshot not working" issue on an iPhone or iPad. We hope these solutions can help you out. Before making any changes to your device or fixing an issue on your device, don't forget to transfer files from iPhone to PC with EaseUS MobiMover. Thus, you don't have to worry about data loss anymore.
FAQs on Tips to Fix Screenshot Not Working on iPhone
1. Why some app doesn't allow screenshots?
Even while Android is more flexible than iOS, there are still some things you can't do on Google's mobile operating system. One of them is taking screenshots inside programs that forbid it, either because the screen shows private information or material that is digital-right-protected.
2. Why can't I screenshot pictures?
It might be a problem with your browser, as Chrome and Firefox's incognito versions do not support taking screenshots. One reason for this issue could be that taking screenshots is disabled on your device.
3. How do I enable screenshots on iPhone?
You can hold down the Power button and press the Home button (at the same time). When you snap a screenshot with sound on, you will hear the camera shutter and see a flash on the screen.