There are four different ways for you to transfer music from an iPod to an iPhone, depending on whether these songs are purchased or not. If you wish to transfer purchased songs to an iPhone, then iTunes, Apple Music, and iTunes Store are good options for this purpose. While if you wish to transfer non-purchased music to an iPhone, you may need different transfer solutions.
In either case, we will offer some workable methods to handle this task with ease. Now, you can apply any of the methods below to transfer music from iPod to iPhone.
| Method |
Effectiveness |
|
iPhone Data Transfer Tool
|
It is a professional data transfer software that can migrate all kinds of data across devices, including music. |
|
Apple Music
|
With Apple Music subscriptions, you can sync your music library across your devices with the same Apple ID. |
|
iTunes
|
iTunes is a nice option when you want to transfer purchased songs from iPod to iPhone. |
|
iTunes Store
|
You can download all purchased music to your iPhone by using the same Apple ID. |
|
AirDrop
|
It is an efficient way to transfer music files from iPod to iPhone without a cable over Bluetooth. |
How to Transfer Music from iPod to iPhone Directly - iPhone Data Transfer Tool
If you've ever used iTunes to deliver files, you must know how sluggish it acts. If you don't want to waste too much time exploring iTunes, you can consider using an iTunes alternative or an iPhone data transfer tool like EaseUS MobiMover to handle this task. EaseUS MobiMover boasts a lot of data management functions that can help you organize your device. These functions include transferring data from one iPhone to another, moving data between an iPhone and a computer, managing WhatsApp data, downloading videos from websites, how to put music on iPod without iTunes, etc.
No matter what kind of data you want to transfer and no matter how large the files are, this worry-free iOS data transfer tool can help you transfer at a rapid speed. (If you want to transfer CD to iPhone without computer, click here for details.)
To transfer music from iPod to iPhone:
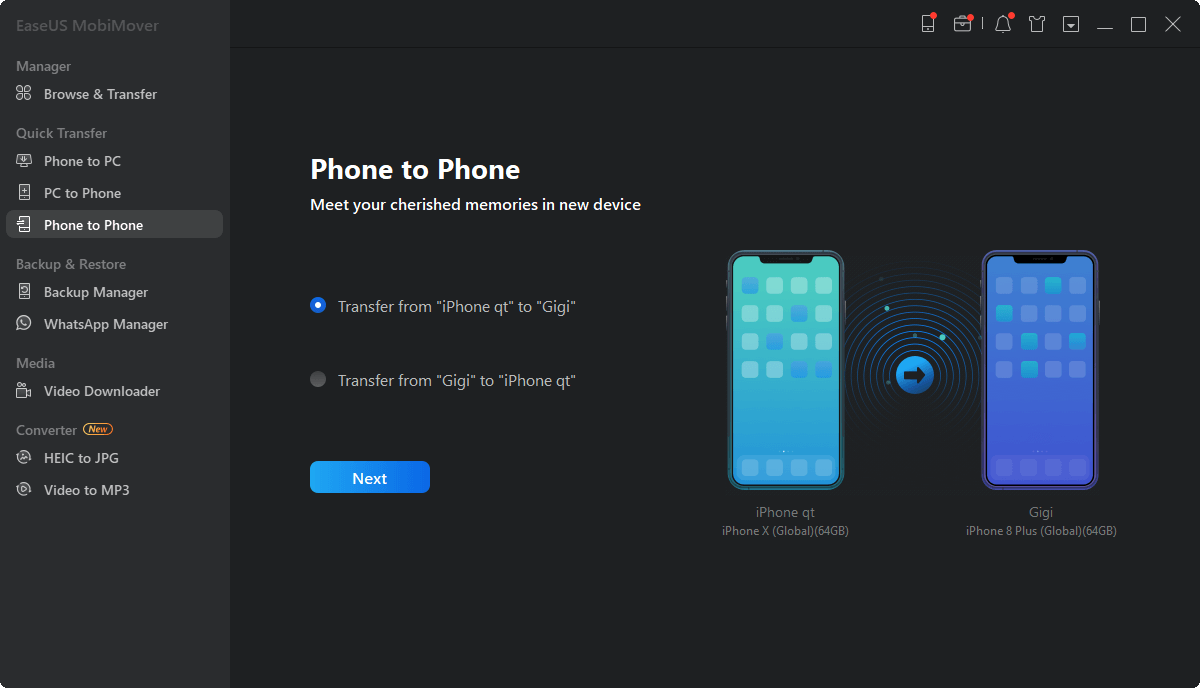
Step 1. Connect two iOS devices to your computer with compatible USB cables and tap on "Trust This Computer" on the devices when asked. Run EaseUS MobiMover and choose the "Phone to Phone" mode. You need to choose a direction to transfer data from the source iOS device to the destination iOS device. Click "Next" to continue.
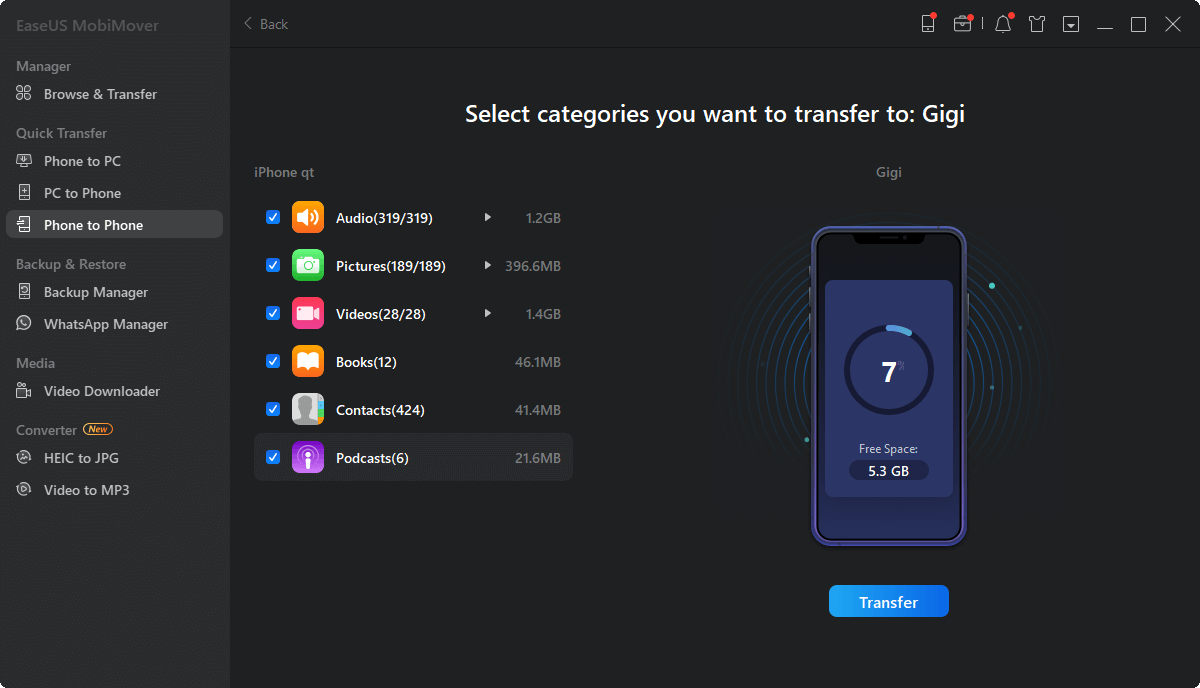
Step 2. MobiMover enables you to transfer files between two iOS devices (iPhone, iPad, or iPod). The supported files include photos, messages, contacts, music, playlist, videos, books, notes, voice memos, and so on. Choose the desired files, and click "Transfer" to begin to sync data.
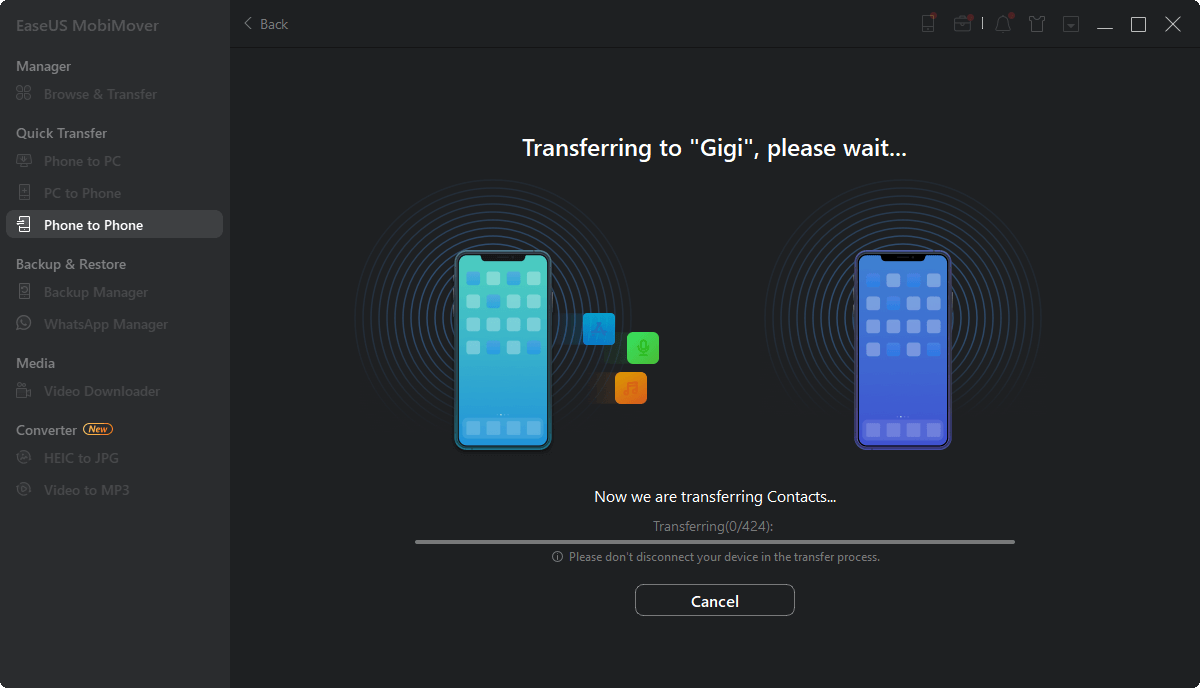
Step 3. Wait patiently until the process finished. Later , you can go to the corresponding apps to check the synced files. Such as pictures in Photos, music, and playlist in Music, audiobooks and PDF in iBooks, TV shows and movies in Videos, etc..
How to Use Apple Music Transfer Music from iPod to iPhone
The easiest way to transfer your iPad music to an iPhone or other Apple devices is actually using Apple Music. With Apple Music subscriptions, you will be able to sync and access your music library across your devices that use the same Apple ID. You can take a look at the Apple Music service first. If you decide to subscribe to it, there are steps to enable iCloud Music Library to transfer music from an iPod to an iPhone or vice versa.
Step 1. On your iPod, go to the Settings and tap "Music."
Step 2. Toggle one "Sync Library."
Step 3. Repeat the process on your iPhone.
![Sync music from iPod to iPhone via Apple Music]()
How to Use iTunes to Transfer Music from iPod to iPhone
If you want to transfer purchased songs from iPod to iPhone, iTunes is a nice option. You can first sync music from your iPod to iTunes and then sync these songs to your iPhone. To start with iTunes, you'll need to do some preparations:
- Make sure that the iPhone iOS version is higher than your iPod version.
- Make sure that you have installed the latest iTunes version.
- Turn off Find My iPhone.
To transfer music from iPod to iPhone:
Step 1. Connect your iPod to the computer and launch iTunes.
Step 2. In iTunes, go to "Account" > "Authorizations" to authorize this computer.
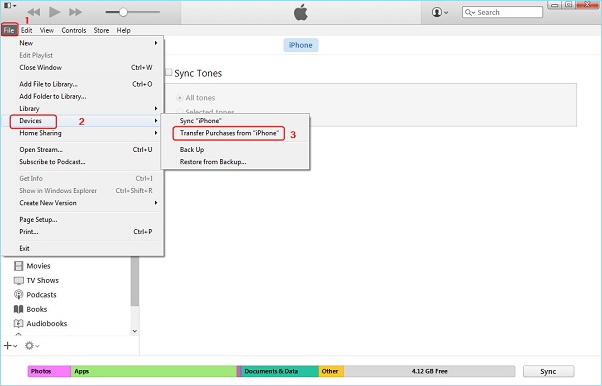
Step 3. Then, go to "Files" > "Devices" > "Transfer Purchases from [your iPod name].
Step 4. Connect your iPhone to this computer and click on your device icon.
Step 5. From the expanded section, choose "Songs."
Step 6. Right-click the music files you want to transfer and choose "Add to Device."
![Transfer music from iPod to iPhone via iTunes]()
How to Move Songs from iPod to iPhone via iTunes Store
If you've ever purchased songs from the iTunes Store on your iPod, you can also sync songs to another iPhone by signing in to the same Apple ID on both devices and downloading all music to your iPhone. Here are the steps.
Step 1. Make sure your iPhone uses the same Apple ID as that on your iPod.
Step 2. Next, go to the iTunes Store > "More" > "Purchased."
Step 3. Tap "Music" > "Not on This iPhone."
Step 4. Tap "All Songs," then tap "Download All" to save music to your iPhone.
How to Transfer Music from iPod to iPhone via Bluetooth
There is another way to transfer songs from your iPod to your iPhone wirelessly - AirDrop. It is an iOS feature that enables you to move data between Apple devices over Bluetooth within a limited distance. If you are using the 7G iPod Nano, the 2G iPod touch, or a later version, you can use this method to import music to iPhone from iPod because these models are equipped with the Bluetooth function.
Step 1. Turn on the AirDrop feature on both devices, and Bluetooth and Wi-Fi will be enabled automatically.
Step 2. Launch the music application on your iPod and select the song you want to share.
Step 3. Tap the three-dot button, choose Share Song, and select AirDrop and the receiver.
Step 4. On your iPhone, the target device, tap Accept to receive the music file.
Note: This method can only be used to AirDrop the purchased music from the Apple Music Store.
Conclusions on How to Transfer Music from iPod to iPhone
Actually, in addition to the ways introduced in this guide, you can also use cloud services like Dropbox to transfer music or other data. Whichever way you prefer to use it, we hope you can transfer music from iPod to iPhone successfully. If you find the methods included in this guide really useful, don't forget to share them with others who need help!
How to Transfer Music from iPod to iPhone FAQs
Learn the following related questions, and you will have a deeper understanding of how to transfer music from an iPod to an iPhone.
1. Can I Transfer music from my iPod?
Yes, when you connect your iPod to your computer and launch iTunes, you can click the iPhone device icon from the sidebar. Then, visit the Music section, where you can choose to sync the whole music library or select the playlist or albums.
2. How do I sync my old iPod to iTunes?
- Connect your iPod to your computer with a compatible cable. Run iTunes and select your device.
- Got to the Summary tab on the left sidebar. Select Sync with this device over Wi-Fi, and click Apply.
Then, all your iPod content is synced to iTunes.


 NEW
NEW HOT
HOT