Five easy and proven ways for you to transfer photos from iPhone to Mac.
Photos generally take a large portion of your iPhone storage. To free up your iPhone space, you may want to transfer photos from your iPhone to Mac and then remove them from your iOS device. Or you just want to import photos from iPhone to Mac to make a copy to avoid accidental data loss.
Regardless of the reason, as long as you want to get photos from your iPhone to Mac, you can follow one of the methods below to get it down successfully.
How to Transfer Photos from iPhone to Mac via Photos
Since both iPhone and Mac are Apple products, there are built-in apps on your Mac that make photo transfer between your iPhone and Mac easy. The Photos app is one of them. Photos enables you to organize and edit photos on the Mac. It also helps to import photos from an external device, like your iPhone. Thus, when you want to download photos from iPhone to Mac, Photos could come to help.
To import photos from iPhone to Mac:
Step 1. Connect the iPhone to the Mac and unlock the iOS device.
Step 2. Launch Photos on the Mac, then click your iPhone under "Devices."
Step 3. Click "Trust" on your iPhone and then enter the passcode as required.
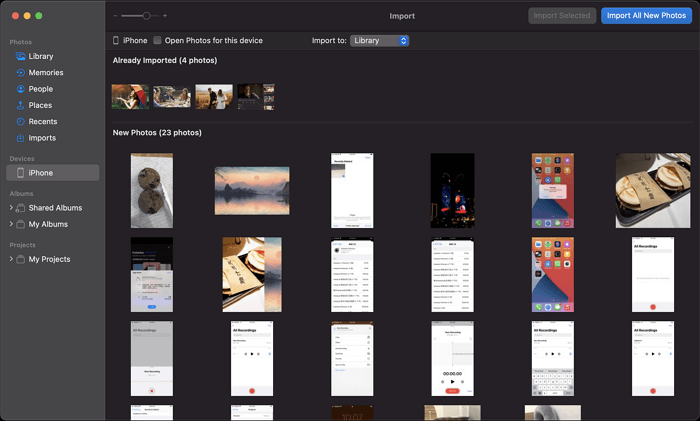
Step 4. Now you can see all photos on your iPhone. Click "Import All New Photos" or select the items you want to transfer and then click "Import [number] Selected" to transfer photos from iPhone to Mac.
You can customize the storage path by clicking "Import to."
![How to transfer photos from iPhone to Mac via Photos]()
How to Import Photos from iPhone to Mac via Image Capture
Another built-in program that allows you to move photos from iPhone to Mac is Image Capture. The difference between Photos and Image Captures is that, Photos is more like a photo management app while Image Captures is a photo transfer program. Other than your iPhone, Image Capture also works to transfer photos and videos from cameras or other devices that have a camera.
To download photos from iPhone to Mac:
Step 1. Connect your iPhone to the Mac via a USB cable.
Step 2. Make sure your iPhone is unlocked and allowed to trust the computer.
Step 3. Launch Image Capture and select your iPhone from the left panel.
Step 4. Click "Import to" and select the folder you'd like to save the photos to.
Step 5. Select photos and click "Download" or click "Download All" to import photos from your iPhone to the Mac.
![How to import photos from iPhone to Mac via Image Capture]()
How to Move Photos from iPhone to Mac via EaseUS MobiMover
As you can see, both Photos and Image Capture show all photos and videos from your iPhone instead of present them by album. Besides, they only allow you to upload photos from iPhone to Mac. When you want to transfer pictures from Mac to iPhone, they won't work. If you want to transfer iPhone photos to Mac by album or need to get photos from Mac to iPhone, you can use the iPhone transfer software - EaseUS MobiMover.
As an iOS content manager, it works well to transfer photos, videos, music, ringtones, books, and more between your iPhone/iPad/iPod and a Mac or between two iDevices. Thus, EaseUS MobiMover will be your good helper whenever you need to transfer files between iPhone and Mac.
To transfer photos from iPhone to Mac:
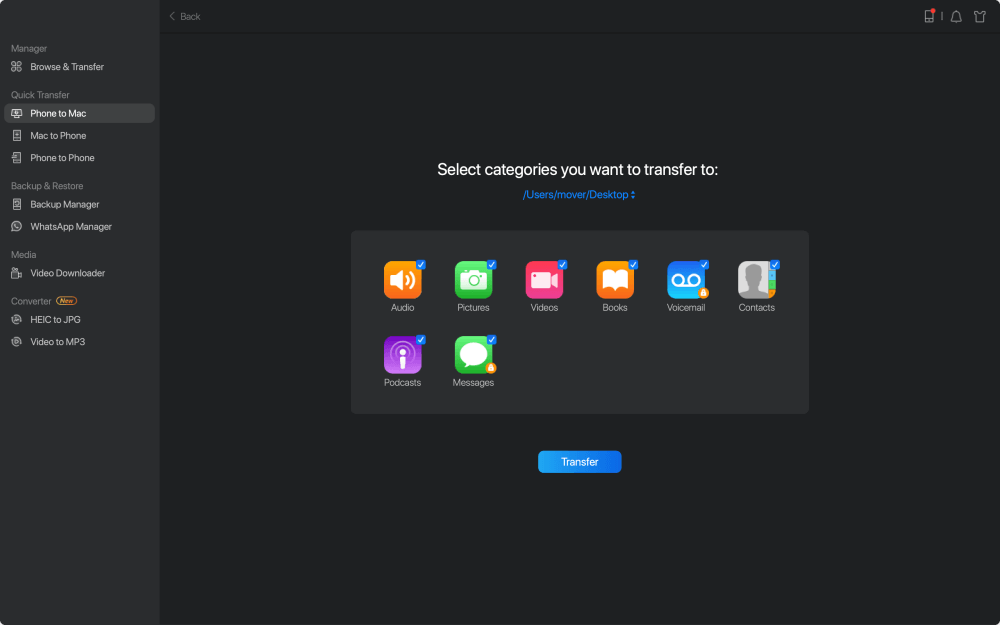
Step 1. Connect your iPhone to Mac with a USB cable. Run EaseUS MobiMover, choose "Phone to Mac" and click the "Next" button to continue.
Step 2. Check the category/categories you want to copy from your iPhone to Mac. As you can see, you can copy other supported files together with photos from your iPhone to Mac all at once. After that, don't forget to customize the storage path for the exported photos unless you want to save them on your desktop.
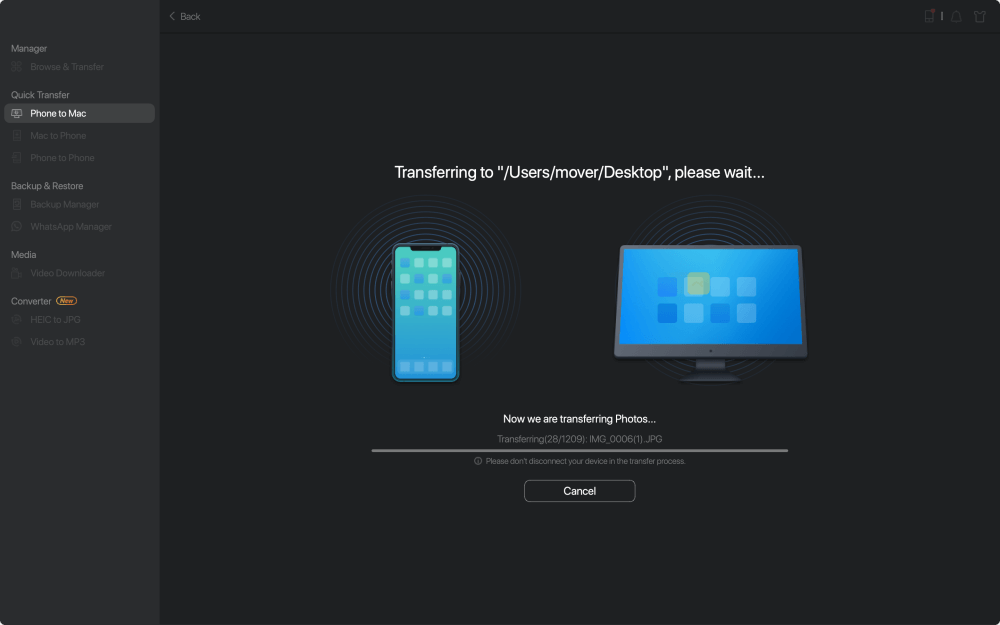
Step 3. Now, click the "Transfer" button to start transferring photos or other files from your iPhone to Mac without iTunes. Exporting files from iPhone to Mac with MobiMover is the right way for backup to avoid unexpected data loss.
As you may have noticed, there is a video download feature in this tool. With this feature, you will be able to download online videos to your Mac or iPhone/iPad. For example, you can download YouTube videos to Mac for offline watching.
How to Sync Photos from iPhone to Mac via iCloud
All of the three methods above need a USB cable to work. If you are looking for a way to upload photos from iPhone to Mac wirelessly, using iCloud is advisable. By turning on iCloud Photos, you can sync photos from iPhone to Mac over a network connetion.
Make sure there is enough storage in iCloud and you are using the same Apple ID account on your devices. Then follow the steps below to upload photos from iPhone to Mac.
To sync iPhone photos to Mac:
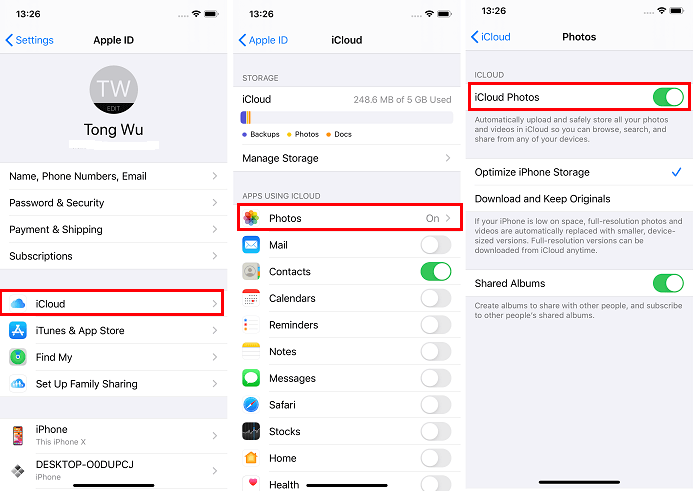
Step 1. On the iPhone, go to "Settings" > [your name] > "iCloud" and toggle on "Photos."
Step 2. On the Mac, go to click "Apple Menu" > "System Preferences" > "Apple ID" > "iCloud" and check "Photos."
Step 3. After the syncing process, you can access your iPhone photos via the Photos app on Mac.
On an earlier version of macOS, you need to go to "System Preferences" > "iCloud". Click "Options" next to Photos, then select "iCloud Photos."
![How to download all photos from iCloud to iPhone]()
How to Transfer Photos from iPhone to Mac Using AirDrop
The ways above are suitable for transferring a large number of photos. There are times when you just need to transfer a small number or photos. In such a case, using AirDrop is the optimal choice. AirDrop is a file-sharing service on almost all Apple devices that can be used to transfer photos, videos, contacts, websites, and more between two AirDrop-supported devices.
When it comes to transferring pictures from iPhone to Mac, it will surely help.
To transfer photos from iPhone to Mac:
Step 1. Go to the Control Center to enable AirDrop on your iPhone.
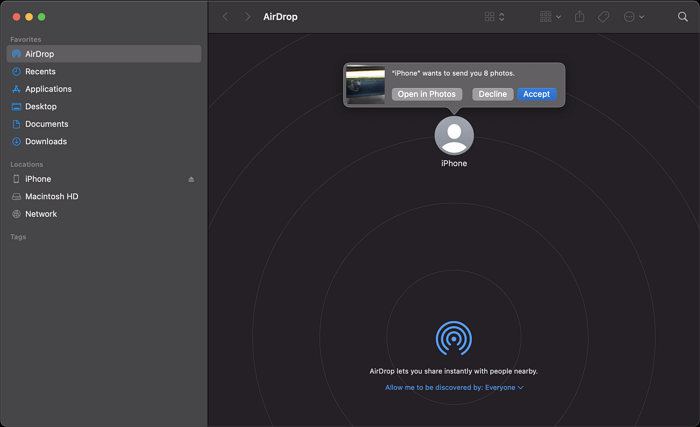
Step 2. On the Mac, open Finder and go to "Go" > "AirDrop".
Step 3. Turn on Wi-Fi to enable AirDrop if necessary. (Make sure your devices can find each other by setting your devices to be discovered by "Contacts Only" or "Everyone.")
Step 4. Go to Photos on your iPhone, select the pictures you want to transfer, and tap the "Share" button.
Step 5. Choose "AirDrop" and tap the name of the Mac.
Step 6. In the AirDrop window on your Mac, click "Accept" to receive these pictures. Afterward, you can go to the "Downloads" folder to check the photos from your iPhone.
![How to download photos from iPhone to Mac via AirDrop]()
The Bottom Line
For you to make a better choice:
- Photos and Image Capture could import photos and videos from iPhone to Mac via a USB cable.
- EaseUS MobiMover is a third-party tool but could help in more data transfer situations.
- iCloud is a wireless solution to sync photos from iPhone to Mac all at once.
- AirDrop is the most convenient wireless solution when you need to transfer a small number of pictures.
Specify your needs and carry out the way you prefer to get iPhone photos to Mac. By the way, except for Photos and Image Captures, all the other three ways are also applicable to transfer photos from Mac to iPhone.