Applies To: iPhone XS/XS Max/XR, iPhone X, iPhone 8/8 Plus
It's quite common for you to want to take a screenshot on your iPhone 8/8 Plus, iPhone X, or iPhone XS/XS Max/XR, for you may want to share the screenshot with others or to keep the important information in the screenshot on your device. That's why this article that covers two ways to take a screenshot on your iPhone (from iPhone 8/8 Plus to the newly released iPhone XS/XS Max/XR) is written. Other than the ways to screenshot on your iPhone, the ways to view, edit and share the screenshot on your device are also provided. Read to get the details.
You may also need the solutions to the common problem "touch screen not working" on your iPhone/iPad. Follow the detailed fixes to fix the issue if you are troubled by it.
Part 1: How to take a screenshot on iPhone 8/iPhone 8 Plus
Generally speaking, you can screenshot on your iPhone in two ways, either via the buttons or via Assistive Touch.
Tip 1: Screenshot iPhone 8/8 Plus using iPhone buttons
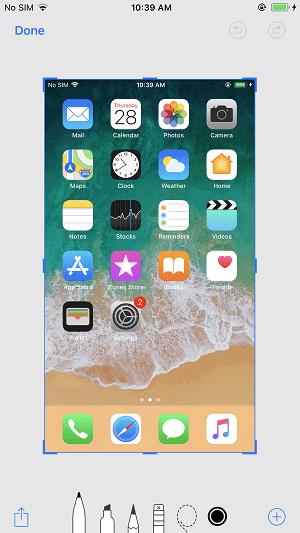
Step 1: Go to the screen you want to capture on your iPhone.
Step 2: Quickly press and release both Sleep/Wake button (also called Side button) and Home button on your iPhone 8/8 Plus to take a screenshot.
Step 3: Then you can see the preview of the screenshot on the lower left of the screen. If you want to edit the screenshot, tap on the preview and you can crop/markup the image or add texts/signature/magnifier to the image. Then click Done > Save to Photos to keep the screenshot on your iPhone or click the Share Button to share the screenshot via Message, Mail or other ways as you like. If you save the screenshot directly, swipe left across the preview and it will be saved on your iPhone automatically. If you want to check it later, go to Photos > Albums > Screenshots on your iPhone.
![How to take a screenshot on iPhone 8/8 Plus - Tip 1]()
Tip 2: Take a screenshot on iPhone 8/8 Plus using AssistiveTouch
Actually, using AssistiveTouch to screenshot your iPhone is more convenient if you find using buttons may mistakenly activate Siri or lock your iPhone if you don't press the buttons simultaneously. The steps below will show you how to do it.
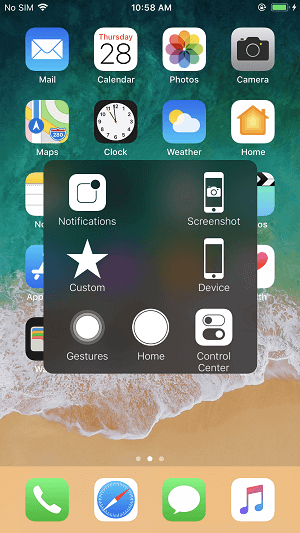
Step 1: Go to Settings > General > Accessibility on your iPhone. (Under Accessibility, you can also invert color on iPhone 8/8 Plus to make your iPhone screen more eye-friendly.)
Step 2: Scroll down to click AssistiveTouch and turn it on.
Step 3: Then go to Customize Top Level Menu... and tap on the Plus sign to add a new icon.
Step 4: Tap on the newly added icon, choose Screenshot and click Done. Then you will see Screenshot option in the AssistiveTouch Menu.
Step 5: Go to the screen you want to take a screenshot on your iPhone 8/8 Plus, click the AssistiveTouch button on your screen and choose Screenshot to screenshot your iPhone.
![How to screenshot on iPhone 8/8 Plus - Tip 2]()
Part 2: How to screenshot on iPhone X
On iPhone X, the way to take a screenshot is slightly different since there is no Home button on it.
Step 1: Navigate to the screen you want to capture on your device.
Step 2: Press and hold both Side button and Volume Up button at the same time to screenshot on your iPhone X.
Step 3: After the screenshot is taken, you can click the thumbnail in the bottom-left corner of your iPhone X to make further edits or leave it to save to your device automatically. You can get access to the screenshots by going to Photos > Albums > Camera Roll/Screenshots in iOS 11. In iOS 12, if you want to visit the Screenshots album, open Photos, click Albums, navigate to Media Types and choose Screenshots.
Note: Similarly, you can also screenshot your iPhone X with Assistive Touch introduced in Tip 2 of Part 1.
![How to take a screenshot on iPhone X]()
Part 3: How to screenshot iPhone XS/XS Max/XR
On your iPhone XS/XS Max or iPhone XR, you can also take a screenshot with the buttons or Assistive Touch.
You may also need:
Tip 1: Screenshot on iPhone XS/XS Max/XR with buttons
Step 1: Go to the screen you want to capture.
Step 2: Press and hold the Side button on the right side of your iPhone XS/XS Max/XR, then quickly click the Volume Up button to screenshot your iPhone.
Step 3: Then you will see the thumbnail of the screenshot appears on your iPhone. You can: tap the thumbnail to edit the photo or press and hold it to share the screenshot via AirDrop, Messages, Mail, and more.
![How to take a screenshot on iPhone XS/XS Max or iPhone XR]()
Tip 2: Take a screenshot on iPhone XS/XS Max/XR via Assistive Touch
By enabling Assistive Touch and adding Screenshot control to the menu, you can screenshot on your iPhone XS/XS Max/XR without pressing the buttons.
Step 1: Go to Settings > General > Accessibility on your iPhone XS/XS Max or iPhone XR.
Step 2: Scroll down to click AssistiveTouch and turn it on.
Step 3: Click Customize Top Level Menu... and tap on the Plus sign to add a new icon.
Step 4: Tap on the newly added icon, choose Screenshot and click Done.
Step 5: Go to the screen you want to take a screenshot, click the AssistiveTouch button on your screen and choose Screenshot to screenshot your iPhone XS/XS Max/XR.
![How to screenshot on iPhone XS/XS Max/XR via Assistive Touch]()
Part 4: How to transfer screenshots from iPhone to computer (or another iDevice)
Want a totally free iOS data transfer tool that can help you copy the screenshots on your iPhone to computer to other iDevices? If so, EaseUS MobiMover Free is a good choice for you. As long as your iPhone/iPad is in iOS 8 or later and your computer is running Windows 7 and later or OS X 10.7 and later, you can use MobiMover to copy the contents from your iPhone/iPad to computer to free up space on iPhone/iPad, transfer files from one iPhone/iPad to another to keep the data synced, export files from computer to enrich your iPhone/iPad contents as you like. The files you can transfer include photos, videos, audios, contacts, messages, notes and more, depending on the feature you'd like to use. Sounds great? Download MobiMover and try it yourself. (The guide below shows you how to import pictures from your iPhone to computer. You can also transfer photos from iPhone to iPhone if you need to.)
MobiMover can also be taken as a file manager and a video downloader, with which you can easily delete iPhone photos from PC or download videos from websites to your computer or iPhone/iPad.
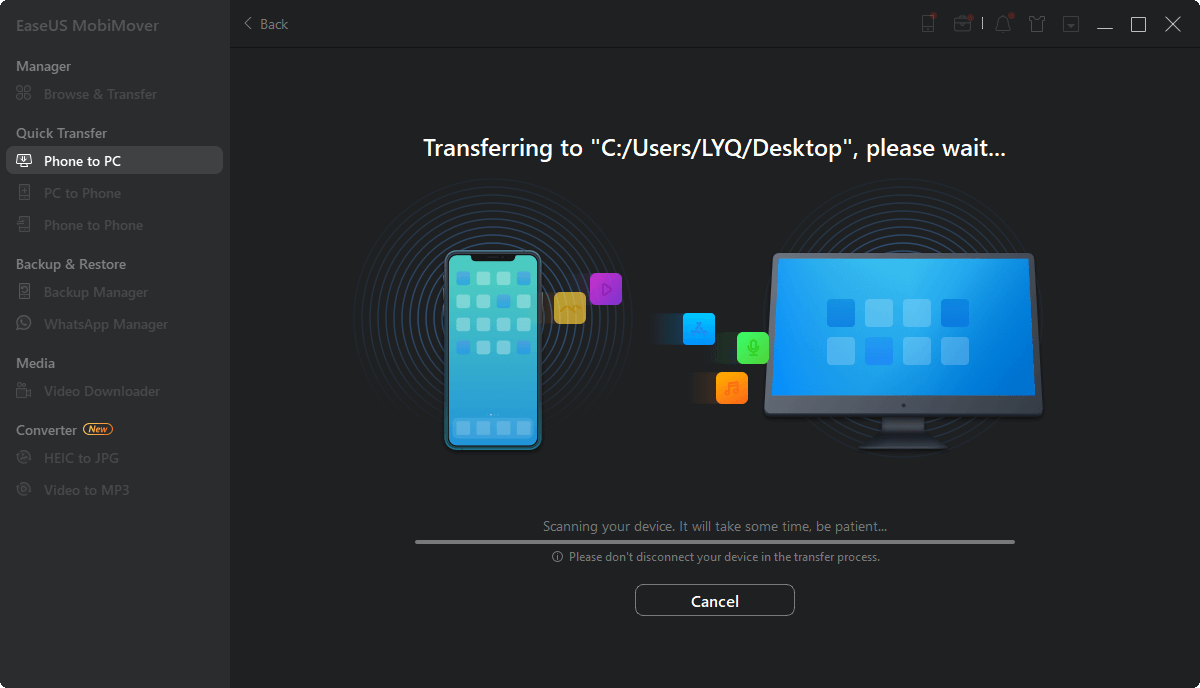
Step 1. Connect your iPhone to your computer running Windows 7 and later or Mac OS X 10.7 and later. Launch EaseUS MobiMover, choose "Phone to PC" on the main screen and click the "Next" button to move on.
Step 2. Select the "Pictures" category as you want to copy from your iPhone to your computer. It's the right choice for you to transfer other supported file types together with photos from your iPhone to the computer to make a backup.
Step 3. Click the "Transfer" button to start transferring photos from your iPhone to the computer. Depending on the size of the files, it may take seconds or a while to import pictures from your iPhone to your computer. Wait patiently for the process to finish and check the items in the selected folder after that.


 NEW
NEW HOT
HOT