Applies To: iPhone XS/XS Max/XR, iPhone X, iPhone 8/8 Plus, iPhone 7/7 Plus, iPhone 6/6s
“iTunes could not connect to this iPhone because an unknown error occurred (0xE8000015)” is the complete notification of iTunes error 0xE8000015. According to Apple, an unknown error or a “0xE” error always indicates that your iPhone or other iOS device connected is not recognized by the computer. To solve the iTunes error 0xE8000015 happened when connecting your iPhone 8 or iPhone 7 to the computer and help your iPhone to be recognized by iTunes, this article introduces all the possible solutions you can try to solve the iTunes error. Read on to get the details.
Part 1: How to fix iTunes error 0xE8000015
The fixes to the iTunes error can be divided into two categories; the simple ones and the relatively complex ones. You are recommended to try the easy solutions first. If these don't work, go on to try the complex fixes. (There are other situations in which iTunes could not connect to this iPhone. Read the related article to get more information.)
If you don't like the data syncing that will be caused by using iTunes, you can use an iTunes alternative introduced in Part 2 to help you transfer data between two iOS devices or between an iOS device and the computer (Mac or PC).
9 simple fixes to the iTunes error 0xE8000015:
- Update iTunes to the latest version.
- Update your iPhone to the latest version of iOS.
- Update your computer to the latest version of macOS or Windows.
- Make sure your iPhone is turned on.
- When you see the Trust this Computer notification, unlock your iPhone and click Trust.
- Disconnect all peripheral devices except for your iPhone. Try a different USB port, and then try another Apple USB cable to see whether it works.
- Make sure the network connection works properly on your iPhone.
- Make sure you have enough space left on your iPhone.
- Restart your computer and iPhone.
5 relatively complex fixes to the iTunes error 0xE8000015:
Let's get right to these methods now!
⚡Tip 1: Repair iTunes based on the error 0xE8000015
You can take advantage of a professional iTunes repair tool to fix the error 0xE8000015 directly. Here I recommend EaseUS MobiXpert, a highly effective iTunes repair software to fix such kind of error code, such as code 11556, 11571, 42110, 42408, 45054 or 0xE8000015. Besides, it also enables users to fix the unconnectable, unrecognizable, and other iTunes problems.
Click below to free downlaod this EaseUS software now:
Here's how:
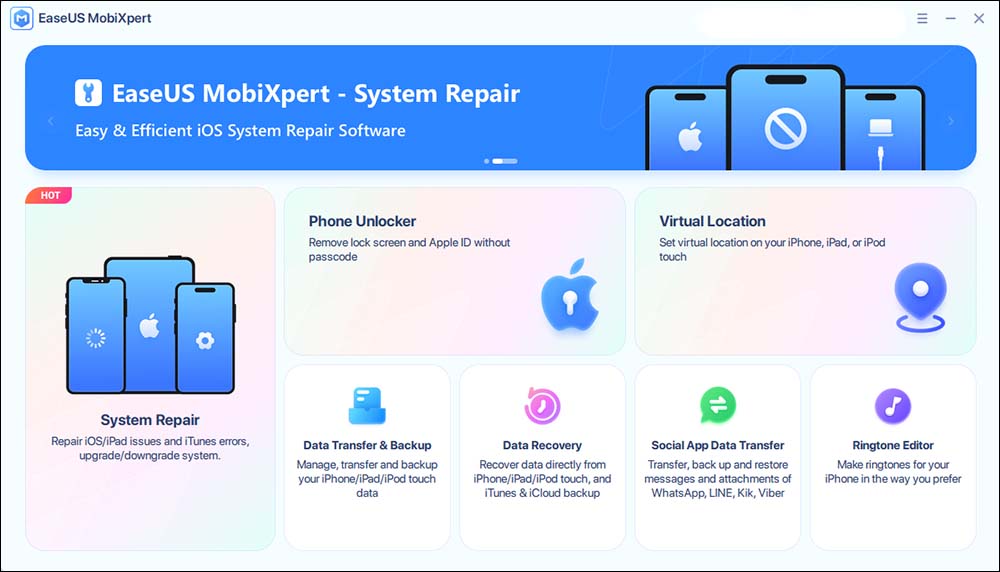
Step 1. Connect your device to computer and launch EaseUS MobiXpert. Choose System Repair from the main interface.
![MobiXpert hompage]()
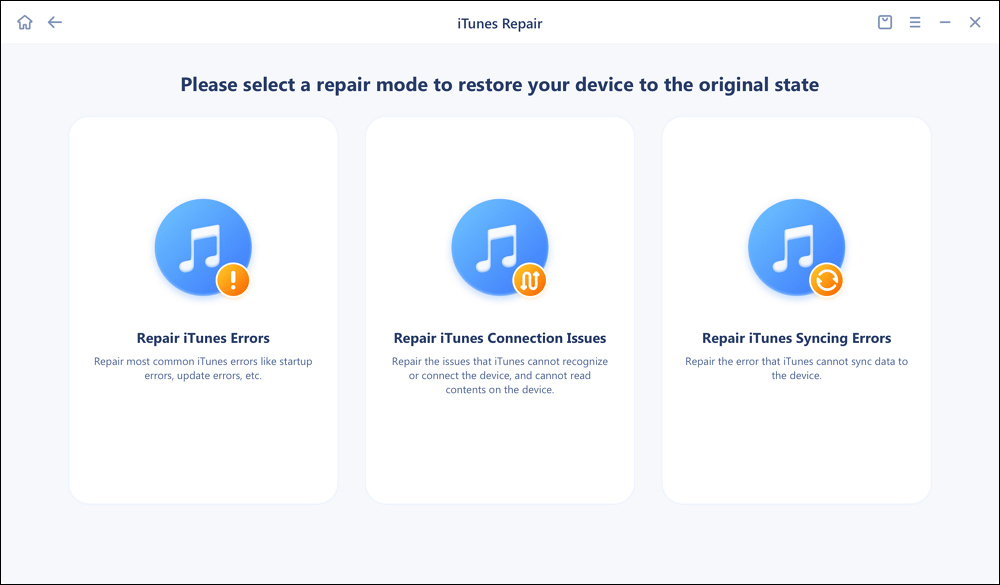
Step 2. Click iTunes Repair and select a mode to restore your device to the original state. You can choose from Repair iTunes Errors, Repair iTunes Connection Issues, and Repair iTunes Syncing Errors.
![]()
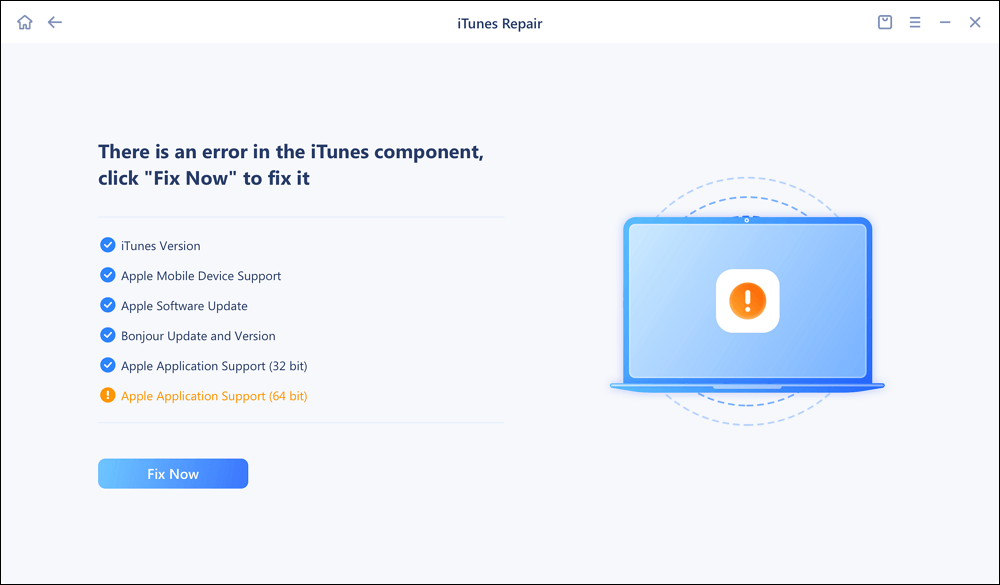
Step 3. It will automatically examine your iTunes errors. Click Fix Now to fix the iTunes component.
![]()
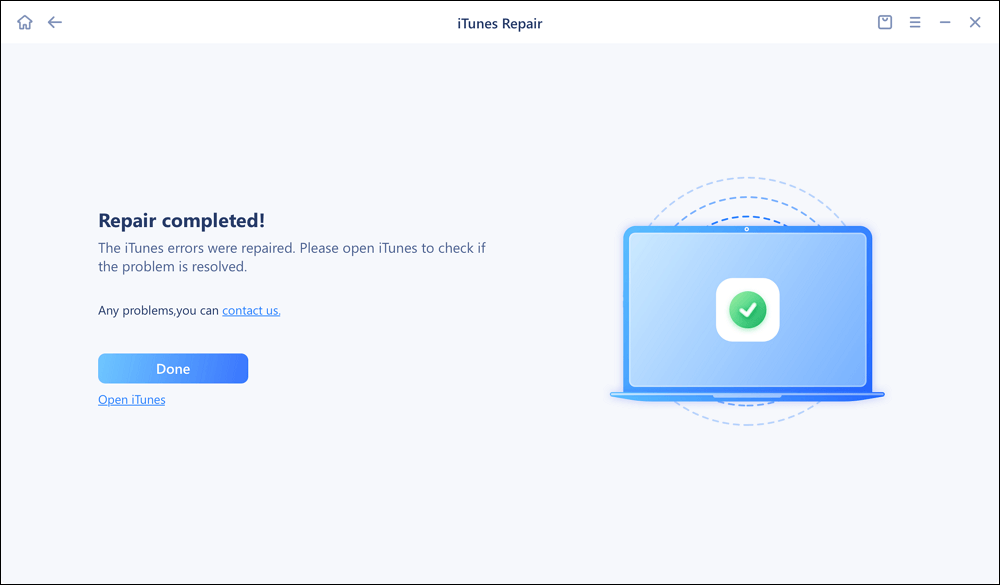
Step 4. When the repair process is completed, click Done and open iTunes to check whether the problem is solved.
![]()
⚡Tip 2: Disable Restrictions on your iPhone
It's possible that you have made your iPhone inaccessible to iTunes by enabling Restrictions on your iPhone, which may lead to the iTunes error 0xE8000015. Go to Settings > General > Restrictions to have a check, and click Disable Restrictions on your iPhone if it is enabled.
⚡Tip 3: Reset the Lockdown folder
By deleting the Lockdown Folder on your computer, iTunes will recreate the directory, which may help to fix the iTunes error 0xE8000015.
On PC:
Step 1: Press Windows + R to open the Run command.
Step 2: Enter %ProgramData% and click OK.
Step 3: Locate and double-click the folder named Apple.
Step 4: Delete the Lockdown folder from your computer.
On Mac:
Step 1: Go to Finder > Go > Go to Folder from your Mac.
Step 2: Enter /var/db/ lockdown and press the return button.
Step 3: Select all the items in the Lockdown folder and remove them from your computer.
⚡Tip 4: Check your iPhone under the USB Device Tree on Mac
This solution is for Mac users who are facing the iTunes error 0xE8000015 while connecting their iPhone 8 or iPhone 7 to the Mac.
Step 1: Press and hold the Option key, and go to Apple > System Information or System Report.
Step 2: Under Hardware, choose USB.
Step 3: If you see your iPhone 8 or iPhone 7 under the USB Device Tree, remove third-party security software from your Mac will fix iTunes error. If your iPhone is not showing there, you may need to contact Apple for help (https://support.apple.com/contact).
⚡Tip 5: Reinstall the Apple Mobile Device USB driver on PC
According to Apple, reinstalling the Apple Mobile Device USB driver helps iTunes to recognize your iPhone. The way to do it differs depending on where you have download downloaded iTunes from, the Microsoft Store or Apple.
If you downloaded iTunes from the Microsoft store:
Step 1: Disconnect your iPhone from your PC.
Step 2: Reconnect your iPhone to your computer. (Close iTunes if it opens automatically.)
Step 3: Right-click the Start button (the Windows icon), and then select Device Manager.
Step 4: Find and expand the Portable Devices option.
Step 5: When you see your iPhone 8 or iPhone 7, right-click your iPhone name and choose Update driver.
Step 6: Choose Search automatically for updated driver software.
Step 7: After the driver is updated, go to Settings > Update & Security > Windows Update and make sure there are no other available updates.
Step 8: Run iTunes and see whether the iTunes error 0xE8000015 still exist.
If you downloaded iTunes from Apple:
Step 1: Disconnect your iPhone from your PC.
Step 2: Reconnect your iPhone to your computer. (Close iTunes if it opens automatically.)
Step 3: Press the key combination (Windows + R) to open the Run command.
Step 4: Then enter the following string and click OK.
%ProgramFiles%\Common Files\Apple\Mobile Device Support\Drivers
Step 5: Right-click usbaapl64.inf or usbaapl.inf file and choose Install. (Make sure the filename extension is .inf.)
Step 6: Disconnect your iPhone from your PC and restart your computer.
Step 7: Reconnect your iPhone to your PC and run iTunes.
Part 2: How to back up or transfer iPhone data without using iTunes
As an iPhone user, you may need an iTunes alternative that enables you to transfer data to your iPhone without data syncing. That's why EaseUS MobiMover Pro, the iTunes alternative, is introduced here. As you will know, EaseUS MobiMover is a reliable tool for iOS data transfer and file management, which means you can use it to transfer data between two iOS devices (iPhone/iPad in iOS 8 or later) or between an iOS device and computer (Mac or PC) and manage your iPhone content by deleting/editing/adding items from computer. The file types supported by MobiMover are:
- What can MobiMover transfer or manage for you:
-
Photos: Camera Roll, Photo Library, Photo Stream, Photo Videos
Videos: Movies, TV shows, Music Videos
Audios: Music, Ringtones, Voice Memos, Audiobooks, Playlists
Others: Contacts, Notes, Messages, Voice Mails, Books, and Safari Bookmarks
Thus, no matter you want to transfer photos from iPhone to iPhone, put music to iPhone, or back up iPhone to computer, you can use EaseUS MobiMover to do it. Follow the steps below to back up your iPhone to computer within minutes.
Conclusion
In this article, I've shared with you 9 simple ways and 5 other step-by-step solutions to fix iTunes error 0xE8000015, and EaseUS MobiXpert is recommended most to help you with that. I sincerely hope this post is useful and help you out of this dilemma. You are welcome to contact me on Twitter if you have any further questions or concerns about this guide. If you found this guide useful, you can click the button below to share it with your friends.
FAQs
For more information on today's topic - how to fix iTunes error 0xE8000015, you can check the following frequently asked questions.
1. How do I fix my iPhone when I cant connect to iTunes?
You can perform some checking for troubleshooting, such as restarting your iPhone, the computer, and iTunes. You can also change to another USB cable for reconnection. And EaseUS MobiXpert is recommended to fix the connection failure due to an unknown iOS system glitch.
2. What's the best iTunes alternative?
In addition to iTunes, you can use EaseUS MobiMover to back up, transfer or restore iPhone data. It also enables users to transfer data from Android to iPhone.
3. How to do a hard reset through iTunes?
To do this, follow the steps below:
- Connect your device to your computer.
- In iTunes, click the Device button near the top left corner.
- Click Summary > Restore, then follow the onscreen instructions.
 NEW
NEW HOT
HOT