Applies To: iPhone XS/XS Max/XR, iPhone X, iPhone 8/8 Plus, iPhone 7/7 Plus, iPhone 6/6s
When it comes to iPhone data transfer, many of you may first think of iTunes to help you get things done. It no doubt that you can use iTunes to back up your iPhone, sync data from computer to your iPhone, or transfer files from one iOS device to another. However, it's also true that you may encounter various kinds of iTunes errors while using iTunes. According to iPhone users, one of the commonest issues is iTunes Could Not Connect to This iPhone. Given that, this article is written to introduces the potential solutions to the iTunes could not connect to this iPhone problem, either due to an error occurred (0xe8000015), an invalid response received, or other reasons. Read on to get the details.
Part 1: Fixes to iTunes Could Not Connect to This iPhone
You can also apply the tips below to your device if you are troubled by the iTunes could not connect to this iPad issue.
If you can't fix the iTunes error with the possible solutions provided, you are recommended to use the FREEWARE for iOS data transfer and file backup introduced in Part 2 to help you transfer data to or from your iPhone.
Situation 1: iTunes could not connect to this iPhone because an unknown error occurred (0xE8000015)
An unknown error or a “0xE” error always indicates that iTunes on your Mac or PC doesn't recognize your connected iPhone. When you are facing this issue, follow the steps below and try to re-connect your iPhone after each step before you try the relatively complex solutions provided.
Tip 1. Simple tips that you should try first:
- Check that you have the latest version of iTunes, macOS, or Windows on your computer.
- Make sure your iPhone is turned on.
- When you see the Trust this Computer notification, unlock your iPhone and click Trust.
- Disconnect all peripheral devices except for your iPhone. Try a different USB port, and then try another Apple USB cable to see whether it works.
- Restart your computer and iPhone.
If the tips above doesn't help to solve the iTunes could not connect to this iPhone (0xe8000015) problem, try the methods below.
For Mac users:
Step 1: Press and hold the Option key, and go to Apple > System Information or System Report.
Step 2: Under Hardware, choose USB.
Step 3: If you see your iPhone under the USB Device Tree, remove third-party security software from your Mac will fix the iTunes could not connect to this iPhone issue. If your iPhone is not showing there, you may need to contact Apple for help (https://support.apple.com/contact).
For PC users:
You need to reinstall the Apple Mobile Device USB driver. The steps to do it vary according to where you have download downloaded iTunes from, the Microsoft Store or Apple.
If you downloaded iTunes from the Microsoft store:
Step 1: Disconnect your iPhone from your PC.
Step 2: Reconnect your iPhone to your computer. (Close iTunes if it opens automatically.)
Step 3: Right-click the Start button (the Windows icon), and then select Device Manager.
Step 4: Find and expand the Portable Devices option.
Step 5: When you see your iPhone, right-click your iPhone name and choose Update driver.
Step 6: Choose Search automatically for updated driver software.
Step 7: After the driver is updated, go to Settings > Update & Security > Windows Update and make sure there are no other available updates.
Step 8: Run iTunes and see whether the iTunes could not connect to this iPhone still exist.
If you downloaded iTunes from Apple:
Step 1: Disconnect your iPhone from your PC.
Step 2: Reconnect your iPhone to your computer. (Close iTunes if it opens automatically.)
Step 3: Press the key combination (Windows + R) to open the Run command.
Step 4: Then enter the following string and click OK.
%ProgramFiles%\Common Files\Apple\Mobile Device Support\Drivers
Step 5: Right-click the usbaapl64.inf or usbaapl.inf file and choose Install. (Make sure the filename extension is .inf.)
Step 6: Disconnect your iPhone from your PC and restart your computer.
Step 7: Reconnect your iPhone to your PC and run iTunes.
Tip 2. iTunes system reapair
If your iPhone can't still appear in iTunes after the regular check above, then you can download EaseUS MobiXpert to fix the unkown system bugs in iTunes. This EaseUS software is a professional and reliable repair tool, exclusively designed to fix connection failure or the system bugs in iTunes.
Follow the steps below to repair iTunes with EaseUS MobiXpert:
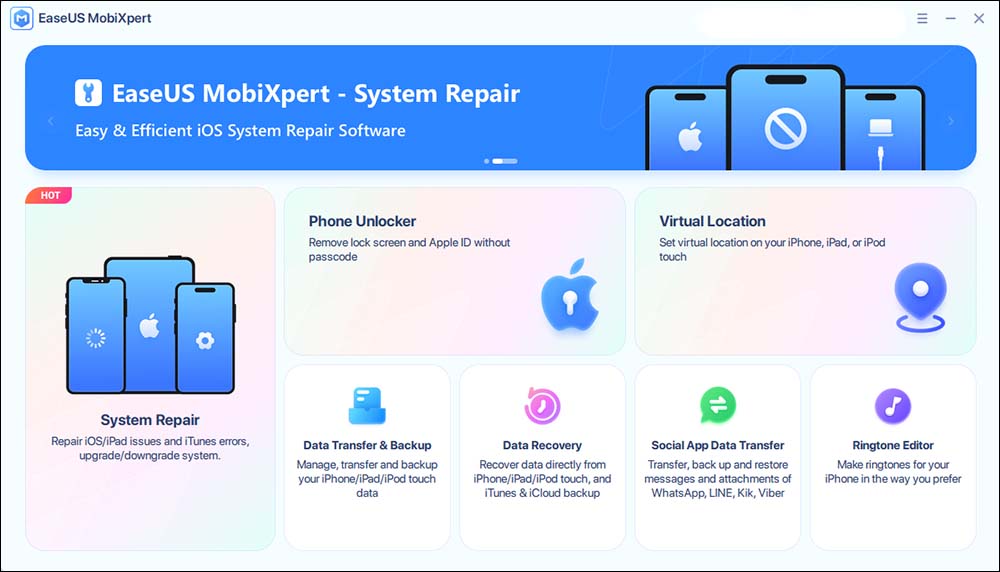
Step 1. Connect your device to computer and launch EaseUS MobiXpert. Choose System Repair from the main interface.
![MobiXpert hompage]()
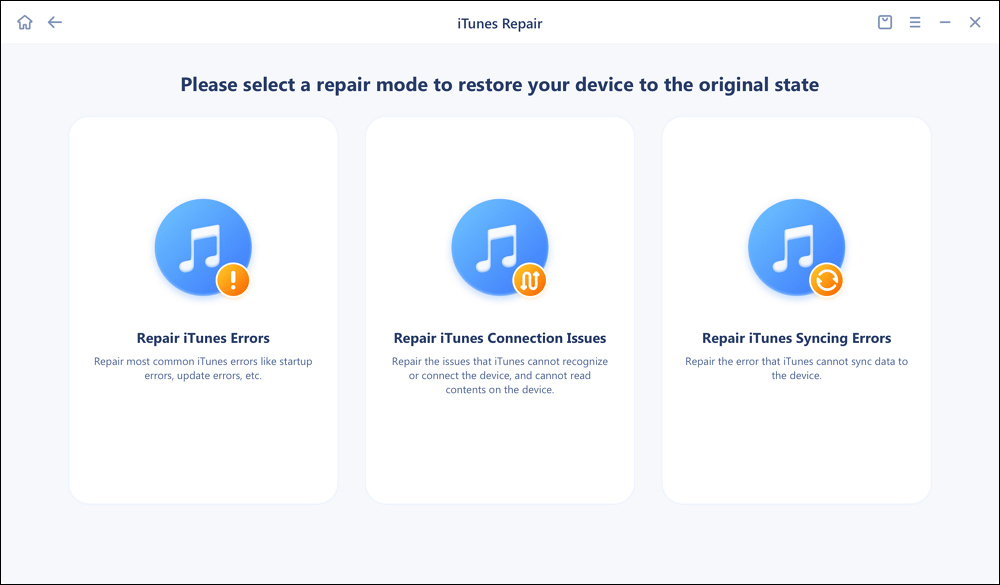
Step 2. Click iTunes Repair and select a mode to restore your device to the original state. You can choose from Repair iTunes Errors, Repair iTunes Connection Issues, and Repair iTunes Syncing Errors.
![]()
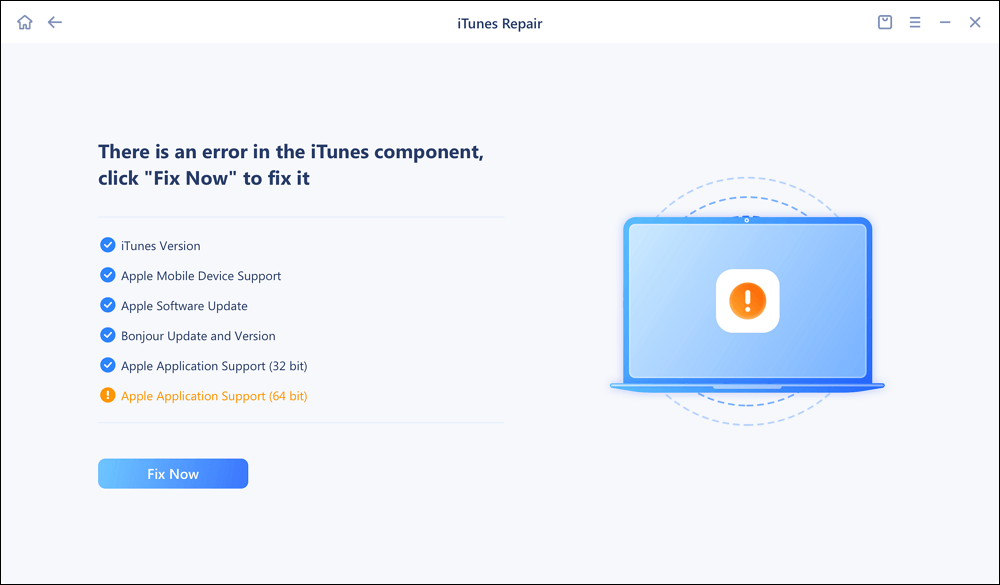
Step 3. It will automatically examine your iTunes errors. Click Fix Now to fix the iTunes component.
![]()
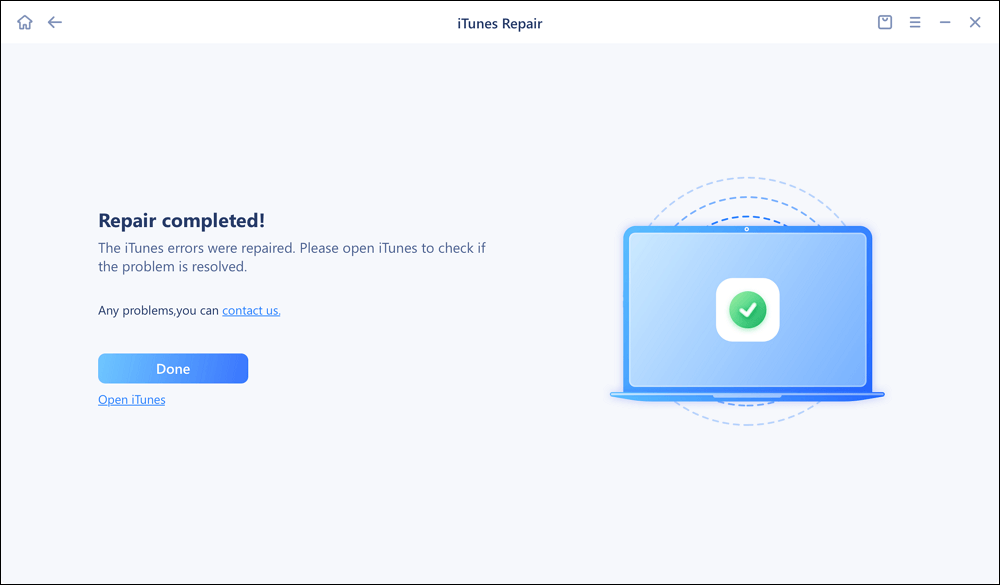
Step 4. When the repair process is completed, click Done and open iTunes to check whether the problem is solved.
![]()
Situation 2: iTunes could not connect to this iPhone because an invalid response was received from the device
If iTunes could not connect to your iPhone due to an invalid response received from your iPhone, you can try the following tips to fix the issue.
- Update iTunes to the latest version on your computer.
- Update your iPhone to the latest iOS and update your computer to the latest operating system.
- Reset network settings on your iPhone. (Go to Settings > General > Reset > Reset Network Settings on your iPhone.)
- Try a different USB port or Apple USB cable.
- Restart your iPhone and computer.
- Make sure your iPhone is unlocked when connecting to computer.
Situation 3: iTunes could not connect to this iPhone because an error occurred while reading from the device
If you see the error message "iTunes could not connect to this iPhone because an error occurred while reading from the device", follow the tips below to have a try.
- Make sure you have the latest version of iTunes on your computer.
- Authorize your computer in iTunes. (On Mac: Open iTunes, sign in with your Apple ID by going to Account > Sign In, navigate to Account > Authorizations > Authorize This Computer. On PC: Open iTunes, sign in with your Apple ID by going to Account > Sign In, then choose Account > Authorizations > Authorize This Computer. If the iTunes menu bar is hidden, press Control + B to show it.)
- Delete incompatible Apps from your iPhone. (Learn how to delete Apps from iPhone here.)
- Make sure your iPhone is unlocked when connecting to your computer.
- Make sure you have enough space left on your computer.
Part 2: A free Alternative to Transfer iPhone Data without iTunes
Using iTunes is not the only choice for you to back up your iPhone to computer, transfer data from computer to your iPhone, or sync files from one iPhone to another. For example, as an iTunes alternative, EaseUS MobiMover Free supports the data transfer between an iOS device (iPhone/iPad in iOS 8 or later) and computer (Mac or PC) or between two iOS devices. With MobiMover installed on your Mac or PC, you can transfer and manage your iPhone content without any cost or limitations.
- What can MobiMover transfer or manage for you:
-
Photos: Camera Roll, Photo Library, Photo Stream, Photo Videos
Videos: Movies, TV shows, Music Videos
Audios: Music, Ringtones, Voice Memos, Audiobooks, Playlists
Others: Contacts, Notes, Messages, Voice Mails, Books, and Safari Bookmarks
Note: If you want to transfer files from computer to iPhone or sync data from one iPhone to another, learn how to do it from the full guide of EaseUS MobiMover Free.
The Bottom Line
In this guide, I've provided a few effective methods to help you fix "iTunes Could Not Connect to This iPhone" issue. And if you can't identify the source of the error, then it is recommended to tru EaseUS MobiXpert to fix the iTunes error.
If you find this article helpful, click the button below to share it with your friends. If you have any queries regarding the topic, feel free to contact me, and do let me know of the future issues you wish to see articles from us.
FAQs
For more information on today's topic - iTunes could not connect to this iPhone, you can check the following frequently asked questions.
1. When should I restore my iPhone using Finder and iTunes, respectively?
If your computer is a Windows PC or a Mac running macOS Mojave or earlier, iTunes is available to restore your iPhone. While if your Mac is updated to macOS Catalina or later, then Finder is your new option instead. Nowadays iTunes has been replaced gradually by Finder with the release of macOS Catalina.
2. How to back up iPhone to PC?
The optimal option is using iTunes to back up iPhone to a computer or iCloud. But sometimes, iTunes doean't work well as we expected. You can select EaseUS MobiMover as the best alternative to iTunes.
3. What data can you sync with iTunes?
You are allowed to sync three files, including:
- Albums, songs, playlists, movies, TV shows, podcasts, and audiobooks.
- Photos and videos.
- Contacts and calendars.
 NEW
NEW HOT
HOT