Modern iPhones and iPads are using eSIM technology, which has eliminated the need for a physical SIM card. So, it's essential to know first how to transfer SIM to eSIM, whether you're upgrading to a new iPhone or want to transfer eSIM from Android to iPhone. This article will also mention the key differences between SIM and eSIM and guide you through the step-by-step process of transferring SIM to eSIM. Let's start now!
Part 1. How to Transfer SIM to eSIM on iPhone (3 Easy Ways)
Instead of taking out and putting in a tiny card, transferring physical SIM to eSIM is much easier. It's part of a bigger shift to make things digital, where connecting to mobile networks is simpler than ever. Here are 3 easiest methods for this shift:
Way 1. How to Transfer SIM to eSIM via Convert to eSIM
Apple has provided users with a built-in feature to transfer SIM cards to eSIM, whether on the same iPhone or a new one. In that case, you don't even contact your network providers for this transfer. You can simply convert your cellular plan into eSIM through device settings. Follow the steps below to convert SIM to eSIM.
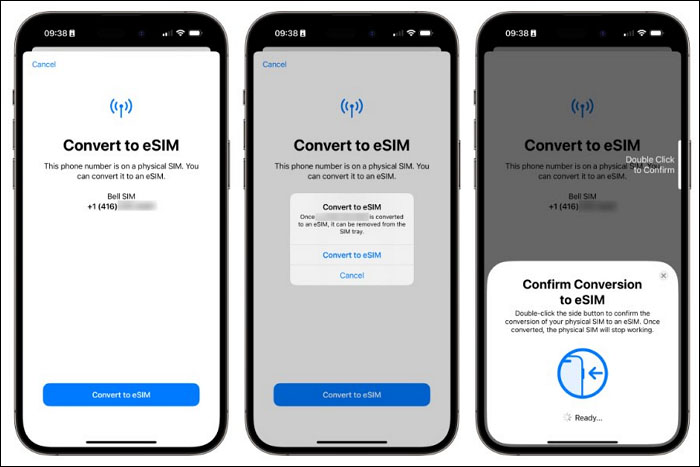
Here's how to transfer SIM to eSIM for the same iPhone:
Step 1. Go to "Settings" on your iPhone. Swipe down and tap on "Cellular" settings.
Step 2. To transfer Android SIM to iPhone eSIM, hit the "Convert to eSIM" option.
Step 3. Then, tap on the "Convert Cellular Plan" button and finally hit "Convert to eSIM" to activate your eSIM successfully.
Step 4. At last, dislodge the physical SIM and reboot your device to transfer physical SIM to eSIM.
![press convert to esim]()
Here's how to transfer SIM to eSIM for a new iPhone:
Step 1. After accessing the "Cellular settings, now go to "Add Cellular Plan".
Step 2. Afterward, hit "Transfer from another iPhone" from the "Set Up eSIM" section and confirm the transfer through a verification code.
Step 3. A banner "Finish Setting Up Your Network Provider's Data Plan" may appear on your new phone; simply tap it to complete the process.
![choose transfer from another iphone]()
See also:
Way 2. How to Convert SIM to eSIM with Network Provider
If your network provider doesn't support direct transfer through device settings, you can get assistance from your carrier company. For example, if you're using Verizon's carrier, you can transfer Verizon physical SIM to eSIM on your new iPhone from their website. It requires that your iOS must be updated to iOS 16 or later.
Step 1. On your new iPhone/iPad, go to "General" > "About". Afterward, scroll down to find your iDevice's "IMEI" number.
Step 2. Now, go to the official Verizon website and sign in. From there, select "Account" >"Switch Device".
Step 3. Then, choose your previous device and tap the "Switch Mobile Number to Another Device" option. Once done, hit the "Activate" button.
Step 4. After that, go to "Your Eligible Device" > "Next". Finally, enter your new device's IMEI when asked for "Device ID IMEI" and complete the following steps. Now, configure your eSIM and restart the new iPhone.
Way 3. How to Move SIM to eSIM Using Mint Mobile
You can easily convert your SIM cards to eSIM to enjoy this innovative experience through the above-enlisted methods. However, if you are wondering how to transfer SIM to eSIM other than these methods, there's still a way. Many third-party apps are working in this regard to let you operate this transfer effectively. To provide an example, we will explain the step-by-step procedure via the Mint Mobile app to transfer SIM to eSIM.
Step 1. Start by downloading the "Mint Mobile" app from the App Store on your iOS device. Once downloaded and installed, locate and launch the app on your iDevice from the home screen.
Step 2. After this, scroll to the "SIM CARD" section in the "Account" tab and choose the "Change Device" option. An invitation text will prompt you to switch to eSIM; just tap it. Finally, after following the remaining setup guide, restart your iPhone/iPad to activate your eSIM.
![tap the change device option]()
Part 2. How to Transfer eSIM to Physical SIM back
![eSIM icon]()
We know a question might appear on your mind now about transferring eSIM back to physical SIM. The answer to this question is that you cannot transfer your eSIM back to the physical one. Once you transfer your physical SIM to eSIM, your physical SIM gets instantly deactivated. So, you will contact your carrier service and ask for a new physical SIM if you want to use one. But you can transfer eSIM from iPhone to Android easily.
Part 3. SIM VS eSIM: Key Differences
![sim vs esim]()
eSIM is an innovative cellular network technology that lets you access carrier data through software. It’s like a digital version of SIM, which is embedded directly into the device’s hardware. So, it facilitates users to switch between mobile carriers and plans without needing a physical SIM swap. For further perception of an eSIM, consider this comparison table with its key differences from physical SIM.
| Feature |
SIM Card |
eSIM |
| Physical Presence |
A physical card needs to be inserted |
Built-in chip integrated into the device |
| Activation |
Requires physical insertion and activation |
It can be remotely activated and provisioned |
| Carriers |
Fixed to a carrier and requires physical replacement |
Independent to the carrier (switch carriers and plans digitally) |
| Size |
Standard, Micro, Nano sizes available |
No physical size variations |
| Security |
Less secure and easy to steal |
More secure and can't be removed |
| Durability |
Prone to damage or loss |
Less susceptible to damage or loss |
How to Transfer Files from Android/iPhone to iPhone
Undoubtedly, activating your cellular network on your new device is essential. Other than the SIM transfer, when we shift to another device, you may want to transfer your precious data to the new iDevice without losing data. Therefore, you can use a competent tool, EaseUS MobiMover, which has mind-blowing features for phone data transfer.
This all-in-one tool lets you transfer your data from an old phone to a new one or any operating device, like a tablet, PC, Mac, etc. Even the data from social accounts, such as WhatsApp, can be successfully transferred from one device to another. Key Features:
- With this tool, you can batch convert complex image formats, like HEIC, to JPG for better accessibility.
- Users can use this tool to back up iPhone data and restore it on any device at any time.
- EaseUS MobiMover can even fetch videos or audio from websites and allows you to save them to your device.
Conclusion
This guide has explained what an eSIM is, how to transfer SIM to eSIM and how it differs from the traditional physical SIM. All the effective methods for the transfer of SIM cards to eSIM on iPhone/iPad have been discussed. Plus, it's worth noting that there's no way to return to your physical SIM from eSIM. Other than this, EaseUS MobiMover gives you the most secure and fastest data transfer experience in the simplest steps when you need to transfer files across devices.
FAQs on How to Transfer SIM to eSIM on iPhone
To develop your concepts further about this eSIM transfer matter, we will now mention some of the commonly asked questions and their appropriate answers. Give this section a few moments to clarify your confusion.
1. How do I activate eSIM on my iPhone?
First, enter "Cellular" settings and then tap the "Add Cellular Plan" option. Afterward, enter the activation details or scan the QR code provided by your network provider. Follow the prompts to proceed with the activation process.
2. What are the disadvantages of converting to eSIM?
Using eSIMs has some downsides, like limited carrier support and potential compatibility problems with older devices. Switching carriers with an eSIM also needs an internet connection, and its activation may not be accessible in all areas or with every carrier.
3. How much time will it take to convert SIM to eSIM?
The process typically takes a few minutes but may vary depending on your carrier's activation procedures and internet connection speed.


 NEW
NEW HOT
HOT