Guided Access: A Complete Introduction of What It Is
Guided Access is a feature on iPhones and iPads that allows users to restrict access to a single app or turn off certain features on the device. It can be helpful for parents who want to limit their child's access to certain apps or for teachers who want to ensure students stay focused on a specific task.
When you enable Guided Access on your iPhone or iPad, it will grant access to all controls and features available to a specific app. Any other app installed on the device, even the home screen, cannot be reached by others. You can also use a Touch ID, Face ID, or a six-digit passcode for Guided Access so that only you can have full access to all the apps.
Overall, Guided Access protects your data, prevents accidental changes by someone who may be using your device, and keeps you focused on the current task with fewer distractions. You can also set a time limit, which is especially convenient for parents, educational organizations, businesses, restaurants, museums, etc.
Related Articles:
How to Set Up Guided Access on iPhone and iPad
After knowing what Guided Access is, it's time to learn how to set up this feature. Right before turning it on, you should check its compatibility. Guided Access is available on iOS 11 and later, which means you can get this built-in feature on iPhone 5s and later, iPad (4th generation), iPad Pro, iPad Air, iPad Air 2, and later.
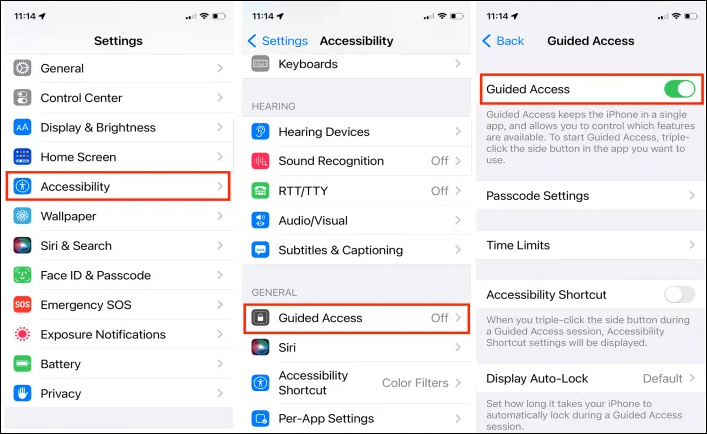
Follow the path to turn on Guided Access on your iPhone and iPad: Go to Settings > Accessibility > Guided Access to toggle on the Guided Access option.
![enable guided access]()
- Set a passcode for Guided Access: On the same page, tap Passcode Settings, and you can set the passcode used when Guided Access is enabled. Alternatively, you can enable Face ID or Touch ID verification.
- Set a time limit for Guided Access: There is a Time Limits option on the Guided Access settings page. When you set it up, it will play a sound or speak about the time remaining before a Guided Access session ends.
- Enable Accessibility Shortcut: This allows you to activate Guided Access by triple-clicking the Home or Side button and entering your passcode. Then, your iPhone and iPad will get into the Guided Access mode from within your chosen app.
- Display Auto-Lock: When you enable this option, the Guided Access will match your auto-lock settings in Display & Brightness.
How to Use Guided Access on iPhone and iPad
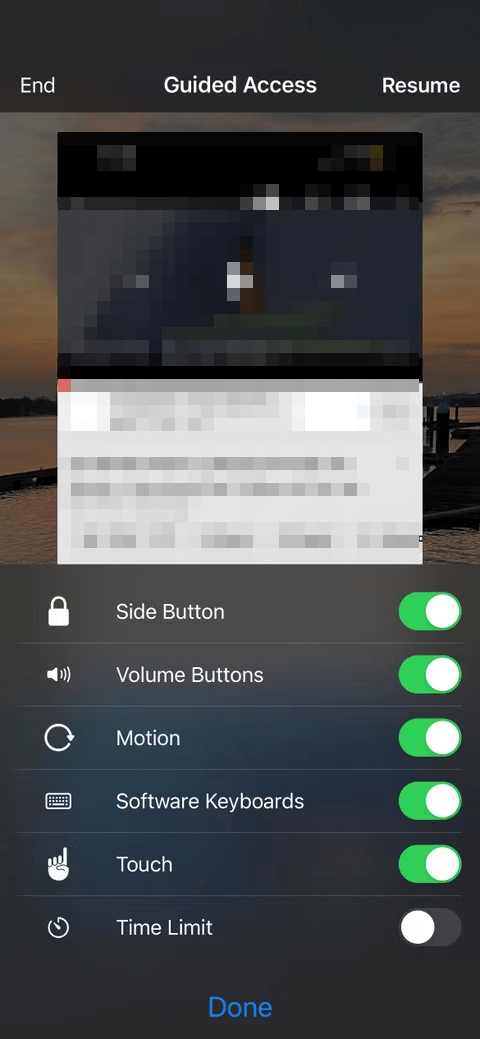
When you're ready to start with Guided Access, open the app you want to use during the session. Triple-click the Side or Home button to activate your Guided Access session. You can also ask Siri to help by saying, "Turn on Guided Access." Remember, Guided Access only works with one app at a time. Then, you can tap Start to begin using Guided Access mode immediately. Alternatively, you can add additional options for Guided access, such as the side button, volume buttons, motion, software keyboards, touch, and time limit.
![additonal options for guided access]()
You will notice a tip on the Guided Access screen saying that you can circle areas of the screen you would like to disable. Use your finger to circle the areas you want to disable, and you'll see a shape display on the screen that you can make larger or smaller, as well as move or delete it. This aims to prevent yourself or others from tapping certain parts of the app and screen while Guided Access is enabled.
How to Exit Guided Access
If you set a time limit for the Guided Access, the session will end when the time runs out. You can also triple-click the Home or Side button again and enter the passcode to exit Guided Access.
Conclusion
Using the Guided Access feature on your iPhones and iPads is worth it when it comes to the security of your data and information. It is also a great feature for parents to limit the time and access to their iPhone devices so their children won't indulge in the network or video games.
NEW
HOT

