Exciting to share photos with others? Maybe the AirDrop is troublesome when you want to share a large number of photos. Now the practical feature perfectly meets your needs - iCloud shared albums. This post is going to give you a full guide on iCloud shared albums.
iCloud shared album is a photo-sharing feature launched by Apple. With this function, users can make a shared album and invite other Apple users to participate. Once added, those who are invited can upload and add new images to the album in addition to viewing all of the photos already there. Sharing pictures with friends and family from vacations, parties, and other occasions is made easier with this tool.
In addition to making photo sharing simple, iCloud shared albums help reduce storage requirements. It is not necessary for each participant in the sharing to store the images separately because everyone can see the same photos. iCloud shared albums don't take up iCloud storage. Users may view and share images more easily with the help of iCloud shared albums, which offer several options for managing and browsing photos. Users can create multiple shared photo albums, each album is very flexible for different friend groups or events.
iCloud shared album is a very convenient feature for sharing photos with families. iCloud shared albums provide various options except photo sharing. Take a look at what you can do with iCloud shared albums.
In this part, we are going to unveil the details about using iCloud shared albums. These include creating a shared album, sharing a album, deleting a shared album, and more. Before you start, you need to note that there are many requirements for iCloud shared albums.
Requirements:
Step 1. Open the Photos app on your iPhone or iPad.
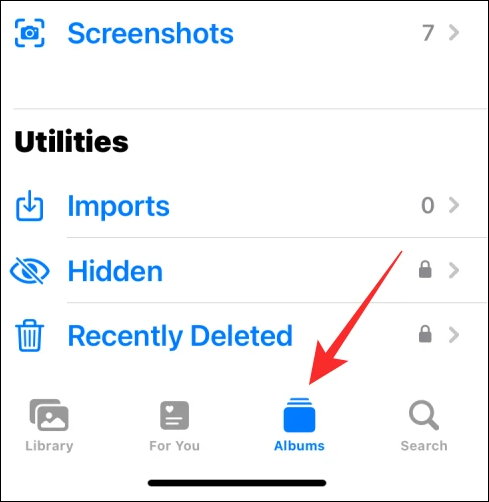
Step 2. Go to the Albums tab and tap the '+' button.
Step 3. Click the 'New Shared Album' option.
Step 4. Name the shared album and select 'people' to invite others.
Step 5. Enter the email address or phone number.
Step 6. Tap 'Create' to accomplish the process.

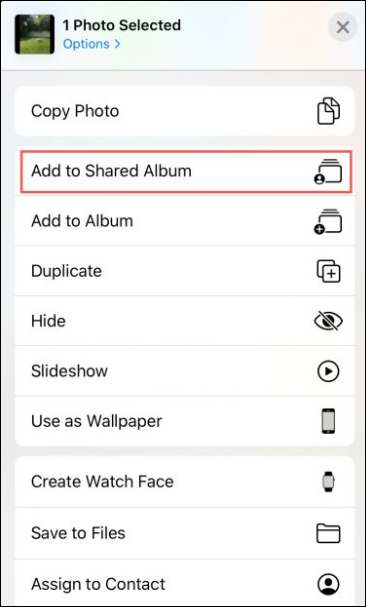
Step 1. In the Photos app, choose the photos you want to add.
Step 2. Tap the 'Share' icon at the button.
Step 3. Tap the 'Add to Shared Album' option.
Step 4. Select the shared album you want to share and tap 'Post.'

Step 1. In the Photos app, open the shared album you want to delete.
Step 2. Tap the 'People' icon.
Step 3. Tap the 'Delete Shared Album' option.

Step 1. In the Photos app, choose a shared album.
Step 2. Tap the 'People' icon.
Step 3. Click 'Invite People.'
Step 4. Type the names of people that you want to invite and tap 'Add.'

To like a shared album: Open a shared album, select a photo, and tap the 'Like' icon. (It is like a thumb.)
To comment on a shared album: Choose a photo, and tap the 'Add a comment.' Then, you can make comments as you want.
iCloud shared albums have some limits, like the number of shared photos. If you want to share photos in bulk, there is an iCloud alternative to do this - EaseUS MobiMover. This data transfer tool can help you share photos from one device to another seamlessly. You don't need to worry about the number of photos. The transfer speed is very fast to save you time.
iCloud shared albums enable users to add images and videos to a shared album in iCloud Photos and invite other iCloud users to see and manage the album together. With iCloud shared albums, you can easily share the beautiful moments in your life with family and friends and interact with them in real-time. After creating a new shared album, add photos to the album and share them with someone you like.
Share this post with your friends if you find it helpful!
Related Articles - ALSO ON EaseUS SOFTWARE
How to Fix iPhone Flashlight Won't Turn on in iOS 11
![]() Sofia Albert/2023-09-05
Sofia Albert/2023-09-05
How to Fix iOS 11 Voicemail/Visual Voicemail Not Working on iPhone 6/6S/7/7 Plus
![]() Sofia Albert/2023-09-05
Sofia Albert/2023-09-05
iPhone Symbols on Top of Screen [Click to Know]
![]() Myra/2024-01-11
Myra/2024-01-11
What Does No SIM Restrictions Mean?
![]() Gorilla/2024-02-24
Gorilla/2024-02-24