How to Extract Photos from iPhone to Computer (Mac or PC)
Myra updated on Feb 27, 2024 to iPhone Data Transfer
There are different ways for you to transfer photos from iPhone to computer, be it a Mac or PC. If you want to extract photos from your iPhone, read this guide and you will know how to do it easily.
There are five ways in total that will help you to extract photos from iPhone to computer. Whether you are using a PC or Mac, you will know how to transfer photos from iPhone to computer with ease.
The iPhone transfer software - EaseUS MobiMover, will help you export all your photos from your iPhone to a PC or Mac at once since it is the perfect software to transfer photos from iPhont to PC/iPad/iPhone/Mac/External storage device. Other than photos, you can also transfer your iPhone videos, music, ringtones, contacts, messages, books, and more from your iPhone to computer.
In addition to being an iOS data transfer tool, EaseUS MobiMover is also a free video & audio downloader which allows you to download online videos or music to your computer or iPhone/iPad for offline viewing. Whether you want to download YouTube videos to iPhone or save music from SoundCloud to computer, it will fulfill your needs well.
To extract photos from iPhone to PC or Mac:
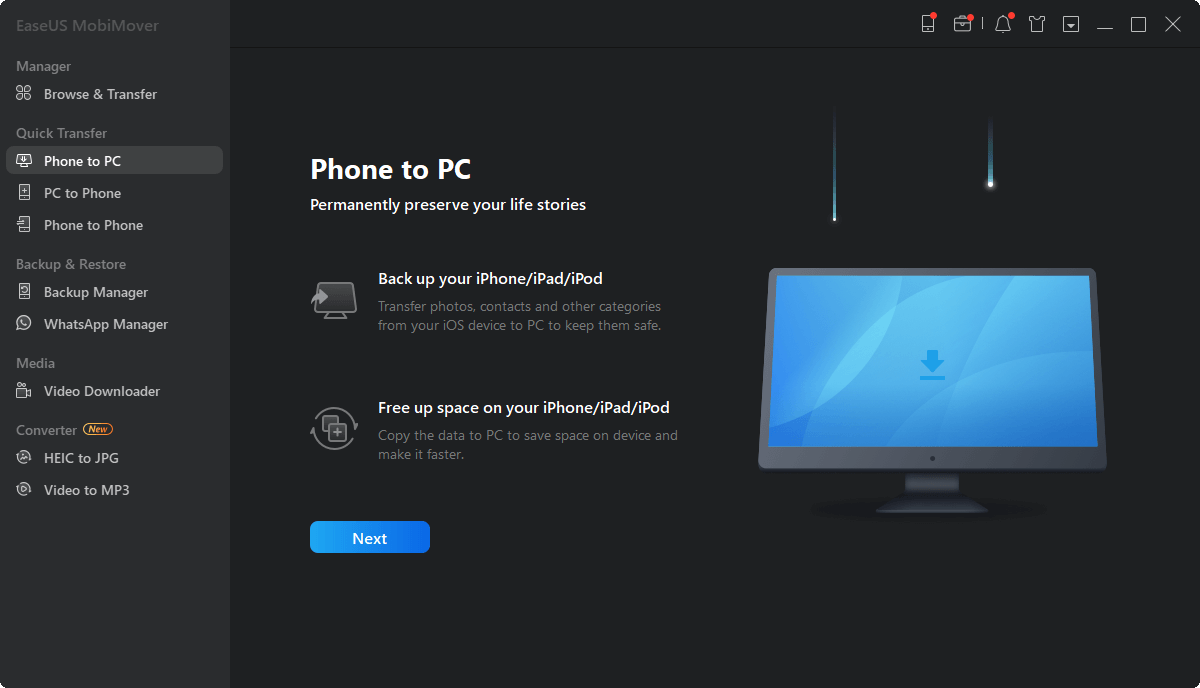
Step 1. Connect your iPhone to your computer running Windows 7 and later or Mac OS X 10.7 and later. Launch EaseUS MobiMover, choose "Phone to PC" on the main screen and click the "Next" button to move on.

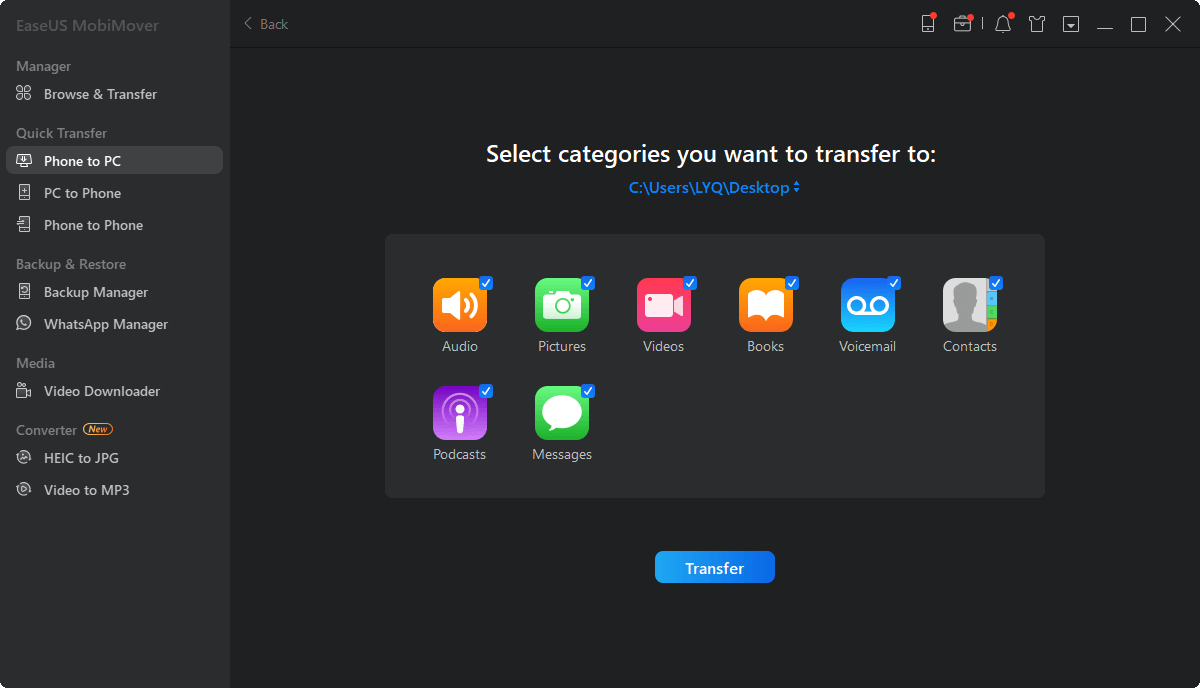
Step 2. Select the "Pictures" category as you want to copy from your iPhone to your computer. It's the right choice for you to transfer other supported file types together with photos from your iPhone to the computer to make a backup.

Step 3. Click the "Transfer" button to start transferring photos from your iPhone to the computer. Depending on the size of the files, it may take seconds or a while to import pictures from your iPhone to your computer. Wait patiently for the process to finish and check the items in the selected folder after that.
On both Windows and macOS, there is an app called Photos that helps you with how to access iPhone photos on PC and import photos from an external device like iPhone and iPad, to your computer. Thus, you can also extract photos from your iPhone to PC or Mac using the Photos app via a USB cable.
Step 1. Connect your iPhone to your PC with a USB cable.
Step 2. Unlock the iOS device and click "Trust" in the prompt on the iPhone to trust the computer.
Step 3. Click the "Start" menu and choose "Photos".
Step 4. In the Photos app, click "Import" in the top-right corner of the window, and select "From a USB device".
Step 5. Then Photos will look for a device to import from. When it has done, it will show you the new photos and videos it found.
Step 6. Since the new items will be imported to the PC by default, you need to uncheck the photos you don't want to transfer.
Step 7. Click the "Continue" button to start transferring iPhone photos to PC.
Step 1. Connect your iPhone to your Mac and trust the computer on your device.
Step 2. Launch the Photos app and select your iPhone in the window.
Step 3. Wait for Photos to load all the new pictures and videos from your mobile device.
Step 4. Choose to import selected photos and videos or "Import All New Photos (including your videos)".
If you are a PC user, the easiest way for you to extract pictures and videos from your iOS device to the computer is probably using File Explorer. With it, you can transfer all the items from your iPhone camera roll to your PC or copy photos and videos selectively.
To transfer photos from iPhone to PC:
Step 1. Connect your iPhone to your PC with a USB cable.
Step 2. Make sure your iPhone is detected by the computer.
Step 3. Go to "This PC" > [your iPhone's name] > "Internal Storage" > "DCIM" > "100APPLE".
Step 4. Now you could see the photos and videos on your iPhone. Manually copy the photos and videos you want to transfer to your computer.
iCloud offers you a wireless solution to get photos off your iPhone to computer or any other device that supports iCloud. Thus, you can share photos and videos across your devices including iPhone, iPad, iPod Touch, Mac, and PC.
Here I will show you how to transfer photos from iPhone to PC using iCloud. If you want to know how to extract photos from iPhone to Mac using iCloud, refer to the guide on how to transfer photos from iPhone to Mac.
To sync photos from your iPhone to computer automatically:
Step 1. Turn on iCloud Photos on your iPhone.
Step 2. Set up iCloud Photos on PC.
Step 3. New photos and videos synced to iCloud will be downloaded to your PC automatically. You can check the pictures in the location you set in iCloud Photos Options.
There is an exclusive method for Mac users, which is to use AirDrop. AirDrop is available on both Mac and iPhone. Thus, you can use it to send photos from your iPhone to your computer over Wi-Fi and Bluetooth connections.
Step 1. Turn on AirDrop on your iPhone and Mac.
Step 2. Go to the Photos app on your iPhone and select the items you want to transfer.
Step 3. Click the "Share" button and tap "AirDrop" > [your Mac's name].
Step 4. On your computer, click "Accept" to start transferring photos from your iPhone to Mac.
Whether you want to use the built-in features or third-party tools, there are workable choices for you to extract photos from your iPhone to a computer, either PC or Mac. Specify your needs and carry out the way that fits your needs most to transfer photos from your iPhone to computer.
Related Articles
How to Transfer PDF from iPad to Computer
Transfer Notes from iPad to Computer with 4 Easy Methods
iOS 12 Guide | How to Transfer Files from PC to iPhone XR/XS/XS Max
How to Transfer Photos from iPhone to Dell Laptop in 6 Ways