[Guide]How to Set Live Wallpaper on iPhone X/iPhone 8 in iOS 11
Myra updated on Sep 05, 2023 to iOS & Mac Topics
No matter you want to set live wallpaper using the existing photos or want to set the live photos you take as wallpaper on your iPhone X, iPhone 8 or iPhone 8 Plus in iOS 11, you can learn how to make it from this blog post within minutes.
Thanks to Apple, you can set live wallpaper for your iPhone to make it cooler. But how to set live wallpaper on iPhone X,iPhone 8 or iPhone 8 Plus in iOS 11 remains unknown for some iPhone users. If you are one of them, this article is written for you by providing the detailed guide to make a live photo your wallpaper. No matter you want to set an existing live photo or the live photo you are going to take as the wallpaper, you can learn how to make it within minutes from this article. For more tips on how to use your new iPhone X, iPhone 8 or iPhone 8 Plus, go to iOS & Mac Tips to get more.
Step 1: Open Settings App on your iPhone X/8/8 Plus in iOS 11.
Step 2: Go to Wallpaper > Choose a New Wallpaper.
Step 3: Choose Live and choose one of the live wallpapers Apple provides. (You need to press on the screen to preview the wallpaper. Similarly, once set, you need to press on the screen to view the live effects. Don't complain live paper not working when you don't use it correctly.)
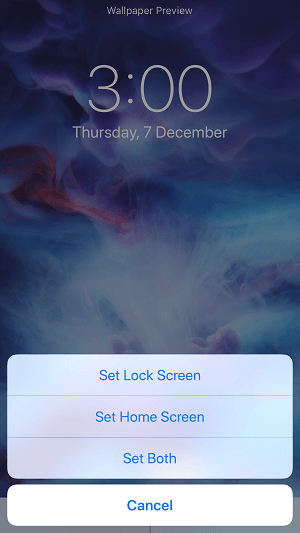
Step 4: Tap on Set and choose Set Lock Screen, Set Home Screen or Set Both according to your needs.

You can surely take a live photo you like on your iPhone and then set it as your iPhone wallpaper.
Step 1: Go to the Camera App on your iPhone in iOS 11.
Step 2: Make sure your iPhone is in Photo Mode (the standard mode you will see when you open Camera) and Live Photo is on (the circle in the top middle of your iPhone screen is yellow).
Step 3: Tap on the big circle at the bottom of the screen to start to take live photos on your iPhone X, iPhone 8 or iPhone 8 Plus in iOS 11.
Step 4: Click the Share button and then choose Use as Wallpaper.
Step 5: Press on the screen to preview the live wallpaper and then tap on Set to set the live photo as your lock screen wallpaper, home screen wallpaper or both.
Notes:
Don't you want a FREE tool to help you transfer data to or out of your iPhone X/8/8 Plus? For iPhone users like you, EaseUS MobiMover Free is an unmissable iOS data transfer and file management tool that you can use to copy files from one iDevice (iPhone/iPad in iOS 8 or later), back up iDevice to computer and add files to your iDevice from the computer for completely free. Photos, videos, audios, contacts, messages, notes, calendars, and more are all supported by MobiMover. No matter you want to add ringtones to your iPhone X or transfer contacts from PC to your iPhone 8, MobiMover can always come to help. Sounds attractive? Why not start to use MobiMover to transfer data from iPhone to iPad without iCloud.
Step 1. Connect your iPhone and iPad to your Mac via compatible USB cables. Run EaseUS MobiMover and choose the "Phone to Phone" mode. To transfer data from iPhone to iPad, you need to switch to the correct direction. Click "Next".
Step 2. Here you can choose all types of data to start the transfer, such as photos, audios, videos, contacts, messages, books, podcast, voice memos, and more. After choosing the desired data, click "Transfer" to transfer data from iPhone to iPad on Mac at a fast speed.
Step 3. Wait patiently until the process finished. When the transferring has done, go to open the corresponding applications to check the synced items.
Related Articles
[Solved] FaceTime Live Photos Missing in iOS 12/11? Fixes Here!
The Most Simple Way to Browse Files on iPad for Well File Management
[Fixed] iCloud Contacts Not Syncing to PC on Windows 10/8/7
How to Move iPhone Storage to iCloud [Full Guide]