How to Transfer Music from iTunes to iPad
Myra updated on Feb 27, 2024 to iPhone Data Transfer
If you want to transfer music from PC to iPhone with iTunes, read this guide and you will learn two ways to transfer music from iTunes to iPad, either automatically or manually.
When you store songs you like on your computer and want to add them to your iPad, using iTunes is the default solution. Indeed, Apple has provided iTunes for you to sync data from PC to an iPhone, iPad, or iPod touch. It's no exception when it comes to music. If you want to transfer music from PC to iPad using iTunes, keep reading to check the details.
You can choose to automatically sync music from iTunes to iPad or manually transfer songs from iTunes to iPad. But before you start, you should know that iTunes syncs data, which means it replaces the existing files on your iPad with the newly added items. In other words, it may cause data loss. If you don't mind, follow either of the methods to transfer music from PC to iPad with iTunes. (Of course, you can apply the same steps to transfer music from iTunes to iPhone.)
To allow iTunes to add music to your iPad automatically:
Step 1. Connect your iPad to the computer with a USB cable.
Step 2. Unlock your iPad and trust the computer. If asked, enter your iPad password as required.
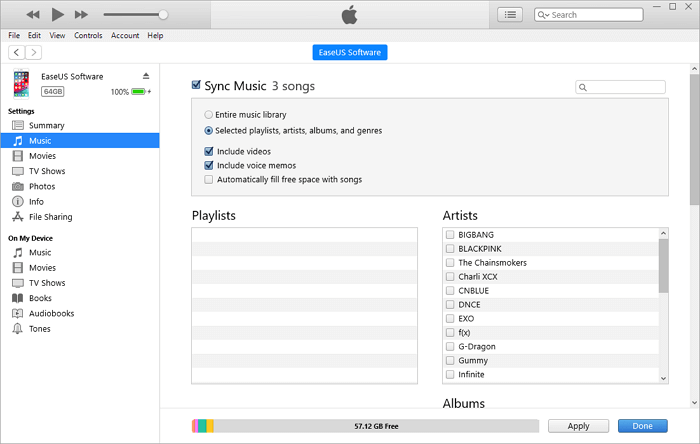
Step 3. Click the device icon and choose "Music."
Step 4. Check the option "Sync Music" and choose "Remove and Sync" in the new iTunes window.
Step 5. Select to sync the "Entire music library" or "Selected playlists, artists, albums, and genres" from iTunes to your iPad. If you choose the latter, continue to select the specific items you want to transfer.
Step 6. After the selection, click "Apply" > "Sync" to start transferring music from iTunes to your iPad.
Step 7. When the syncing is over, you can check the songs on your iPad by going to "Music" > "Library" > "Songs."

If you want to take more control over the items to be transferred, follow these steps instead:
Step 1. Connect your iPad to your computer and make sure iTunes is running.
Step 2. Unlock your iOS device and trust the computer.
Step 3. In the iTunes window, click your iPad icon and choose "Summary" from the left panel.
Step 4. Check "Manually manage music and videos" in the "Options" section and click "Apply" to save the settings.
Step 5. Go to "Devices" > "Music." Open the folder that contains the songs, select the items you want to sync, and then drag and drop them to the left panel or to the center of the window. (For how to transfer music from iTunes to iPhone, you can also drag and drop songs from the iTunes library to your device.)
Using iTunes is neither the only nor best way to transfer music from PC to iPad. When you want to transfer files, including music, ringtones, photos, videos, contacts, and more, between an iPhone, iPad, iPod and a computer, you can use the iPhone transfer software - EaseUS MobiMover to help. Unlike iTunes, EaseUS MobiMover transfers data without syncing. You can always keep the existing files on your iPad safe while using this tool.
Other than being an iOS data transfer tool, it is also a free video downloader that allows you to download online videos to a computer or iPhone/iPad for offline watching. For example, you can download YouTube videos to iPad or save Facebook videos to computer if you like to.
To transfer music from PC to iPad:
Step 1. Connect your iPhone/iPad to the computer and run EaseUS MobiMover.
Allow EaseUS MobiMover to access your iDevice, click "Trust" on the phone and "Allow" on the program.
Select "PC to Phone" transfer mode, and click "Select Files" to continue.
Step 2. Browse to select the Music files on your PC and click "Open" to let EaseUS MobiMover detect these files.
Step 3. Check the selected items, and click "Tansfer" to start the process.
You can also add items by dragging and dropping other files on this Windows before starting the transferring.
Wait patiently till the process finishes and then you can open Music app on your iPhone or iPad to check the transferred items.
Whether you want to use iTunes or not, there are ways for you to transfer music from PC to iPad. The two methods above are also applicable to transfer other types of content like photos, videos, books... Keep these two tips in mind and you can help yourself out in most of the data transfer situations.
Related Articles
How to Transfer Ringtones to iPhone in All Possible Ways
How to Back Up iPad to Computer Without iTunes
How to Export Text Messages from iPhone
How to Delete Contacts on iPad