How to Access Notes on iCloud on PC
Myra updated on Feb 27, 2024 to iPhone Data Transfer
Sometimes, you might need to get access to your iCloud Notes on PC. If you are wondering how to make it, read this blog post that covers the easy steps about how to access iCloud Notes on your PC for reference.
Want to view and edit your iCloud Notes from your PC? No worry, you can do this by visiting iCloud.com. The method is quite easy. To ensure the process goes smoothly, you need to ensure that you have set up iCloud Notes on your iPhone or iPad.
If you haven't set it up, you can read Part 1 to turn on iCloud Notes first. Then go to Part 2 to learn how to access your iCloud Notes from PC. While if you are interested in accessing and viewing your iPhone Notes on PC without using iCloud, you can go to Part 3 and Part 4 instead.
| Page Content | Quick Navigation |
|---|---|
| Part 1. Set Up iCloud Notes | Go to Settings > Tap [your name]..Full content |
| Part 2. Access iCloud Notes in iCloud | Go to visit iCloud.com > Enter Apple ID...Full content |
| Part 3. Access iCloud Notes on PC | Connect your iPhone to the computer...Full content |
| Part 4. View Apple Notes on PC via Gmail | On your iPhone or iPad, open the Settings...Full content |
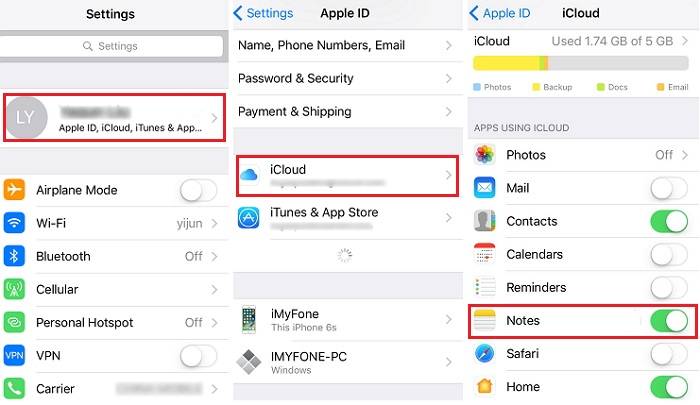
iCloud services offer users great convenience to sync iOS content among their iOS devices. You need to turn it on and make your devices connect to Wi-Fi.
Step 1. Open the Settings app on your iPhone or iPad.
Step 2. Tap on your name and choose "iCloud." (In iOS 10.2 and earlier, choose "iCloud" directly.)
Step 3. Switch on the "Notes" option.

When you use iCloud to back up your iPhone/iPad content, you may have problems like "iPhone can't back up to iCloud." If so, learn how to fix it first before you continue.
If you have turned on iCloud Notes on your iPhone, you can access them from your PC as long as you have the network connection and browser available.
Step 1. Go to visit iCloud.com on your PC.
Step 2. Enter your Apple ID and sign in to iCloud.
Step 3. Tap on "Notes" to view and manage your iCloud Notes.
If you want to access iCloud Notes on your computer regularly, you can make a progressive web app for this purpose. The process is shown below.
Step 1. Open Chrome on your computer.
Step 2. Visit iCloud.com. Then, sign in to your iCloud account.
Step 3. Tap "Notes" from the options.
Step 4. Tap the three dots in the top-right corner > Choose "More Tools" > "Create Shortcut."
Step 5. Tick the "Open as Window" box and click "Create."
Step 6. Then, you'll see the shortcuts on your desktop.
iCloud is not the only way that allows you to access iPhone Notes. Apart from iCloud, you can also achieve the same goal using this iPhone data transfer tool - EaseUS MobiMover. With it installed, you can access your notes, messages, contacts, video, and more data anytime and anywhere, even there is no internet available. And unlike iCloud offers 5GB free storage, EaseUS MobiMover enables you to transfer as many files as your computer's storage space allows.
Now, you can click the button below to download and install EaseUS MobiMover on your computer safely.
Step 1. Connect your iPhone/iPad to your computer, launch EaseUS MobiMover, then unlock your iDevice and click "Trust" in the prompt asking for your permission. Among the options, choose "Phone to PC" > "Next".
Step 2. Select the category or categories you want to transfer from your iPhone/iPad to computer. You can click the default path and then set a custom storage path for the notes to be transferred. Afterward, click "Transfer".
Step 3. When the transfer process has finished, you can view and manage the notes on your computer with ease.
The final option to view Apple Notes on the computer is to use Gmail. But through this way, you can only view notes but can't edit them. Moreover, the following steps only work for notes created in the future, and you can't import current notes to Gmail. If you've known the restriction of this method, you can follow these steps to view notes using Gmail.
Step 1. On your iPhone or iPad, open the Settings app.
Step 2. Choose "Passwords & Accounts" > Switch on the "Notes." If your device is running iOS 14 or later, you need to head to "Contacts" > "Accounts" > "Gmail" > Enable the "Notes" option.
Step 3. Since then, whenever you create a new note, it will be automatically synced to your Gmail account. And you can access it whenever you want.
In conclusion, you can apply the methods we introduced to access iCloud notes with ease. Even there is no iCloud available, and you can also access and view your notes via EaseUS MobiMover. We hope our guide is helpful to you. If it does help you, don't forget to share it with others who need it.
Related Articles
Free Video to MP3 Converter to Extract Audio from Video
How to Transfer Photos from iPhone to LaCie Hard Drive👍
MobiMover: Simple and Easy Software to Transfer Files from iPhone to PC
How to Transfer Files from iPad to PC With/Without iTunes