How to Transfer iTunes Library to New Computer in 2025 [4 Methods]
Myra updated on Jan 10, 2025 to iOS & Mac Topics
If you're wondering how to transfer iTunes library to new computer, don't worry any further since this article has the answers for you! It's common to want to move along with your iTunes library folder when transitioning from an old computer. Read on to learn how you can do that securely.
The iTunes library allows us to store and track favorite movies, music, and TV shows. When shifting from your old computer, it's important to know how to transfer iTunes library to new computer. With the iTunes library folder being considerably large, it's important to apply methods that won't make your music files corrupted or unplayable.
Everyone wishes to access their media files as conveniently as possible on their new computer. As a result, this article will describe four ways to transfer the iTunes library from your old computer to a new one.
Although many ways exist to transfer iTunes library to new computer, you should only consider those that guarantee the safety and playability of your music files. A good transfer method should be easy and take less time to move all your files. We'll look at the four methods in detail as follows.
The first method you can apply to transfer the iTunes library to a new computer is creating a backup in the old computer. You'll then use this backup to move your iTunes library to the new computer via an external hard disk. Below are the steps to apply this method:
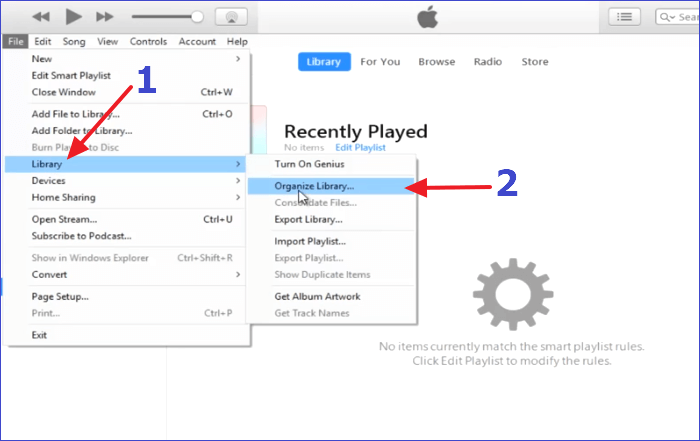
Step 1. Before you start the process, you'll need to consolidate your iTunes folder. Launch iTunes on your old computer and go to "File">" Library" then "Organize Library."

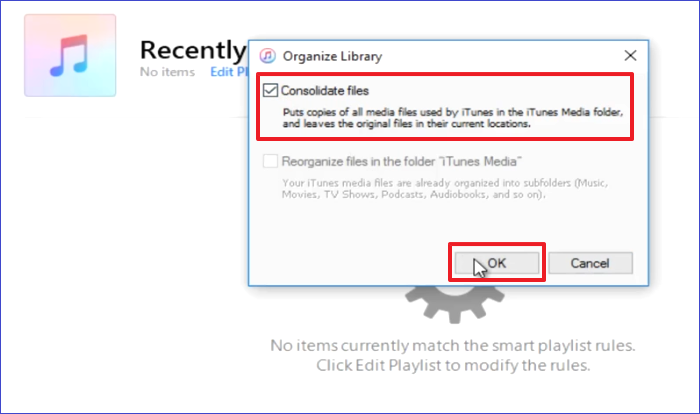
Step 2. Once a popup window displays, check the "Consolidate Files" option and click OK. iTunes will then create a backup of its library.

Step 3. To know the location of the backup library, go to your iTunes Menu, then click on "Edit">" Preferences." Next, click the "Advanced" tab to view the folder's location.
Step 4. Open Explorer and visit the location of your iTunes library backup folder.
Step 5. Copy all the files within the backup folder and paste them to your external hard drive.
Step 6. Once the transfer process finishes, disconnect the external hard drive from your old computer and connect it to the new computer.
Step 7. Install iTunes on the new computer and ensure it's an updated version.
Step 8. Click on your external hard drive to open it. Right-click on the iTunes library backup folder and select "Copy."
Step 9. Open the iTunes folder on your computer by going to "Music">" iTunes Folder." Next, paste the content you had copied from your external hard drive. You have now transferred the iTunes library from the old computer to your new computer!
Step 10. Launch iTunes on your new computer. While iTunes is still loading, press and hold the Shift Key (for PC) or the Command Key (for Mac) to select an iTunes library.
Step 11. When the "Choose iTunes Library" window pops up, click "Choose Library." Select the new library that you had copied to the iTunes folder. iTunes will now open the library folder as it was on your old computer.
To apply this method, you must ensure that both computers are connected to the same Wi-Fi and use the same Apple ID. Also, the computers need to be running on iTunes 9 or later to access the Home Sharing feature. Next, you can apply the following steps to implement this method:
Step 1. Open iTunes on both computers and connect them to the same Wi-Fi network.
Step 2. Go to the iTunes menu on your old computer, click "File," then "Home Sharing," and turn it on. Key in your Apple ID to initiate Home Sharing.
Step 3. On your new computer, go to iTunes and click on "Account">" Authorizations">" Authorize This Computer." Enter the same Apple ID used on the source computer to link the device to a shared account.
Step 4. Next, click on the Home Sharing icon from iTunes on the old computer. Enable the option for "Shared Library." iTunes will sync your library folder data to the new computer.
Step 5. To find the iTunes library data on the destination computer, go to "iTunes library." That's it! You can now access the iTunes library on the new computer.
Apple designed the iTunes Match feature with the aim of making it simpler to migrate music across different destinations. Although it initially worked for music only, you can now use iTunes Match to move applications, videos, and other files. The annual subscription fee for iTunes Match is also very affordable (only $24.99).
Below are the steps to use iTunes Match:
Step 1. Open iTunes on your old computer and navigate to "Store" then "iTunes Match" to check your subscription status. If your subscription has expired, you can pay for a new one.
Step 2. Next, move to your new computer and open iTunes. Click on "Store" then "iTunes Match."
Step 3. Click on "Add This Computer" and key in the Apple ID used on the first computer.
Step 4. Once the new computer is connected, iTunes will sync the linked libraries. Keep waiting until this process completes. You'll now have access to the iTunes library from your old computer on the new device. From there, you can choose to download this folder to your local storage.
Apart from transferring files using a flash drive or external hard drive, you can also use a built-in utility called Migration Assistant to transfer files between computers. With this utility, you can transfer user accounts, data, applications, computer settings, etc. You can also use it to transfer the iTunes library folder. Below are the steps to transfer iTunes library from a Windows PC to a new Mac computer:
Step 1. Go to the utility folder on your new Mac and launch Migration Assistant.
Step 2. Enter your admin password and click OK. After a moment, the Migration Assistant window will appear.
Step 3. Move to your Windows PC and also launch Migration Assistant. Under "How do you want to transfer your information," select the "To a Mac, Time Machine backup, or startup disk" button and click Continue.
Step 4. Move back to your new Mac, navigate to "How do you want to transfer your information," and select the button for "From a Windows PC."
Step 5. Select your Windows PC from the list of devices connected to your new Mac and click Continue.
Step 6. Confirm the six-digit security code displayed on both devices and click Continue on your old Mac.
Step 7. When the "Select the Information to Transfer" window opens on your new Mac, select what you want to transfer. You can select and deselect files based on preference.
Step 8. Click on Continue to proceed with the migration process. This will take some time, depending on the size of your files. Once the process completes, you'll have the iTunes library folder on your new computer. Hurray!
You can also click here to learn how to use the Migration Assistant feature on your Windows PC.
Read through the following questions about how to transfer the iTunes library to a new computer.
1. Why Isn't iTunes Library Displaying on My New Computer?
This could happen because you've not turned on Sync Library or have signed in with a different Apple ID. To avoid a similar problem in the future, turn on Sync Library on all your devices and use the same Apple ID. Also, ensure your cloud storage is updated to avoid missing any songs.
2. Can I Have My iTunes Library on Two Computers?
Yes, provided you've subscribed to Apple Music, you can make the iTunes library available on all your computers. You'll only need to sign in using the same Apple ID to access your iTunes library. You can access it either online (you must have an internet connection) or offline (if you've downloaded the library).
3. How Do I Move My iTunes Library to Another Windows 10 Device?
To move your iTunes library to another Windows 10 PC, you can apply the following steps:
It's easy to transfer the iTunes library to a new computer in 2023, provided you apply the right methods. Since it's important to ensure the playability of the transferred music files, only pick effective methods.
According to this article, the best ways how to transfer iTunes library to new computer entail using an iTunes backup or built-in features like Home Sharing, iTunes Match, and Migration Assistant. Consider applying these methods one after the other to find the one that works best for you. Happy iTunes library transfer!
Related Articles
How to Turn Off iCloud Photos Without Deleting Everything
YouTube Downloader Not Working | Why & What to Do
7 Ways to Fix iOS 17 Contact Poster Not Working
Complete Guide | How to Delete Books from iBooks on iPhone/iPad and Mac